Taking a Look at the Image Menu
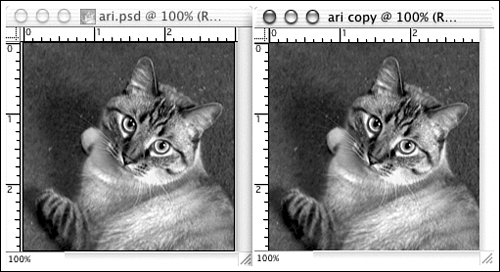
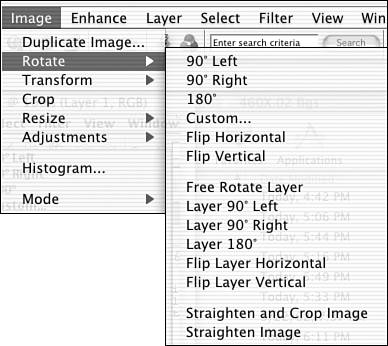
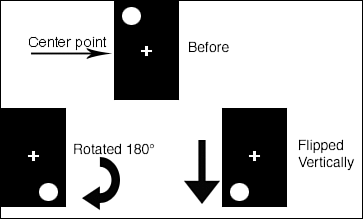
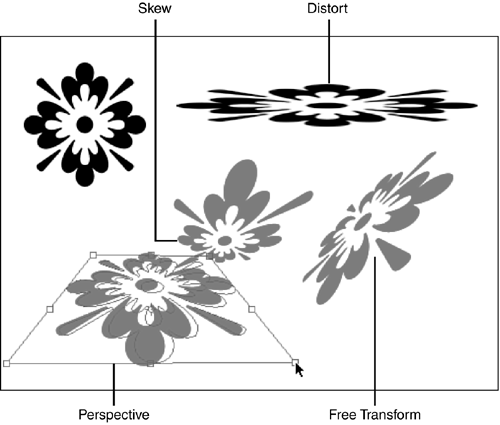
| The Image menu has the commands to do what I'd consider "physical" things to the picture. Turn it sideways , flip it, rotate a single layer or the whole image, distort it, make it bigger or smaller . You get the idea. Duplicate ImageThe Duplicate Image command does not save a copy of the image. I want to be very clear about that. If you want to keep a copy of your picture, use Save As and check Save a Copy. Duplicate Image puts a temporary copy of the picture into RAM and in a window on the screen (see Figure 21.14). Use it to save a "before" version, so you can compare the updated image to the original as you retouch a badly damaged photo or experiment wildly. When you're done, you can save the copy or not, as you wish. Figure 21.14. You can tell that the picture on the right is just a working copy. It has no file type attached, so it's not saved as a file. RotateCameras and monitors are designed to work with horizontal rectangular images, or pictures that are wider than they are tall. But not all pictures have that shape. Suppose you are visiting New York and want a shot of the Empire State Building. First, you find a spot where you can see the whole building. If you hold your camera normally, you'll have to step backwards all the way to New Jersey before you'll be able to see the top of the building, and of course, you will have several blocks worth of other stuff on either side. Instead, if you turn the camera sideways, you change the format to vertical, and you can see a lot more of the tall building with a lot less of the neighborhood. Of course, when you get the photo back home and open it up in Elements again, it's sideways. It's not very practical to rotate the monitor. For one thing, it weighs a lot more than a camera. That's why you'll use the Rotate commands shown in Figure 21.15. Figure 21.15. Rotate the entire image or rotate one layer at a time. As you can see, there are many Rotate options. For Custom, enter a number of degrees and choose left or right. You need to be aware of the difference between rotating and flipping. When you rotate, you move the picture around its center point. Flipping draws a midline axis and flips the image relative to it. The difference is depicted visually in Figure 21.16. Figure 21.16. Flipping crosses an axis. Rotating travels around a center point. TransformationsTransformations occur within the theoretical perspective of a bounding box and are used to warp an object or selection. A bounding box is very much like a marquee. It's a rectangular selection box placed over the object to be transformed. Each corner and the center point of each side of the box has a small square called a handle. When you drag a handle, only the lines connected or related to it will move. The Transformation options available in Elements are
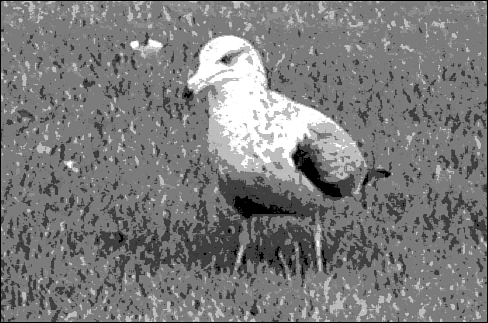
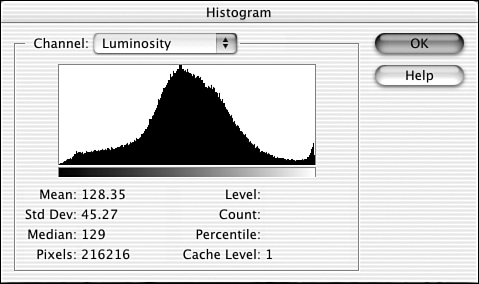
Figure 21.17 shows some examples. You can see in the bounding box at the bottom left that we're using perspective. The two side lines are of equal length, and the two angles on each side are complementary (they add up to 180 degrees). Figure 21.17. The shape at the bottom left still has its bounding box in place. Crop/ResizeCropping is usually the single most important thing I do to a photo. You can't always stand where you should when you take a picture, so you may not be able to compose your shots in the camera. Cropping gives you a chance to correct them. It also lets you reshape a picture to emphasize a different part. We'll talk more about the theory and uses of cropping in Chapter 23, "Using Basic Tools in Elements." Resizing is the process of changing the size of the image. There are many things you have to consider when you do this. Will your picture be seen in print or on the screen or both? Screen resolution becomes a factor here. There are right ways and wrong ways to resize. You can also keep the image the same size and in effect add more space around it by resizing the canvas. In Chapter 23, we'll deal with shrinking and stretching the canvas. AdjustThe items on the Image Adjustments submenu are mainly used for special effects. Invert and Posterize are easily the most useful. Invert takes a positive image in black and white and coverts it to an artificial but correct negative. It also does strange and amazing things to color by rotating the color wheel 180 °. Posterize reduces the image from full color to a given number of colors, based on the sum of the average number of colors being converted. All the fancy math can often result in a beautiful picture. Figure 21.18 shows 4 levels of posterization (four levels of brightness for each color channel, such as red, green, and blue). Reducing the levels of brightness for each color creates large areas of a single color, removing the subtleties of color from an image and making it appear flatter. Be sure to see this in the color section. You'll learn how to use posterization in Chapter 25, "Enhancing Your Photos with Filters." Figure 21.18. The lower the number of levels, the more simplified the drawing becomes. HistogramWere you ever into math or statistics? If so, you can probably explain a histogram better than I can. Simply put, it's a graph. In Elements, it's a graph that shows the distribution of pixels throughout the color/tonal range of the image. You can look at a histogram like the one in Figure 21.19 and know whether there's detail in the highlights and shadows and how to make corrections to bring them out. Shadows (blacks) are graphed on the left, midtones in the middle, and highlights (whites) on the right. Quite simply, if there are only a few lines that are very short, you may not be able to raise the picture from the dead. If you do have a lot of data, even though you're not sure what it means, there's hope. Figure 21.19. The picture from which this histogram was generated has few real whites (on the right), but a lot of light grays and beiges (middle), and few true blacks (on the left). ModesThe four color modes available in Elements are Bitmap (which is 1-bit black and white), Grayscale (256 grays), RGB, and Indexed Color. When you work in color, as you will most of the time, stay with RGB. Indexed Color is for Web use, and since the adoption of JPEG compression (which you'll learn more about in the next chapter), it isn't often used except for line art (simple drawings of one or two colors) or spot color (a method of identifying the exact color desired in a section of a graphic image, typically by selecting a Pantone color from a chart). |
EAN: 2147483647
Pages: 349