| The Sales By Category view in the Northwind sample database returns over 80 rows of data far too many to display on one page. When you initially set up the DataGrid control, you changed the AllowPaging property to True. This causes, by default, 10 rows of data to be sent out for each page. At the bottom of the grid you see paging links (by default, < and >). Once you've added a little code, you can use these links to page through the data, 10 rows at a time. You can also change the number of rows per page by setting the PageSize property of the DataGrid control. In addition, you can change the style of the paging indicators (adding page numbers rather than simple Next and Previous links). If you want to allow users to page using Next and Previous links, you can also use your own images in place of the text links. Basically, there are three types of paging mechanisms you can use to help your users browse through the data: Next and Previous links (the default behavior) Numeric links, displaying page number links A custom pager, where you take complete control over how the paging links appear to the user In order to use any of these techniques, you'll need to add a bit of code. In the control's PageIndexChanged event, you must do the following: The first requirement is easy: The PageIndexChanged event procedure passes to you an object whose NewPageIndex property indicates the value you need to place in the CurrentPage property of the grid. The second part is simple, too. You've already added the GridLoad procedure to the page. Now you simply need to call that procedure again. To add support for paging to your DataGrid control, follow these steps: -
With CategorySales.aspx open in the page designer, select the View, Code menu item to view the page's code-behind file. -
At the top of the code editor window, from the drop-down list on the left, select grdCatSales. -
From the drop-down list on the right, select PageIndexChanged. This inserts the appropriate event-handling procedure in the class for you. -
Modify the grdCatSales_PageIndexChanged procedure so that it looks like this: Private Sub grdCatSales_PageIndexChanged( _ ByVal source As System.Object, _ ByVal e As System.Web.UI.WebControls. _ DataGridPageChangedEventArgs) _ Handles grdCatSales.PageIndexChanged grdCatSales.CurrentPageIndex = e.NewPageIndex GridLoad() End Sub Note that the second parameter, e, is a DataGridPageChangedEventArgs object. This object provides the NewPageIndex property, and setting the grid's CurrentPageIndex property to e.NewPageIndex causes the DataGrid control to only display data from the selected page the next time it redraws. (The grid's PageSize property, 10 by default, controls the number of rows displayed per page. Given the page number and the page size, the grid can retrieve exactly the rows it needs from its data source and display just those rows.)  | With this code in place, you should now be able to browse to the page and select the < and > links to display subsets of the data. Follow these steps to try out the paging capability you've added to the DataGrid control: |
-
In the Solution Explorer, right-click CategorySales.aspx and select Build and Browse from the context menu. -
Use the links at the bottom of the grid to page through the data. By clicking the right angle bracket, you can move forward through the pages. By clicking the left angle bracket, you can move backward through the pages. TIP By default, the Pager hyperlink appears at the bottom of the DataGrid control. By modifying the Position property, you can set the pager to the top instead or both the top and bottom.
Customizing the Pager If you want to modify the "look" of your pager, you can use the Properties dialog box, as you saw earlier. Imagine that you'd like to display the following: To add these effects, follow these steps: -
With CategorySales.aspx open in the page designer, right-click the DataGrid control. -
Select Property Builder from the context menu. -
Select the Paging tab and then modify the properties as shown in Table 16.6. Table 16.6. Set These Paging Properties | Property | Value | | Position | Bottom | | Mode | Page numbers | | Numeric buttons | 10 | -
Select the Format tab, select Pager from the Objects list, and set the Horizontal Alignment property to Center. -
Click OK to dismiss the dialog box. | After making the changes outlined in the previous section, browse to the page and verify that you see the paging indicators, as shown in Figure 16.10. |
Figure 16.10. You can format the paging indicators to match your own needs.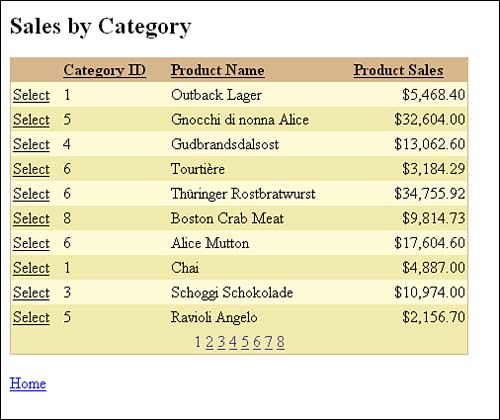
|
