Netbus
|
| < Day Day Up > |
|
Netbus is much different than VNC; although Netbus allows for nearly full control of the victim machine, it isn’t as graphically friendly as VNC and is geared specifically for more nefarious purposes. Furthermore, most virus scanners detect Netbus, making it a viable choice only when the victim is not protected by such means. Otherwise, Netbus is difficult to use effectively.
You can find Netbus at most popular security web sites, such as the following:
-
http://www.packetstormsecurity.org
-
http://www.tlsecurity.com
-
http://www.securityfocus.com
Implementation
Netbus version 2 (beta) is publicly available and contains most of the features an attacker needs in the unregistered version. Netbus must be installed on the attacker’s machine first so that it may be configured before infecting a victim. Its installation is similar to most Windows operating system applications and is available by choosing Start | Programs and clicking the Netbus application name.
Netbus comes packaged in a client/sever model, similar to VNC. Typically, the server is delivered to the victim via e-mail, CD-ROM, or a similar device. Once the server is run, the victim is compromised as long as the network security architecture does not exist between it and the attacker’s client.
To configure Netbus to install itself properly on the victim, the client is run first to modify the server executable. The configuration process is shown in the following steps:
-
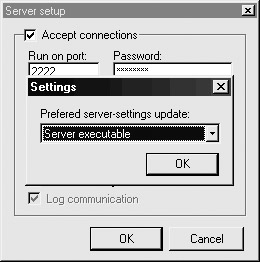
In the client program, choose File | Server Setup.
-
In the Server Setup dialog box, select Server Executable. The executable we will be configuring in this process will be the file we will install on the victim machine.
-
Locate the server executable you wish to configure. Most of the time, you will want to configure the NBsvr.exe executable that is packaged with the Netbus installation.
-
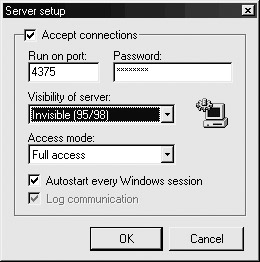
After you have found the server executable you want to configure (typically the one in the installation directory), you need to finish selecting options in the Server Setup dialog box, as shown next. Be sure to select the Accept Connections checkbox.
-
Indicate which TCP port Netbus will use to wait for connections in the Run On Port field. In this example, TCP port 4375 is chosen, but any port can be chosen that is not already bound on the victim machine. This port will need to be open all the way from the client to the server through the security architecture.
-
Then select the visibility of the server. This tool was obviously developed for nefarious purposes, because the Invisible option is selected by default.
-
Select Full Access in the Access Mode field. Other access modes allowed include Spy Access method, which does not provide as much control as Full Access. Because this tool will be used to compromise a machine on the network for auditing purposes, select Full Access.
-
Finally, choose whether Netbus will be restarted every time the machine is rebooted. Usually, this option is activated.
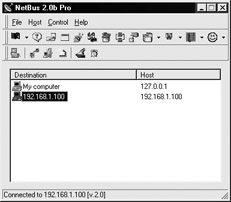
After the server executable has been configured, you can rename it to any arbitrary name and transmit it to the victim by any means allowable. After the tool is installed on the victim machine, simply run the executable to launch it. The Netbus server will then be running and await connections from the client. Figure 10-1 shows a victim machine at 192.168.1.100 listening on TCP port 4375.
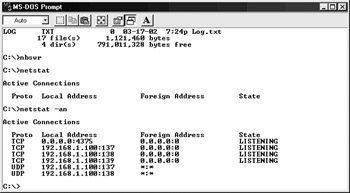
Figure 10-1: A victim machine listening
The client configuration is also a short process:
-
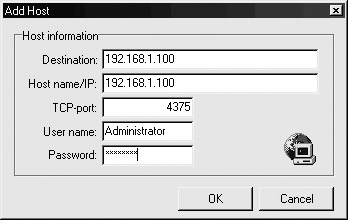
Once again, open the Netbus client program and select Host | Add. A dialog box similar to the following appears:
-
Here, input the victim IP address and TCP port it is listening on. Supply the password that was originally installed into the server executable at the bottom of the configuration screen.
-
Click OK to add the victim host to the list of available servers.
This is a simple way to make hosts show up in the client’s listing of servers, but you can add hundreds of Netbus servers to the affected list by selecting Host | Find in step 1. This option places the client into a scanning configuration that will check a list of IP addresses for a given port and detect any Netbus servers running. This option would be useful to a system administrator trying to detect Netbus servers on his network.
Follow these next steps to connect the Netbus client to a victim machine infected with the server:
-
On the client’s main Netbus screen, highlight the IP address to which you wish to connect.
-
Select Host | Connect.
-
If the password you set is correct and the server is available, a Connected message will appear at the bottom of the client’s main screen, as shown here:
-
After you have connected to the server, a list of commands can be performed on the victim. From the Control menu, you can assess some of the options available:
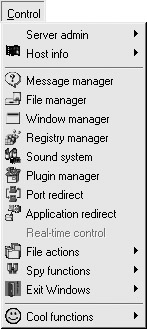
You may wish to accomplish two tasks after Netbus has been installed on the victim machine: scavenge the file system or redirect TCP ports around a security architecture. Both are available using the options the client provides. How Netbus is used is up to the attacker/auditor after it is installed.
|
| < Day Day Up > |
|
EAN: 2147483647
Pages: 189