The Coroner s Toolkit
|
| < Day Day Up > |
|
The Coroner’s Toolkit
Realistically, only one option for forensic analysis software is open-source (that is, free). The tool’s name is The Coroner’s Toolkit, or TCT. TCT is different from FTK and EnCase in that it automates the analysis of Unix file systems (UFS, FFS, EXT2, and so on). TCT can be executed on a live system that you may suspect has been hacked, or you can run it on a forensic image created by dd (explained at length in Chapter 22). It has been updated to support OpenBSD 30, RedHat 9.0, and FreeBSD 5.x.
TCT can be downloaded from the web sites belonging to the authors (Dan Farmer and Wietse Venema) at http://www.fish.com/forensics/ or http://www.porcupine.org/forensics/.
| Caution | TCT requires a greater understanding of computer forensics to operate than does EnCase or FTK. |
Implementation
After downloading TCT, untar and enter the directory it creates. Once in TCT’s directory, type the following command to compile the package:
forensics# make
When the compilation is complete, the tools listed here are available to you in either the bin or lazarus directory. Many more tools are included, but we will not cover them all here. Refer to the included documentation (in the doc directory) for details.
-
Graverobber Graverobber automates most of the commands discussed in Chapter 20. When run in live mode, it collects all of the process status information, network connections and parameters, and important system configuration files. Graverobber can also be invoked to perform an offline analysis. If you have created a dd image of the subject’s hard drive, graverobber can analyze it for you.
-
Mactime Mactime acquires the times the file system was last modified, last accessed, and the ctimes (the last modification of the file structure, such as permissions). Mactime can be invoked directly, or it can be run as part of the graverobber analysis process.
-
Unrm Unrm dumps the unallocated space from a dd image. By default, the data is sent to the screen, but it is typically redirected to a file using the > operator.
-
Lazarus Lazarus gathers investigative detail from a forensic duplication. It contains tools to attempt reconstruction of deleted files. Lazarus typically is invoked on the dataset created from unrm, building an HTML report of the files it has attempted to recover.
The following sections discuss these tools.
Graverobber
Graverobber collects the important, nondeleted information of a subject system. It can be invoked in two different states: to gather information from a live system (a system that is currently running), and to gather information from a system that is offline. For an offline analysis, you would need to have access to the subject’s hard drive or a dd representation of it. We will start by exploring the live data gathering state; then we will explore the offline analysis.
Graverobber is a command-line tool and has numerous switches. The command-line usage information is available within the graverobber source code.
Usage: grave-robber [-filmnpstvDEFIMOPVS] [-b body_file] [-c corpse_dir] [-d data_directory] [-e error_file] [-o os_type] [directory_name(s)]
| Note | If no directory names are given, graverobber will assume root dir (/). |
| Graverobber Option | Description |
|---|---|
| -b body | Save the output to a file. Use '-' to write output to STDOUT. |
| -c corpse_dir | A dead, not live, system (perhaps a mounted disk?) |
| -d dir | The data directory; overrides $DATA/hostname. |
| -e file | Redirect the stderr stream to this file. |
| -o os_type | To be used with the -c flag, to tell Graverobber what sort of corpse you have. This is required with the -c flag! |
| -v | Verbose |
| -D | Debug |
| -F | Collect files from the file system as the file walking moves through. Copies matched items from the $conf_pattern variable (set in coroner.cf, and usually including REGEXPs such as "*.cf", "*.conf", etc.) |
| -i | Collect dead inode data. |
| -I | Capture running processes based on their inodes/proc entries. Tries copying from proc first, and then tries icat (does both in case it can read inodes but not /proc). |
| -l | Do the “look@first” stuff: process the path, look at files in the look@first dir. |
| -m | Capture MACtime (and generic lstat()) data. |
| -M | do md5’s of files. |
| -O | Save files that are open but have been deleted from the disk (often config files, executables, etc.). |
| -p | Copy process memory to file with the pcat command. Some systems have trouble with this, so beware! |
| -P | Run the process commands - ps, lsof, etc. |
| -s | Run the general Shell commands on the host; this includes network and host info gathering, such as netstat, df, etc., and doesn’t include process (ps/lsof) commands (see -P). |
| -S | Save files listed in “save_these_files” (conf dir). |
| -t | Gather trust information. |
| -V | Do some mucking around in dev (deV?). |
| -f | Fast/quick capture; try to avoid the file system; no MD5’s, stat(), or CPU/disk intensive commands. Doesn’t make sense with the -m option. |
| -n | Perform default data collection. |
| -E | Everything collected that it can, including dangerous ops. Currently that only adds -p to the default. |
If the preceding list looks a little daunting, don’t worry. Execution of graverobber will boil down to one command. The command, which we will mostly concern ourselves with, to collect data from a live system (processing the / directory) is as follows:
victim# cd tct-1.13/bin victim# mkdir /mnt/storage/evid victim# ./grave-robber -v -d /mnt/storage/evid/
The -v parameter runs graverobber in verbose mode. The -d parameter specifies the /mnt/storage/evid directory as the storage area for the output.
Some caveats are worth mentioning regarding the preceding command. The first is that the tool kit must be installed and compiled on the victim system. This can potentially destroy some of the evidence if you want to perform a forensic duplication of this hard drive in the future (perhaps for offline analysis using TCT). Second, the amount of data produced by this process can be enormous and typically will not fit on a floppy disk. Therefore, the command here used the /mnt/storage/evid directory, which could be on an external hard drive mounted via the Network File System (NFS). Mounting the storage directory via NFS may help reduce the activity on the victim hard drive if you should choose to perform a forensic duplication in the future. You may want to copy and compile the TCT installation to that hard drive for the same reason. When the graverobber process is completed, you will have a directory—/mnt/storage/evid—full of evidence to analyze.
For this chapter, assume that we exported the directory /mnt/storage from our forensic workstation and mounted it on our victim machine via NFS. We will now perform all additional analysis on the forensic workstation. Only the collection of evidentiary data will be performed on the victim machine, to limit intrusive activity on the victim machine. We will follow this fundamental forensic principle in case we want to perform a duplication later.
forensic# pwd /mnt/storage/evid forensic# ls -al total 4460 drwxr-xr-x 9 root wheel 4096 Apr 19 12:23 . drwxr-xr-x 3 root wheel 4096 Apr 19 12:23 .. -rw-r--r-- 1 root wheel 81342 Apr 19 12:23 MD5_all -rw-r--r-- 1 root wheel 54 Apr 19 12:23 MD5_all.md5 -rw-r--r-- 1 root wheel 4414968 Apr 19 12:23 body -rw-r--r-- 1 root wheel 8282 Apr 19 12:23 body.S drwx------ 2 root wheel 4096 Apr 19 12:23 command_out drwx------ 8 root wheel 4096 Apr 19 12:23 conf_vault drwx------ 2 root wheel 4096 Apr 19 12:23 icat drwx------ 2 root wheel 4096 Apr 19 12:23 proc drwx------ 2 root wheel 4096 Apr 19 12:23 removed_but_running drwx------ 2 root wheel 4096 Apr 19 12:23 trust drwx------ 2 root wheel 4096 Apr 19 12:23 user_vault
The MD5_all file will contain all of MD5 checksums of the output generated by graverobber. A fragment of the file is shown here:
Fri Apr 19 14:45:00 EDT 2002 d41d8cd98f00b204e9800998ecf8427e /root/evid// c213baacdb82f1b4b7b017e64bb7f9e9 /root/evid//body.S 121eb60b8a0a74045fefe3e3c445a766 /root/evid//body d41d8cd98f00b204e9800998ecf8427e /root/evid//command_out f2e21b93a776dbd2bf8e2c180bbf0d2b /mnt/storage/evid//command_out/lsof0 1977905a8c61187e98a3ed83a04d337f /mnt/storage/evid//command_out/lsof0.md5 3f75c98c1c0722e4fe2f473f61084c5d /mnt/storage/evid//command_out/lsof 688d73a46ffd897436c08519108fd1e8 /mnt/storage/evid//command_out/lsof.md5 1a42658e1680864aa41ce65f14a44a7d /mnt/storage/evid//command_out/ps 76df89b0b72d90d18e6d04184d4660b3 /mnt/storage/evid//command_out/ps.md5
| Note | It may seem strange to have an MD5 checksum of a directory, but if you think of a directory as a special file on the disk that points to the files and directories it contains, an MD5 checksum is possible. |
Since it is impossible to calculate the MD5 checksum of the MD5_all file while the others are being calculated (because it is being appended), there exists an MD5_all.md5 file. This file contains the MD5 checksum of MD5_all. The contents of the file are as follows:
c185ae9291fda9365ac87193d437b01b /mnt/storage/evid//MD5_all
The body file contains most of the information that graverobber collects. It is basically a | delimited spreadsheet with information pertaining to the MAC times, file permissions, file ownership, and other information pertinent to our investigation. The contents of the file look similar to this fragment:
class|host|start_time body|redhat62|1018203800 md5|file|st_dev|st_ino|st_mode|st_ls|st_nlink|st_uid|st_gid|st_rdev|st_size |st_atime|st_mtime|st_ctime|st_blksize|st_blocks cc6a0e39ec990af13cc6406bbc0ff333|/sbin/arp|770|100477|33261| -rwxr-xr-x|1|0|0|0|36272|1018203746|952425102|1016710670|4096|72 d73b4aa0d067479b7b80555fbca64f99|/usr/bin/at|770|16748|35309 |-rwsr-xr-x|1|0|0|0|33288|1018203769|951940087|1016710377|4096|72 93287edbf19f164bb81b188b6475d756|/bin/cat|770|81832|33261 |-rwxr-xr-x|1|0|0|0|9528|1018203746|949931427|1016710371|4096|24 023915f5fd17489a0595277e1051eac0|/bin/cp|770|81820|33261 |-rwxr-xr-x|1|0|0|0|33392|1018203754|952479772|1016710370|4096|72
The lines in italics obviously signify the names of the fields. Most of this information may seem meaningless to you, and we will not bore you with the gory details. However, what you should remember is that graverobber (and other tools in the TCT package) can use this information to generate more meaningful reports. We will return to this topic after we discuss the rest of the evidence file structure TCT produces.
The body.S file has the same structure as the body file discussed earlier, except that it contains all SUID programs from the victim machine. If you are new to Unix, all SUID programs should be of interest to you as the investigator. This is because when these files are executed, the resulting process changes the user to the owner of the file. Typically, we would be interested in SUID files that are owned by root.
The command_out directory contains the output to the commands performed on the system by TCT. Since we chose to run graverobber on a live system, this is the information we were after! We will have the output of every command that was executed, such as arp, redirected to a file with the same name as the command. The output file will also have its MD5 checksum calculated and saved to the same filename with the .md5 extension. If you want a log of the commands run on the system, you can read the coroner.log file at the top of the data directory.
forensic# ls -al total 428 drwx------ 2 root wheel 4096 Apr 19 12:23 . drwxr-xr-x 9 root wheel 4096 Apr 19 12:23 .. -rw-r--r-- 1 root wheel 29 Apr 19 12:23 arp -rw-r--r-- 1 root wheel 62 Apr 19 12:23 arp.md5 -rw-r--r-- 1 root wheel 154 Apr 19 12:23 df -rw-r--r-- 1 root wheel 61 Apr 19 12:23 df.md5 -rw-r--r-- 1 root wheel 4291 Apr 19 12:23 dmesg -rw-r--r-- 1 root wheel 64 Apr 19 12:23 dmesg.md5 -rw-r--r-- 1 root wheel 401 Apr 19 12:23 finger -rw-r--r-- 1 root wheel 65 Apr 19 12:23 finger.md5 -rw-r--r-- 1 root wheel 1147 Apr 19 12:23 free_inode_info._dev_hda2 -rw-r--r-- 1 root wheel 84 Apr 19 12:23 free_inode_info._dev_hda2.md5 -rw-r--r-- 1 root wheel 732 Apr 19 12:23 ifconfig -rw-r--r-- 1 root wheel 67 Apr 19 12:23 ifconfig.md5 -rw-r--r-- 1 root wheel 337 Apr 19 12:23 ipcs
To see more clearly what we are describing here, we’ll examine the ifconfig file. Since the ifconfig command in Unix provides the network interface card information, we should expect to see the IP addresses and available interfaces. The following information was collected from our system:
forensic# cat ifconfig Sun Apr 7 14:25:37 EDT 2002 eth0 Link encap:Ethernet HWaddr 00:BD:73:9E:00:01 inet addr:192.168.1.104 Bcast:192.168.1.255 Mask:255.255.255.0 UP BROADCAST RUNNING MULTICAST MTU:1500 Metric:1 RX packets:851 errors:0 dropped:0 overruns:0 frame:0 TX packets:725 errors:0 dropped:0 overruns:0 carrier:0 collisions:0 txqueuelen:100 Interrupt:9 Base address:0x1000 lo Link encap:Local Loopback inet addr:127.0.0.1 Mask:255.0.0.0 UP LOOPBACK RUNNING MTU:3924 Metric:1 RX packets:89 errors:0 dropped:0 overruns:0 frame:0 TX packets:89 errors:0 dropped:0 overruns:0 carrier:0 collisions:0 txqueuelen:0 forensic# cat ifconfig.md5 cae275f055428cdaa505f81970b29662 /mnt/storage/evid//command_out/ifconfig
It is important to note that most of the evidence found in this directory would typically be lost if the power cord was yanked out of the victim machine. Removing the power from a system and imaging it before any other analysis is performed is a standard technique employed by many organizations and is, in our opinion, misguided. Unless you’re faced with a specific threat of data loss or damage, it typically makes more sense for you to leave the system on and collect the valuable volatile information before taking it offline. Without volatile data, such as netstat, we would not be able to see what type of network activity was occurring on the victim machine.
The conf_vault directory contains all of the interesting system configuration files. It also captures most of the home directories of the users on the system. The files within this directory are kept in the same directory structure as on the original victim system. Additionally, graverobber creates a file called index.html that can be loaded in a web browser. This allows you to point and click your way around this directory.
The icat and proc directories contain the images of the running processes. These directories are very important to a Unix investigation because an executable can be marked for deletion in the file system but still be running in memory. As you might imagine, most attackers run a backdoor or sniffer tool and delete the executable. These directories would be the only way to locate images of the processes so that you can perform tool analysis. The files in this directory are named according to the original process ID (PID) and the timestamp at the time they were captured. Graverobber also presents an .md5 file that contains the MD5 checksum of the executable image. The following excerpt is from the proc directory which will help illustrate our point:
forensic# ls -al total 3312 drwx------ 2 root wheel 4096 Apr 19 12:23 . drwxr-xr-x 9 root wheel 4096 Apr 19 12:23 .. -rw-r--r-- 1 root wheel 25968 Apr 19 14:23 1.out_2002_04_19_14:23:20_-0400 -rw-r--r-- 1 root wheel 83 Apr 19 14:23 1.out_2002_04_19_14:23:20_ l ¬ -0400.md5
The removed_but_running directory contains the files that were deleted but were still open while graverobber was being executed. This situation may occur when an attacker runs an executable he or she uploaded (such as a sniffer) and then deletes a file while it is still open. Because the file has not been completely removed from the physical file system, we can retrieve a copy of it. Note, however, that the file is removed from the logical file system. The name of each file in the removed_but_running directory specifies when the data was collected, similar to the process images discussed earlier.
The next directory we see in the evidence is the trust directory. The trust directory contains files that establish any sort of trust between this system and another. Our example here did not have any trust relationships established.
The last directory, user_vault, contains files from each user directory that may aid our investigation. Some of the data it collects are the .bash_history files from each user directory. The .bash_history files contain a list of the last commands that the user attempted to execute. In our experience, if these files are located, they will either allow you to catch an inexperienced hacker who is not familiar with Unix or not contain anything of use to your investigation.
Mactime
One of the phases during an incident response is determining a timeline for the attack. This may be completed for investigative or remediation purposes. Lucky for us, TCT has a tool called mactime that calculates the last modified time, last accessed time, and ctime (the last modification of the file structure, such as permissions) after a given date. We can also choose an ending date, to sandwich our time frame and limit our analysis if we so desire. If we do not specify a time2 value, this value will default to the present time. The tool has many command-line options and the summary, according to the source code, is as follows:
Usage: mactime [-DfhlnpRsty] [-d directory] [-g group] [-p passwd] [-u user] [-b bodyfile] time1[-time2] [-d directory] The time format is given, in its simplest form as: month/date/year - 4/5/1982 Be sure to supply the four-digit year. -b [file] - Use this file as an alternate "body" file instead of the default ($DATA/$body). -B [file] - Output the body to this file. "-" is stdout, of course. This switch is only usable with the -d flag. -d [directory] - This specifies a particular directory to walk and report on. This DOES NOT use the normal body database file. -f [filename] - flag files listed in file as a different color (HTML only!) -g [filename] - This flag uses an alternate group file for printing groups -h - This flag emits some simple HTML output rather than plain ascii text. -l - takes "last" output, sort of, as a time. Last looks like: -n - This flag makes mactime receive the normal "date" output, which looks something like: "Tue Apr 7 17:20:43 PDT 1998" -p [filename] - This flag uses an alternate password file for printing user IDs. -R - This flag configures mactime to recursively analyze the subdirectories (only useful with the -d flag) -s - This switch flags SUID/SGID files as a different color (HTML only!) -t - This switch outputs the time in machine format -u [user] - flag files owned by user as a different color (HTML only!) -v - This switch activates verbose output.
To execute mactime on the data collected from graverobber in the last section, we will use the -b switch. Therefore, the following command will output the mactimes for the data we captured in the last section. We chose the date 1/1/1971 so that we would be sure to see the mactimes for all of the files on the victim system (unless, of course, you installed the operating system more than three decades ago).
forensic# ./mactime -b /mnt/storage/evid/body "1/1/1971" Mar 03 89 21:54:51 574 ma. -rw-r--r-- root/toor wheel /usr/lib/bcc/include/regexp.h Mar 03 89 21:55:06 153 ma. -rw-r--r-- root/toor wheel /usr/lib/bcc/include/regmagic.h Nov 15 89 01:57:45 353 ma. -r--r--r-- root/toor wheel /usr/doc/pmake-2.1.34/tests/cmd.test 410 ma. -r--r--r-- root/toor wheel /usr/doc/pmake-2.1.34/tests/cmdvar.test
The first column of the output is the date. The second column is the time, and the third is the size of the file. The fourth column represents mac value: the last modified time, last accessed time, and ctime, respectively. If there is a “.” present, this means that time doesn’t count. Thus, in the preceding example, none of the files had their ctimes changed on those dates.
To execute mactime on a file system that graverobber has not analyzed, we will use the -d and -R switches. We could mount a dd image (as discussed in Chapter 22) for this process, or we could mount a duplicate hard drive as read-only. The command would be as follows for the same output:
forensic# mactime -R -d /mnt/evidence "1/1/1971"
Unrm
Unrm is a simple tool to run and hardly deserves a title in this section. We highlight it only because lazarus will use the output of unrm in the following section.
When executing unrm to collect the unallocated space of a dd image, you should use the following command:
forensic# ./unrm /dev/loop0 > linux_free.bin
This command assumes that you have mounted the forensic duplication from the Linux hard drive (named linux_drive.bin) using the losetup utility discussed in Chapter 22.
If the hard drive duplicated to the file linux_drive.bin was 2GB, and there were 1.5GB of free space, the resulting linux_drive_freespace.bin file will be 1.5GB in size.
Lazarus
Lazarus is one of the only noncommercial tools available to the general public that attempts to undelete files from an offline file system. Lazarus has been reported to undelete files from UFS, EXT2, NTFS, and FAT32 file systems.
Lazarus analyzes the data resulting from unrm, discussed in the preceding section. Because lazarus will output more information from this unrm file, we can expect to need as much free space to run this tool as we did for unrm. Therefore, if the file system was 2GB, and 1.5GB were free, unrm will need 1.5GB free on the forensic workstation, and lazarus will need up to another 1.5GB free. Moreover, lazarus is by no means a fast tool. It will take a long time of uninterrupted processing to complete a full analysis.
Lazarus is a command-line tool. The following options are available to you (this information is also available by viewing the source code of lazarus):
Usage: lazarus [flags] <image filename>
| Options | Description |
|---|---|
| -1 | Process one byte at a time, rather than one block (1k) of data at a time. |
| -b | Do not write unrecognized binary data blocks (the default is to write). |
| -B | Do not write any binary data blocks (the default is to write). |
| -h | Emit HTML code rather than ascii text to three files: the data file ($ARGV[0]) +.html, .menu.html, and .frame.html. Using your browser, look at the $ARGV[0].frame.html file initially. |
| -H <directory> | Write the HTML code into this directory. Use this switch with the -h flag. |
| -D <directory> | Write the undeleted blocks into this directory. |
| -t | Do not write unrecognized text data blocks (the default is to write). |
| -T | Do not write any text data blocks (the default is to write). |
| -w <directory> | Write all the HTML code to this directory. Use this switch with the -h flag. |
The command used to undelete blocks from a forensic duplication from this victim machine is the following:
forensic# ./lazarus -h /mnt/storage/www -D /mnt/storage/blocks /mnt/storage/linux_free.bin
The output (after many hours!) will be created in /mnt/storage and named linux_free.bin.html. Load this file into your browser and view the deleted files from the hard drive. The following illustration shows the initial web page we will load.
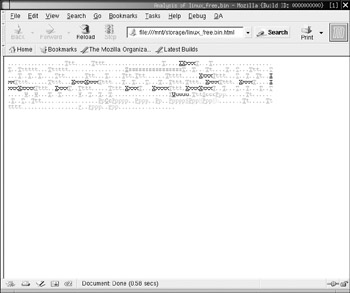
This screen shows the whole hard drive as blocks in a logarithmic scale. Each block that is represented by a “.” indicates free space that did not reconstruct to a file. Any other block is clickable and has a code such as T, X, and so on. When you click this code, you will be navigated to the undeleted file.
Each code represents a different type of file. T represents a text file, X represents an executable file, H represents an HTML file, and so on. The codes are summarized in the following list.
| Code | Color in HTML Output | Type of File |
|---|---|---|
| T | Gray | Unresolved text |
| F | Bright red | Sniffer output |
| M | Blue | |
| Q | Pale blue | Mailq files |
| S | Purple | Emacs/lisp files |
| P | Greenish | Program files |
| C | Green | C code |
| H | Light purple | HTML |
| W | Reddish | Password files |
| L | Light brown | Log files |
| . | Black | Unresolved blocks |
| O | Light gray | Null blocks |
| R | Black | Removed blocks |
| X | Black | Binary executable |
| E | Gold | ELF binary |
| I | Greenish | JPG/GIF files |
| A | Black | Archive (cpio, tar, and so on) |
| Z | Greenish | Compressed files |
| ! | Black | Audio files |
In the HTML output, the capital letter code represents the start of a file and the lowercase letters represent the additional blocks that make up the undeleted file. When we click one of these codes, we are presented with the data within the undeleted file:
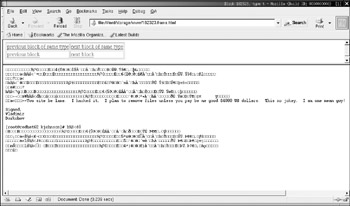
| Note | TCT was executed on the same hard drive that we analyzed with a live response in Chapter 20; therefore, this is the same fragment of data that we saw in the /etc/motd file that the attacker edited. |
It is important to note that lazarus can also process raw devices (such as a duplicate of the victim hard drive) as well as the output of unrm. The only difference will be the processing time required because more data blocks will have to be examined.
You are a forensic examiner for the D.E.A., and you are about to question a very large pharmaceutical company that is in the forefront in the use of high-powered computer processing resources to help develop the next new show-stopping drug. One Friday morning, you arrive at the company and hand over your appropriate legal paperwork to image and analyze the drives you need. It seems that one of the employees of this company, Kevin Johnson, has been using the company's offices as a front to move information to the South American drug lords. It was believed that he used some of the company's resources to develop designer drugs, in exchange for a large sum of money. Kevin Johnson has disappeared without a trace, eluding the authorities who had been watching him.
All that the D.E.A. has as proof of communication are IP addresses originating at the company's offices and going to South American destinations. It is your job to supply information to the D.E.A. to provide a break in the investigation. You, of course, have read Chapter 21 and know exactly how to create a forensic duplication of the work computer that Kevin Johnson left behind. You choose EnCase to acquire the data so you can import it into the appropriate tools.
The Forensic Tool Kit You saw that with very few mouse clicks, it is possible to gain significant insight into what Kevin Johnson's hard drive was used for. By reviewing the e-mail discovered automatically by FTK, you discover that Kevin was planning to meet a woman (perhaps a lover?) in Brazil. The D.E.A. now has a lead that was unavailable previously: the e-mail address ladybluebird@hotpop.com.
EnCase Previously, you saw that EnCase locates information similar to FTK. It does so in an efficient manner, and you can use different external viewers on the data deemed important. Furthermore, you can export the important data to reconstruct evidence such as e-mail.
By using EScripts, you could locate the Internet history and have the results assembled in a user-friendly report. In the report, you see that Kevin Johnson, the suspect, viewed maps and information about Brazil. Furthermore, you see that Kevin Johnson viewed information about the inner harbor of Baltimore, Maryland (shown previously in Figure 23-7). It would be reasonable to assume that Mr. Johnson may be making an appearance in both of these places. Therefore, the D.E.A. may want to perform surveillance there.
|
| < Day Day Up > |
|
EAN: 2147483647
Pages: 189