Exposing a COM Application as a WCF Service
Exposing a COM+ Application as a WCF Service
Any reasonably sized organization that has been using the Microsoft Windows platform for any length of time as the basis for their applications will doubtless have systems that make use of COM+ applications. The good news is that WCF enables you to leverage this technology and reuse your existing COM+ components by building a WCF service wrapper around them. The .NET Framework 3.0 includes a useful tool called ComSvcConfig, which enables you to integrate COM+ applications into the WCF service model (you can find this tool in the C:\WINDOWS\Microsoft.NET\Framework\v3.0\Windows Communication Foundation folder). Additionally, the WCF Service Configuration Editor provides a graphical user interface to many of the features available in the ComSvcConfig utility.
In the final set of exercises, you will use the WCF Service Configuration Editor and the ComSvcConfig utility to configure a COM+ application and enable client applications to access it in the same way as a WCF service. The COM+ application provides an interface that is very similar to the ProductsService service you used in the previous exercise.
Deploy the Products COM+ application to the COM+ catalog
-
Using Visual Studio 2005, open the solution file
 Products.sln located in the Microsoft Press\WCF Step By Step\Chapter 16\Products folder under your \My Documents folder.
This solution contains a COM+ version of the ProductsService service.
Note If you are interested in how this COM+ application has been structured, follow steps 2–4 below. However, this understanding is not crucial to the exercise, and if you have never implemented a COM+ application you can safely skip to step 5.
-
Using Solution Explorer, open the
 Products.cs file. In the Products namespace, examine the Product class. Notice that this class is very similar to the Product data contract you implemented in the WCF service. As with the ASP.NET Web service implementation, this class has been tagged with the Serializable attribute:
[Serializable] public class Product { public string Name; public string ProductNumber; public string Color; public decimal ListPrice; } -
Inspect the IProductsService interface. This interface defines the methods that the application exposes through COM+, in a manner very similar to a WCF service contract:
[ComVisible(true)] [Guid("")] public interface IProductsService { // Get the product number of selected products ICollection ListSelectedProducts(string match); // Get the details of a single product Product GetProduct(string productNumber); // Get the current stock level for a product int CurrentStockLevel(string productNumber); // Change the stock level for a product bool ChangeStockLevel(string productNumber, int newStockLevel, string shelf, int bin); }Apart from the attributes required by COM+ to identify the component, the most important difference between this and the WCF version of the interface is the return type of the ListSelectedProducts method. In the WCF service contract, the corresponding operation returns a List<string> type. COM+ does not support generics, so this version of the method returns an untyped ICollection object.
-
Examine the ProductsService class. This class implements the IProductsService interface and is the equivalent of the service class in the WCF service. Additionally, this class descends from the ServicedComponent class–this is the base class for COM+ serviced components. Notice that this COM+ application does not expose a class interface (the only functionality available is that specified in the IProductsService interface), but it supports transactions (this is common practice for COM+ applications):
[ClassInterface(ClassInterfaceType.None)] [Transaction(TransactionOption.Supported)] public class ProductsService : ServicedComponent, IProductsService { … } -
In Solution Explorer, edit the
 app.config file. Like the ASP.NET Web service in the previous set of exercises, the Products COM+ application uses ADO.NET rather than the Microsoft Enterprise Library for accessing the AdventureWorks database. The
  app.config file contains the connection string that the application uses to connect to the database. If you are not running a local instance of SQL Server Express, you will need to modify the value property in this file to connect to the correct server.
 -
Build the solution.
The application compiles into an assembly called Products.dll. This assembly is signed because you will deploy it to the .NET Framework Global Assembly Cache. (The file holding the strong name key used for signing the assembly is called
 ProductsService.snk, visible in Solution Explorer.)
 -
Open a Visual Studio 2005 Command Prompt window and move to the Microsoft Press\WCF Step By Step\Chapter 16\Products\Products\bin\Debug folder under your \My Documents folder.
Tip To open a Visual Studio 2005 Command Prompt window, on the Windows Start menu point to All Programs, point to Microsoft Visual Studio 2005, point to Visual Studio Tools, and then click Visual Studio 2005 Command Prompt.
-
Type the following command to deploy the Products.dll assembly to the Global Assembly Cache:
gacutil /i Products.dll
-
Start the Component Services console.
Tip To start the Component Services console under Windows XP, in the Start menu, click Control Panel, click Performance and Maintenance, click Administrative Tools, and then double-click Component Services.
Under Windows Vista, type the command mmc in the Command Prompt window. In the Microsoft Management Console, on the File menu, click Open, and open the file comexp.msc in the C:\Windows\System32 folder.
-
In the Component Services Console, in the left pane expand the Component Service node, expand the Computers folder, expand My Computer, right-click the COM+ Applications folder, point to New, and then click Application.
The COM+ Application Install Wizard starts.
-
In the “Welcome to the COM+ Application Install Wizard” page, click Next.
-
In the “Install or Create a New Application” page, click Create an empty application.
-
In the “Create Empty Application” page, type ProductsService for the name of the application, ensure that the Activation type is set to Server application, and then click Next.
-
In the “Set Application Identity” page, accept the default settings, and then click Next.
-
In the “Thank you for using the COM+ Application Install Wizard” page, click Finish.
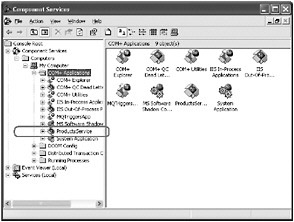
The ProductsService application should appear in the list of COM+ applications, as shown highlighted in the following image:
-
Expand the ProductsService application, right-click the Components folder, point to New, and then click Component.
The Component Install Wizard starts.
-
In the “Welcome to the COM+ Component Install Wizard” page, click Next.
-
In the “Import or install a component” page, click Install new component(s).
-
In the “Select files to install” dialog box, move to the Microsoft Press\WCF Step By Step\Chapter 16\Products\Products\bin\Debug folder under your \My Documents folder. Click the Products.dll assembly, and then click Open.
-
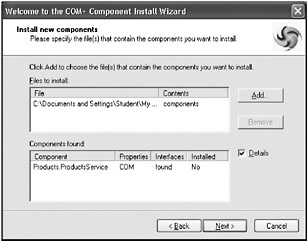
In the “Install new components” page, verify that the Products.ProductsService component is correctly identified, as shown in the following image, and then click Next:
-
In the “Thank you for using the COM+ Component Install Wizard” page, click Finish.
-
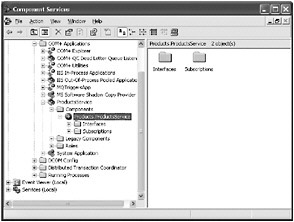
Expand the Components folder under the ProductsService application in the Component Services console After a short delay, the Products.ProductsService component should appear:
-
Leave the Component Services console open.
You can now configure the COM+ application to make it available like a WCF service. The simplest way to do this is to create a new WCF application configuration file and use the Integrate command in the WCF Service Configuration Editor. This command provides similar functionality to using the ComSvcConfig utility from the command line.
Configure the Products COM+ application as a WCF service
-
Start the WCF Service Configuration Editor.
Tip To start the WCF Service Configuration Editor outside of Visual Studio 2005, on the Windows Start menu, point to All Programs, point to Microsoft Windows SDK, point to Tools, and then click Service Configuration Editor.
-
In the WCF Service Configuration Editor, on the File menu, point to Integrate, and then click COM+ Application.
The COM+ Integration Wizard starts.
-
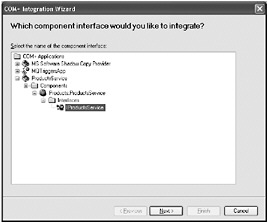
In the “Which component interface would you like to integrate?” page, expand the ProductsService node, expand the Components folder, expand the Products.ProductsService component, expand the Interfaces folder, select the IProductsService interface, and then click Next:
-
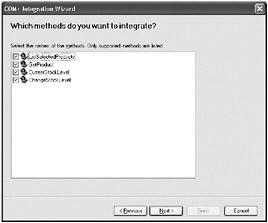
In the “Which met hods do you want to integ rate?” page, make sure that all four met hods are selected, and then click Next.
-
In the “Which hosting mode wo uld you like to use?” page, select COM+ hosted, and then click Next.
Note that by default, the wizard also creates an endpoint for metadata exchange. Leave this option enabled.
-
In the “What communication mode do you want to use?” page, select HTTP, and then click Next.
-
In the “What is the base address of your service?” page, in the Address field, type http://localhost:9090/COMProductsService, and then click Next.
Note that this is the base address of the service and not its URI. The wizard will generate an endpoint URI based on the name of the interface, and append it to this base address. In this example, the URI of the service will actually be http://localhost:9090/COMProductsService/IProductsService.
Note If you are using Windows Vista, use the default port (port 80) rather than port 9090, and specify a base address of http://localhost/COMProductsService.
-
In the “The wizard is ready to create a service configuration page”, click Next.
-
Verify that the wizard completes without reporting any errors, and then click Finish:
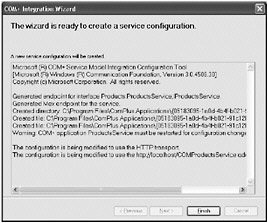
Note that when the wizard finishes, the configuration is not displayed in the WCF Service Configuration Editor.
-
In the WCF Service Configuration Editor, on the File menu, point to Open, and click COM+ Service.
A list of all COM+ applications configured as WCF services appears (just the ProductsService application in this case).
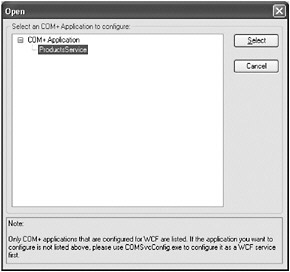
Click the ProductsService application, and then click Select.
The configuration for this service is loaded and displayed in the WCF Service Configuration Editor.
The service is named using the same globally unique identifiers GUIDs that COM+ uses to identify the COM+ application and class. Make a note of the first GUID in the service name.
-
Expand the service and verify that it has two endpoints. One is based on the wsHttpBinding binding and is the endpoint that client applications connect to. The other is the metadata exchange endpoint.
The COM+ component supports transactions, so the configuration file also includes transactional and nontransactional binding configurations for the wsHttpBinding and netNamedPipeBinding bindings. The binding configuration referenced by the HTTP endpoint refers to the binding that enables transactions by default.
-
In the left pane, expand the COM Contracts folder. This folder only appears for COM+ applications configured as WCF services. Expand the child folder named after a GUID, and then click the exposedMethods node.
The right pane displays the four methods available through this configuration. You can hide methods from client applications by deselecting them in this page. Do not change anything.
-
Close the WCF Service Configuration Editor. Do not save any changes if you are prompted (the configuration was saved earlier by the COM+ Integration Wizard).
-
Using Windows Explorer, move to the C:\Program Files\ComPlus Applications folder. This folder contains folders for each configured COM+ application. Move to the folder with the same GUID as the application ID of the COM+ application (this is the GUID that you noted in step 10).
This folder contains two files: a manifest file, and an application configuration file. The application configuration file is the file you have just created using the COM+ Integration Wizard in the WCF Service Configuration Editor.
Open the application.config file using Notepad.
-
Leave Notepad open, and return to Visual Studio 2005. In Solution Explorer, open the
 app.config file in the Products project.
Copy the appSettings section of this file to the Windows clipboard.
Return to Notepad, and paste the contents of the Windows clipboard immediately after the opening <configuration> tag and before the <system.ServiceModel tag>, as shown in bold below:
<?xml version="1.0" encoding="utf-8"?> <configuration> <appSettings> <add key="AdventureWorksConnection" value="Database=AdventureWorks;Server=(local)\SQLEXPRESS;Integrated Security=SSPI;"/> </appSettings> <system.serviceModel> … </system.serviceModel> </configuration>The COM+ component needs this key/value pair to retrieve the connection string for connecting to the database.
Note If you edited the connection string earlier, your value will differ from that shown here.
-
Save the file, and close Notepad.
You should now be able to use this COM+ application just like any WCF service.
Test the Products COM+ application
-
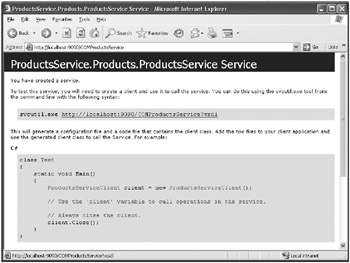
Start Internet Explorer and move to the URL http://localhost:9090/COMProductsService.
Note If you are using Windows Vista, move to the URL http://localhost/COMProductsService.
Internet Explorer displays the page describing how to create a client application for the WCF service:
Tip If Internet Explorer displays the error message “The page cannot be displayed,” then the COM+ application has probably shutdown due to inactivity. To restart the application, return to the Component Services console, right-click the ProductsService application in the COM+ Applications folder, and then click Start.
-
Click the link http://localhost:9090/COMProductsService?wsdl. The WSDL description of the service appears.
-
Close Internet Explorer.
-
In Visual Studio 2005, open the solution file
 ProductsClient.sln located in the Microsoft Press\WCF Step By Step\Chapter 16\ProductsClient folder under your \My Documents folder.
This solution contains a copy of the client application for testing the ProductsService service. This code is not quite complete; you will add a statement to create the proxy object in a later step.
-
Open the
 Program.cs file. There is one small change to this code compared with the program you saw in previous chapters: the statement in the Main method that invokes the ListSelectedProducts operation returns the result into an ICollection object rather than a List<string>, for the reasons described earlier:
ICollection productNumbers = proxy.ListSelectedProducts("Frame"); -
In the Project menu, click Add Service Reference. In the Add Service Reference dialog box, enter http://localhost:9090/COMProductsService?wsdl for the service URI and ProductsService for the service reference name, and then click OK.
Note If you are using Windows Vista, specify http://localhost/COMProductsService?wsdl for the service URI.
Visual Studio 2005 generates a proxy class for the service and adds it to the Services References folder in Solution Explorer. It also creates an application configuration file. If you examine this file, you will see that it contains a client endpoint for accessing the COMProductsService service called WSHttpBinding_IProductsService.
-
Add the following using statement to the list at the top of the
 Program.cs file:
using ProductsClient.ProductsService;
The proxy class you just generated is in this namespace.
-
In the Main method, add the statement shown in bold below, before the try block, to create the proxy object:
// Create a proxy object and connect to the service ProductsServiceClient proxy = new ProductsServiceClient("WSHttpBinding_IProductsService"); -
Start the solution without debugging.
The client application functions as it has done in previous chapters, generating a list of bicycle frames, displaying the details of a water bottle, and displaying the stock level of water bottles and then modifying this stock level.
Tip If client application console displays an error containing the text “No connection could be made because the target machine actively refused it.”, then the COM+ application has again probably shutdown due to inactivity. To restart the application, return to the Component Services console, right-click the ProductsService application in the COM+ Applications folder, and then click Start.
-
Press Enter to close the client application console window.
As far as the client application is concerned, there is little discernable difference between this implementation of the service and previous versions constructed using WCF. The fact that it is a COM+ application is transparent to the client application.
EAN: 2147483647
Pages: 105