Log Shipping
Log shipping is probably the easiest of the “follow the log file” fail-over scenarios discussed in this chapter that we will describe, obviating the need to constantly restore transaction logs to a standby server, as just discussed. Thus, the source and target databases are always in constant synchronization. This approach not only allows you to have a backup server, but it provides a way to offload query processing from the main computer (the source server) to read-only destination servers, one of the key motivators behind replication, but without the overhead and the possible intrusion (or rowguids) into the tables.
Introduced in SQL Server 2000, log shipping lets you configure a primary SQL Server instance to automatically send a copy of its transaction log backups to one or more secondary databases on separate secondary servers somewhere else. The target server is configured to receive the logs and apply them to the target databases. For additional protection a third monitor server instance can be installed to “watch” the process, record history and status, and raise alerts.
The source or active database must use the full or bulk-logged recovery model. Log shipping is not supported in databases configured with the simple recovery model. Also, as you will soon see, the destination servers must first be initialized with a full copy of the database to be log-shipped (just as they were in the standby server option earlier). You cannot start a log shipping scenario (or any other fail-over solution) with nothing on the target. Log shipping does not build databases, tables, triggers, stored procedures, or functions on the target servers. It is simply a procedure for getting transactions from a source server to a destination server, automatically, and with a number of data integrity options.
How It Works
Let’s consider a company with five servers: ServerA, ServerB, ServerC, ServerD, and ServerE. ServerA is the source server, the server on which log backups are performed and made available for copy. Server C, ServerD, and ServerE contain the destination databases on which the log backups from ServerA are restored. Keeping these servers in synchronization with ServerA is ServerB, the monitor server on which the enterprise-level monitoring of log shipping occurs. Each destination or source server is maintained by only one monitor server.
To delve deeper into log shipping configuration, we see that it is a three-stage process. Logs are produced on your production servers and can then be shipped to multiple target servers, and the process is automated using the following sequence:
-
Backups Transaction logs are backed up to the primary server. The backup process is part of a maintenance plan with a schedule that regularly produces transaction log backups.
-
Copies The transaction log is automatically copied to the log shipping partner server, the server that is the beneficiary of the transaction logs.
-
Restore The target server restores the log backups to its own instance.
If you plan to log ship to multiple targets, then Steps 2 and 3 are repeated for each target server instance.
In the log shipping scenario all configuration and administration of the log process is configured with SQL Server Management Studio. Management Studio can define an appropriate delay between the time ServerB backs up the log backup and the time Servers C, D, and E must restore the log backup. If more time elapses than you defined, ServerA will generate an alert using SQL Server Agent. This alert can aid in troubleshooting the reason the destination server has failed to restore the backups.
In a critical OLTP redundancy architecture, we do not use the monitor server as the source server, because it maintains critical information regarding the entire log shipping system. This means that the monitor server should be regularly backed up at the OS level, even cloned, so that its loss will not kill the entire log shipping setup. Also, if you maintain a monitor server independently of the source server, you will be assured of better perf ormance and reliability for the monitoring process. Also, monitoring adds unnecessary overhead, which you don’t need on your OLTP environment. Also, as a source server supporting a production workload, it is the most likely to fail, which would disrupt the monitoring. Finally, most high-availability environments that employ log shipping do so from one fail-over cluster (discussed in Chapter 9) to another, and a cluster node is not a good idea for the setup of a monitor server.
The secondary servers, which I prefer to refer to as “targets” in a log shipping configuration, are the servers where you want to keep a warm standby copy of your primary OLTP databases. Target servers can contain backup copies of databases from several different source or primary servers. For example, a department could have five servers, each running a mission-critical database system, and each server will have a partner target somewhere as long as its failure would be disaster for the company.
Rather than having five separate standby servers, a single standby server could be used. The backups from the five source systems could be loaded onto the single backup system.
This would reduce the number of servers needed, saving money in the initial layout and keeping cost of ownership in check. It is unlikely that all primary systems would fail at the same time. This scenario is perfectly feasible; however, you need to make sure the standby can carry the load of multiple primary databases, so it should be a “bigger” server in all aspects (memory, CPU, disk space, and so on). Otherwise, you would need to fall back to the source server as soon as possible.
Configuring Log Shipping Manually
SQL Server 2005 lets you perform manual log shipping from earlier-edition servers all the way back to a SQL Server version 7.0 Service Pack 2 (SP2) transaction log. It will do this if the pending upgrade option is enabled on the computer running the earlier versions of SQL Server.
To enable this option, simply execute the following code on the target server:
EXEC sp_dboption 'database name', 'pending upgrade', 'true'
When you are restoring the database after log shipping, you can recover only with the NORECOVERY option. Remember, however, that you cannot use SQL Server replication between SQL Server 7.0 and SQL Server 2005 systems. So if you need a widely distributed redundant SQL Server infrastructure with a variety of fail-over options, you need to upgrade to SQL Server 2005.
Configuring Log Shipping with Management Studio
To configure log shipping in Management Studio, you open the Database Properties dialog box and configure the options available. To configure servers for log shipping, perform the following steps:
-
Create a share on the primary database server at the data or transaction log folder above or at the point to which your logs are backed up. For example, at the e:\Program Files\SQL Server\..data\backup\tlogs\ path, you could create the \\logshipping\tlogs share. If you are going to log-ship off a SQL Server cluster, you will need to create a file share resource on the cluster, but you will first need to ensure that a cluster disk is available for SQL Server, as shown in Figure 8–16. Creating the share is shown in Figure 8–17 (see “SQL Server 2005 Server Clustering” in Chapter 9).
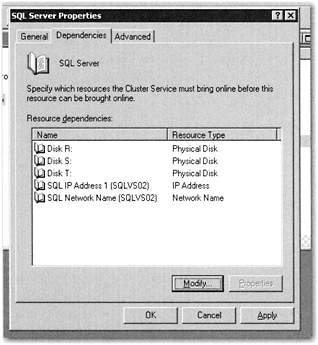
Figure 8–16: Allocating a disk resource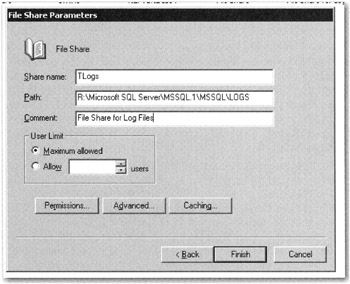
Figure 8–17: Creating the share on the primary server -
In the Database Properties dialog box check the first option, “Enable this as a primary database in a log shipping configuration.” Next click the Backup Settings button. The dialog box in Figure 8–18 loads. Add a path to the transaction log backup folders on the primary server. Configure both the backup procedures and the schedule. (See Chapters 5 and 7 for more information on setting up backups and schedules.) The primary server instance runs the backup job and backs up the transaction log, as it would any local backup. The primary server places the log backup into a primary log-backup share, which it then sends to the secondary backup folder. In this figure, the backup folder is on a shared directory-the backup share we created on a cluster.
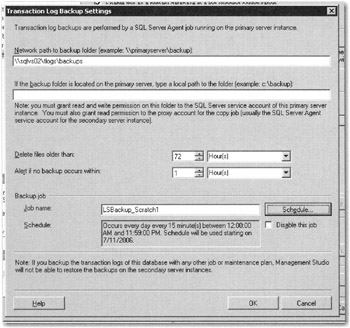
Figure 8–18: Backup settings -
You now need to connect to a secondary server. Click the Add button on the main page for log shipping. The Secondary Database Settings page loads, as shown in Figure 8–19. Click the Connect button. The familiar Connect to Server dialog box loads and prompts you for login credentials. On the first tab you have three options for creating the secondary databases. You can have Management Studio generate a full backup of the database and restore it to the secondary server; or you can restore an existing backup (a good option if you need to access a remote server that already has a full backup of the database on it). Given the second option, Management Studio can create the database on the secondary server, if it does not exist, or restore into an already existing copy of the database. Or the third option can be chosen, which will honor an already manually initialized database on the secondary server.
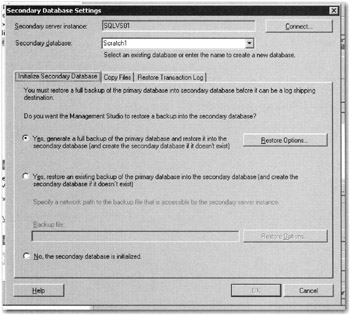
Figure 8–19: The Secondary Database Initialization tab -
If you chose the first option, you can click the Restore Options button to specify folders for both data and log files. Or you can let Management Studio go with the default. If the primary and secondary servers are set up identically, then let Management Studio go with the default. Next click the Copy Files tab, as shown in Figure 8–20, and enter a path for the destination. Go with the default setting for the copy job and its schedules.
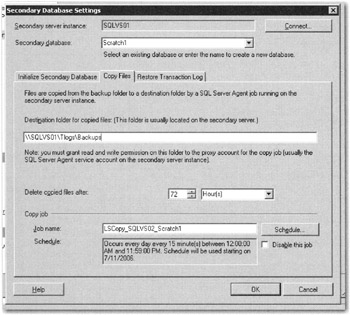
Figure 8–20: The Copy Files tab -
Click the Restore Transaction Log tab, as shown in Figure 8–21. Here you can choose the recovery mode (you would typically choose No Recovery Mode in order to have the database available). Also change the restore maintenance settings to suit your needs and provide a name for the restore job. I would advise that you simply go with the defaults until you have are comfortable configuring log shipping. Click OK to save the configuration. At this point the jobs are created (see the next section, “SQL Server Agent Log Shipping Jobs”).
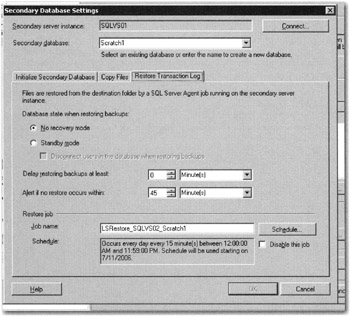
Figure 8–21: The Restore Transaction Log tab -
You now have an option to use another instance of SQL Server to monitor the log shipping process, or you can choose not to monitor.
In the Select Databases dialog box, select the These Databases check box, and then select the database to log-ship. If you select more than one database, log shipping will not work and the log shipping option will not be available. You are not allowed to select a database that is already configured for log shipping.
Select the “Ship the transaction logs to other SQL Servers (Log Shipping)” check box. Continue through the wizard, specifying the rest of the database maintenance options, until you get to the Specify the Log Shipping Destinations dialog box. Click Add to add a destination database. In order for this option to be available, you must have selected to use log shipping earlier in the wizard.
The secondary database must be initialized by restoring a full backup of the primary database. The restore can be completed using either the NORECOVERY or STANDBY option. This can be done manually or through SQL Server Management Studio.
A log shipping configuration does not automatically fail over from the primary server to the secondary server. If the primary database becomes unavailable, any of the secondary databases can be brought online manually
The primary and secondary servers can be on the same computer; however, in this case, SQL Server fail-over clustering may provide better results (see Chapter 9 on the subject of fail-over clusters).
It may take a lot of effort to bring a secondary server online if you are recovering a large database and the production system has failed. To avoid the bottleneck, it is important that the configuration log ship and each transaction log be backed up as soon as it is created.
If, however, you need to assess the damage to a database on the primary server, say an accidental truncation of a table, you can delay applying transaction log backups to the secondary server. The delay gives you a chance to decide the best course of action, which may involve failing over to the secondary server or stopping log shipping until the crisis on the primary has been resolved. With a secondary server you also have the ability to recover a bad “call” on the primary server. For example, you can select data accidentally deleted on the primary server and reinsert it into the primary from the secondary, as long as you were able to stop the rolling forward of the log shipped data on the secondary in time to respond.
SQL Server Agent Log Shipping Jobs
Looking at your newly created log shipping configuration, you will see that SQL Server Agent has been assigned a number of jobs to maintain. These are as follows:
-
Backup Job This is the job that backs up the logs. The job is created on the source or primary server for each database to be log-shipped. This job executes the actual backup process, and stores backup history to the source and monitor servers. As demonstrated in the preceding chapter and Chapter 4, it can also be configured to perform maintenance work, such as deleting old backup files and history information. This job runs every two minutes by default, but you can change this.
-
Copy Job Copies the logs to the destination server. The copy job is created on the target or secondary server during the setup. The job retrieves the backup files from the source server to the destination on the target server (hence the need for an accessible share). It also pulls log history and gets the files over to the monitor server. You can customize the job schedule to suit the backup and maintenance plan on the source server.
-
Restore Job Performs the log restore on the target server. The restore job is automatically created on the target server instance for each log shipping configuration. The job also logs history on the local server and the monitor server, and it deletes old files and old history information. The SQL Server job category “Log Shipping Restore” is created on the secondary server instance when log shipping is enabled.
-
Alert Job Reports problems or events that arise in the process. If you decide to use a monitor server, then an alert job will be created on the monitor server instance. Both primary and secondary servers send history and status data to the monitor server. This alert job is shared by both the source and target servers, so any change you make to this job will affect all servers using the monitor server. If you do not use a monitor server, alert jobs are created locally on the source server instance and each target server instance. The alert job on the primary server instance raises errors when backup operations have not completed successfully within a specified threshold. The alert job on the secondary server instance raises errors when local copy and restore operations have not completed successfully within a specified threshold.
In the course of setup, you will be able to control how often the log backups are taken, how and when they are copied to each target, and how often the target servers apply the logs to their databases. So as not to have transaction logs growing out of control on the target servers, you should have the transactions copied to the targets and applied as often as a reasonable schedule will allow. Your network and bandwidth between the servers will obviously be a factor to consider.
On a given secondary server instance, the restore job can be scheduled as frequently as the copy job, or the restore job can delayed. Scheduling these jobs with the same frequency keeps the secondary database as closely aligned with the primary database as possible to create a warm standby database.
In contrast, delaying restore jobs, perhaps by several hours, can be useful in the event of a serious user error, such as a dropped table or inappropriately deleted table row. If the time of the error is known, you can move that secondary database forward to a time soon before the error. Then you can export the lost data and import it back into the primary database.
EAN: 2147483647
Pages: 239