Backing Up SQL Server
There are several approaches to backing up SQL Server. First, you can use the Backup options in Management Studio. This is SQL Server’s interactive option that can get you started doing database backups from ground zero. Second, there is the noninteractive attack on the DBMS API using T-SQL. Third, you can use the SQL-SMO object model, which publishes a backup object and a restore object that access the same API as with the T-SQL approach (see Chapter 11). Fourth, you can go with a third-party vendor, but this book is not the forum to discuss this option. If you’re a whiz at T-SQL, then you may find the programmatic approach to be extremely powerful, and if you want to build your own backup application or user interface in Visual Basic (the .NET version) C++ or C#, then go the object model. But let’s first deal with Backup in Management Studio because that is the easiest approach and the one most non-DBA database owners and many DBAs will use (and it is adequate in most circumstances).
Using Management Studio to Back Up SQL Server
The steps to take to create local simple backups of SQL Server databases or transaction logs are as follows (you can take a backup of a SQL Server database [ad hoc] at any time without a schedule):
-
Create a backup job. The backup job is managed by SQL Server Agent, which is discussed in Chapter 4.
-
Create a schedule to run the job. Both 1 and 2 here can be rolled into a SSIS package that gets activated as part of a maintenance plan (see Chapter 4).
Create the Backup Job
To create the backup, drill down to the database node under Databases on the DBMS instance to which your target databases are attached, right-click the node, select Tasks and then choose Back Up. The dialog box in Figure 7–3 loads. See the section “SQL Server Backup Bandwidth” later in this chapter to determine the resources needed to write the backup files out to a network disk.)
| Note | Remember that you cannot use SQL Server Backup with a tape drive unit attached to a remote machine. You also need to leave at least 10MB free for the backup image (over and above your other needs, of course) on the hard disk where the SQL Server binaries are installed. If the DBMS cannot find free space, the backup will fail. |
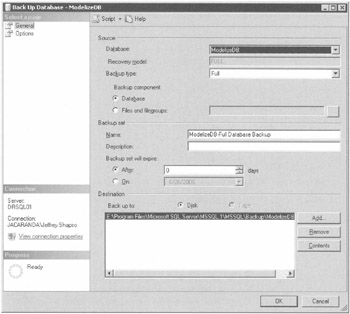
Figure 7–3: Back Up Database (General page)
Creating the backup job requires several steps. You need to determine if your backup job is going to be a full backup or a differential backup, whether to append to the media or overwrite existing media, and whether to run the job once only or schedule it to repeat at regular intervals.
If you are going to work to a full-differential rotation scheme, described later in this chapter, you’ll need to create two jobs, one to run the full backup once a week, and one job to run the differential backups every day. Depending on your needs, you may have to create a third job to run transaction log and file or filegroup backups as well. You might find yourself very busy here, but the sooner you get cracking, the better.
On the General page, you need to set the following:
-
Database Choose your database in the drop-down list (this option is under the Source group).
-
Backup type Choose the type of backup you need to do-complete (full), differential, transaction log, or file or filegroup from the drop-down list. If the transaction log option is disabled, the database is probably in simple recovery mode (model), which does produce transaction log backups. The same limitation of simple recovery applies to file or filegroup backups. To obtain all four backup options, you need to set the recovery model on the target database to full (see “SQL Server 2005 Recovery Architecture” earlier in this chapter).
-
Name Provide a name for the backup; use anything you like or go with the default if that is convenient. This information gets written into the header section of the backup data. It will make it easier to find your backups in a disk or tape device when you need to restore.
-
Description Provide a description of the backup job. This information is also written to the header of the backup data and is used to identify or manage your backups. It is not essential but makes backup life much easier.
-
Destination Check the radio button that applies to the destination device for your backup. You have two choices: Tape or Disk (file). To add devices to the Backup To list, click the Add button (or click Remove to drop devices). If you click Add, the Select Backup Destination dialog box shown in Figure 7–4 loads.
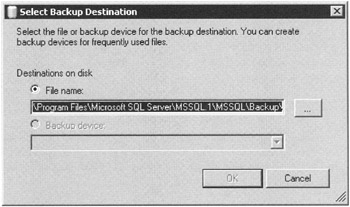
Figure 7–4: Select Backup Destination
On the Options page you need to set the following options:
-
Overwrite media Check the radio option to either append to the media or overwrite the media. Overwriting the media obviously destroys all previous backups in the file. You can append a backup job to the media, which will let you choose previous backup days and times, but the disadvantage is that the media file will keep growing until the disk fills up. If you are backing up the directory to tape, you should overwrite the backup media because you can go back to previous days on tape.
-
Reliability Depending on your needs, you might be better off using the appropriate DBCC command described in Appendix than the specified “Verify backup when finished” option. Verification can be somewhat resource intensive and will lengthen the time it takes to complete your backups. The same goes for the checksum check option; it is also resource intensive. You should enable reliability options to run in the middle of the night when the database is not needed or during times of low use.
-
Backup to a new media set Check this option to specify a media set to be used or overwritten by Backup (See Figure 7–5).
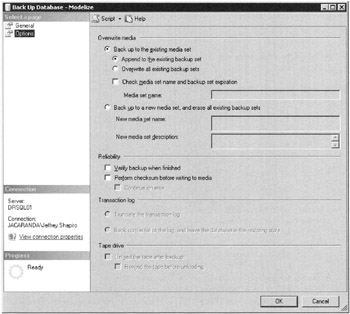
Figure 7–5: Back Up Database (Options page) -
New media set description Check the Initialize and label media option to enable the fields “Media set name” and “Media set description” (see the section “SQL Server Backup by Design” later in this chapter, which discusses SQL Server 2005 media sets and families).
-
Tape drive Here you can specify the option that causes the tape to eject after the backup operation. This helps ensure that another process does not come around and overwrite the backup you just completed. You can also choose to rewind the tape. The option is disabled for obvious reasons if you are backing up to disk. (The “Transaction log” option is grayed out until a Transaction Log backup is performed.
At this point, if you click OK you will be scheduling the job to run immediately or without a schedule. You can go back to the General tab and select the Schedule option or continue with the default.
Backing Up the Transaction Log
On the General and Options pages, respectively, you need to set the following:
-
Backup Choose transaction log backup from the drop-down list (for Full recovery models).
-
Transaction log, Truncate Choose either to truncate the log or to back up the tail of the log.
Using Management Studio to Restore a SQL Server Database
To restore the backup, perform the following steps:
-
Drill down to the database node under Databases on the DBMS instance to which your target databases are attached.
-
Right-click the database, select Tasks, and choose Restore, Database, Files and Filegroups, or Transaction Log. The dialog box in Figure 7–6 loads.
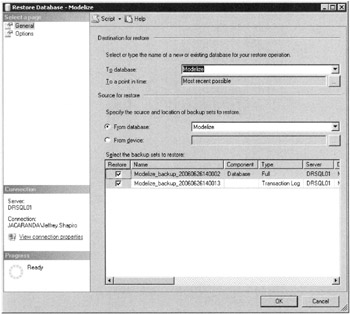
Figure 7–6: Database Restore
To restore a database or transaction log, you need to perform the following on the General tab:
-
Destination for restore, To database Choose the database to restore in the drop-down list. The list can be written to, so you can provide a new name, essentially a new database, for the restore. This is a useful feature that allows you to restore a database to a new DBMS where it did not exist before.
-
Destination for restore, To a point in time If you choose this option, you will be able to select a time in the past to which to restore to. This is useful if you need to restore to a point where you know the database is a desired state.
-
Source for restore, From database If you choose this radio option, backup sets will show you the list of databases to restore from with a lot of useful information.
-
Source for restore, From device If you choose this radio option, then you need to select a backup file from the location on the hard disk, or from a tape drive, after which you will be able to see the list of databases to restore from with a lot of useful information.
To set additional restore options, click the Options item on the Restore database dialog box. The Options tab is illustrated in Figure 7–7.
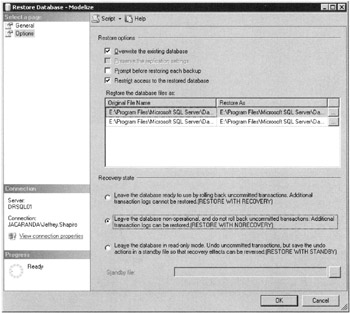
Figure 7–7: Restore Database Options
Parameters on the Options tab are as follows:
-
Overwrite the existing database This option forces the restore to automatically overwrite the existing database.
-
Preserve the replication settings This option lets you preserve the replication settings that have been installed on the database.
-
Prompt before restoring each backup This option forces the restore operation to prompt you after each backup completes. You would use this option if all the restores were coming from one device or one cartridge and you wanted to cancel after the first full and the third differential restore. By having the prompt continue to pop up after each restore, you will be able to cancel before the fourth differential.
-
Restrict access to the restored database This option lets you restore the database but deny connections to it until a later time.
-
Restore the database files as The grid on the Options tab is related to this option, which lets you change the name and path of the restore target. You need to select the files in the left column (logical filename) and provide a new name and path in the right column (move to physical filename).
-
Recovery state, Leave database ready to use This option completes the entire restore process and processes the transaction log as part of the restore feature. This restore will require you to restore all your databases and applicable transaction logs as part of one process. After the restore is complete, the database and transaction log state is considered final and ready for use, and no additional transaction logs can be restored.
-
Recovery completion state, Leave database non-operational This option is the opposite of the preceding one. After the restore, the database is nonoperational and you can still restore additional transaction logs.
-
Recovery completion state, Leave database read-only mode This option allows you to restore the database, permit it to be operational but only for read-only access, and still be in a position to restore additional transaction logs. These options are important for log-shipping functionality and maintaining standby servers as discussed in Chapter 9.
| Note | A new feature of SQL Server 2005 lets the database become available as soon as a filegroup in a collection is restored. SQL Server will continue to allow access while restoring the remaining filegroups. If a filegroup needs to be accessed by a query, an error is returned noting that the database is offline. |
After you have provided all necessary parameters and you decided on the option, click OK to begin the restore. You will be notified by the DBMS whether the restore completed successfully or failed.
Using T-SQL Backup Scripts
The T-SQL BACKUP DATABASE and RESTORE DATABASE commands are very powerful and provide all the facilities you need to program extensive scripts that can completely replace the Backup/Restore facility provided by Management Studio, as just discussed. The syntax for the two commands is extensive, and you should reference them in SQL Server Books Online. The following code provides an example of a simple backup script and an example of a simple restore script:
-- Create a backup device for customers. USE master EXEC sp_addumpdevice 'disk', 'CustomersD', 'c:\Program Files\Microsoft SQL Server\MSSQL\BACKUP\Customers.dat' --Create a log backup device. USE master EXEC sp_addumpdevice 'disk', 'Customers_logD', 'c:\Program Files\Microsoft SQL Server\MSSQL\BACKUP\Customers_log.dat' -- Back up the full Customers database. BACKUP DATABASE Customers TO CustomersD -- Back up the Customers log. BACKUP LOG Customers_log TO Customers_logD RESTORE DATABASE Customers FROM CustomersD WITH NORECOVERY
It is well worth your while to become proficient in T-SQL backup scripts because once you are expert, backup and restore scripts can be easier to manage than the same process in Management Studio. The scripts can also be executed automatically by SQL Agent. In many facilities or data centers, you will be required to have T-SQL capability to code backup/restore scripts. The next section, which examines point-in-time restore, includes more advanced restore scripts as well.
Restoring a Database to a Point in Time
It is possible to restore your database to a certain point in time in the transaction log or to a named mark in the transaction log. Let’s say a careless programmer does a database update and updates 10,000 rows of data instead of ten (trust me, it happens). You then need to restore the database to a point in time just before your lazy hacker hit the ENTER key and all Hades exploded.
To accomplish this task, you need to recover the database to the exact point in the transaction log before disaster struck. To do this, you need to examine the transaction log header information of each transaction log backup or the information in the backupset table stored in msdb. From these sources, you can easily and quickly find the backup set that contains the time to which you recover your database. All you then need to do is apply transaction log backups up to that point.
Before you start, remember that you cannot skip any transaction logs, because this would destroy the integrity of the data in the database. You also have to consider that there might be transactions that came in after the disaster. Sometimes the errors are discovered only after a huge number of good new transactions were committed to the database. Also, the transactions that you want to undo might compromise what appear to be good transactions that were accomplished on bad data. For example, computations, aggregations, row identification, defaults, and the like may no longer be viable after you remove or alter a huge bunch of records, and you will thus have to redo them. The process is as follows:
-
First restore the last database backup but do not recover the database (this is the RESTORE WITH NO-RECOVERY in T-SQL code or the Leave database non-operational option in Management Studio).
-
Next restore each transaction log backup in the same sequence in which they were created, recovering each database after each transaction log restore.
-
Finally recover the database to the desired point in time within the final transaction log backup.
Point-in-Time Restore Using a T-SQL Script
To restore to a point in time using a T-SQL script, your script needs to code the following:
-
Execute a RESTORE DATABASE statement using the NORECOVERY option.
-
Execute a RESTORE LOG statement to restore each transaction log backup. The restore needs to specify the following:
-
The name of the database against which the transaction log will be applied.
-
The backup device holding the transaction log backup.
-
The RECOVERY and STOPAT information. This information is required in the point-in-time script; if it is missing or wrong, the restore will fail.
-
The following is an example of a point-in-time restore script of a database to its state as of 11:19 A.M. on October, 2005; it demonstrates the restore operation involving multiple logs and multiple backup devices:
RESTORE DATABASE Customers FROM CustomersD WITH NORECOVERY GO RESTORE LOG Customers_Log FROM Customers_LogD WITH RECOVERY, STOPAT = 'Oct 9, 2005 11:19 AM' GO
EAN: 2147483647
Pages: 239