Let s Bust It: Planning the Game
| [ LiB ] |
Let's Bust It: Planning the Game
So, I knew I wanted to make a game for the final program in the book. What kind of game do you think I chose to make? You guessed it: a space shooter. I decided I wanted the game to be like Space Invaders (if you have ever played it before, you know what I am talking about). The point of the game is for the player to fire bullets at the enemy UFOs as they appear on the screen. The player is a human ship, and the enemy are alien ships. Now, I'll give you a little history on how I created it, and then we'll walk through the specifics together.
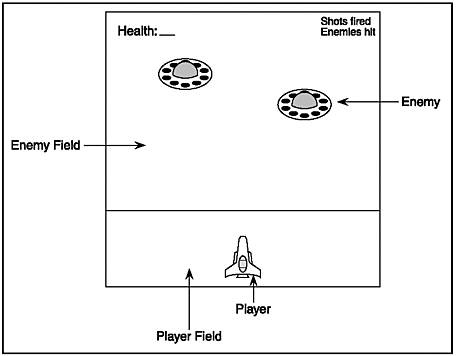
First of all, I planned out what the game would look like. I designed it so that the enemy UFOs appear from the top of the screen, and the player is on the bottom of the screen. As the enemies appear onscreen, the player shoots at the enemies, and they explode on contact.
My sketch for the game setup is shown in Figure 13.1. Well, actually my sketch was done in pencil, but I had it redrawn for this book.
Figure 13.1. A sketch of the final game's playing field.

I then had a basis for how the game would look and feel. Notice that in the sketch, I created a HUD that displays the health and the shots fired /enemies hit totals. This allowed me to completely spend my time on the actual game, instead of thinking about how the HUD should look later when writing the game. Now that I had the game plan ready, I created the images I would be using for the game. The most important ones, of course, were the player and the enemy images. The enemy bitmap looks like Figure 13.2.
Figure 13.2. The enemy bitmap.
![]()
And the player looks like Figure 13.3.
Figure 13.3. The player bitmap.
![]()
These images are used in the game. As you can see, they are animated; however, they are animated in different ways.
The enemy bitmap has a rather straightforward animation styleit just loops from the first frame to the last frame. What I mean is that when the enemy ship moves around, it plays each frame in the bitmap consecutively. The first frame of the game loop is the first frame of the spaceship, the second frame of the game loop is the second frame of the spaceship, and so on, until you reach the final frame of the enemy spaceship (the 10 th frame). The 11 th frame of the game loop is then the first frame of the bitmap again, and so on.
The player bitmap reacts a little bit differently. We want the game to make the player tilt left when the spaceship is moving left, and tilt right when the spaceship is moving right. It will remain flat when not moving at all.
We have to use some interesting code to get this to work. First of all, load the bitmap, as you might expect, with the command LoadAnimImage() .
Global playerimage = LoadAnimImage("player.bmp",35,32,0,13) This assumes that each frame of the player bitmap is 35 x 32 pixels (and so it is), and that there are 13 frames (and so there are). Well, as you can see, the first frame is not a flat position, but instead a view of the spaceship tilting left. We want the player spaceship to rest on the 7 th frame, and have the frames increase (move toward tilting right) when the player presses right, and, conversely, have the frames decrease (move toward tilting left) when the player presses left. Set the frame to rest on frame 7 when no key is pressed, like this:
player\frame = 7
Then, when the player presses right, the code will do this:
;tilt player right player\frame = player\frame + 1 ;don't let frame get too high If player\frame >= 12 player\frame = 12 Endif
Can you see what is happening here? Note that this code occurs within the right key testing block, meaning this code is tested only when the right key is pressed. What is happening is that the frame is being incremented each frame, but only as long as the right key is pressed. (The right-key testing code occurs around the previous code, and is not visible in the book.) The code limits how high player\frame can get, however, because there are only 13 frames in the player spaceship image.
Why does it check to see if the frame variable is greater than or equal to 12, instead of 13? Remember that frame counts begin at 0; therefore, the final frame is 13 1, or 12.
Okay, it's time to wrap up the planning section. There are a lot of other things you need to do, such as deciding how to choose where the enemies come from, how many enemies are on each level, and the like. If you want to see how I did it, open up the invaderz.bb program from the CD. It contains the source, and the comments will help you understand what I was thinking when I wrote the game.
By the way, I chose the name Invaderz!!! for the name of my game. Why? It's a cool name. And you can tell it's important because there are not one, not two, but three exclamation points after the word!
| [ LiB ] |
EAN: 2147483647
Pages: 94
If you may any questions please contact us: flylib@qtcs.net