Page Flipping
| [ LiB ] |
Page flipping is named for its similarities to a flip book. Remember those? They were the small books that, when flipped through quickly, seemed to make an image move. When in a game, a similar process is used. A picture is drawn on an off-screen image called a buffer. The buffer would be the page after the one you are currently looking at in the flip book. When the pages are flipped , the off-screen image is flipped with the front screen image. It looks like Figure 6.1.
Figure 6.1. Page flipping.

NOTE
What Is a Frame?
From what you have learned so far in this book, you should know that a frame is basically one scene of animation that is tied with other scenes so quickly that it creates an illusion of smooth animation. Essentially, a frame is one iteration of the main loop. (In case you forgot , to iterate through a loop is to go through it oncein other words, to perform the instructions of the loop one time.) In a game, you iterate through the loop until the user quits the game. When a frame goes through the loop once, the game has achieved one frame of animation. This loop continues to iterate until the game is over.
Now, you might wonder how this would create animation. Well, this process happens at least thirty times a second. That means that in one second, at least thirty different frames are drawn on the screen. In a flipbook, a single page would be the equivalent of a frame. It is impossible to see each individual page when the book is flipped, and the page-flipping procedure is no different. The frames flip so quickly that it creates smooth animation: it is impossible to tell the difference between the individual frames.
Page flipping has been used in a lot of games in this book so far, but I really haven't explained how it works. Let's start off with a sample of what a game looks like without page flipping. This file can be run from the CD; it is called demo06-01.bb:
;demo06-01.bb - A not-so-greatly animated ship ;Initialize the Graphics Graphics 800,600 ;load the ship image shipimage = LoadImage("ship.bmp") ;Seed the random generator SeedRnd(MilliSecs()) ;create a ship type Type ship Field x,y ;the x and y coords End Type ;create the ship ship.ship = New ship ;position the ship randomly ship\x = Rand(0,800) ship\y = Rand(0,600) While Not KeyDown(1) ;Clear the screen Cls ;move ship left and right ship\x = ship\x + Rand(-8,8) ;Move ship up And down ship\y = ship\y + Rand(-8,8) ;If ship goes off screen, move it back on If ship\x < 0 ship\x = 15 ElseIf ship\x > 800 ship\x = 790 ElseIf ship\y < 0 ship\y = 10 ElseIf ship\y >600 ship\y = 590 EndIf ;Draw the ship DrawImage(shipimage,ship\x,ship\y) Wend Figure 6.2 shows three frames from demo06-01.bb. Do you see how the ship flashes on and off as it moves? This is because there is no page flipping involved, hence, no animation.
Figure 6.2. A game without page flipping.
How page flipping works is that the next frame is drawn onto a back buffer so that the back buffer is flipped with the front buffer quickly and seamlessly. In this example, however, there is no back buffer, so the frame is drawn as the ship is moved. There is no way the computer can draw the image fast enough to provide smooth animation.
Let's get started!
Buffers
I know I've probably gone over this a hundred times, but I think it may be easier to create a section that explains what a general buffer is for future reference. Maybe it will also help you understand the idea.
A buffer is an image. Each frame of your game is drawn onto a buffer; hence, each frame of your game is an image (frame = buffer, buffer = image, frame = image). Now, to create smooth animation (in other words, to make the game actually run), you usually need at least two buffers, although three buffers are used in many modern games.
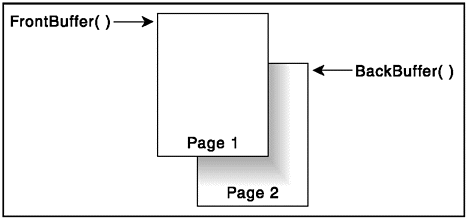
The two buffers are known as the front buffer and the back buffer. The difference is that the front buffer is displayed on the screen, and the back buffer is drawn off-screen. Think of it like this: the front buffer is drawn on the top of a pad of paper, and the back buffer is drawn a sheet below it, like in Figure 6.3.
Figure 6.3. Buffers as a pad of paper.
By the way, there is another type of buffer called an image buffer. An image buffer is just like any other buffer, but it usually holds an image that you want to draw to manually. So, for example, assume you wanted to have a buffer where you want to draw two rectangles. Well, you can use the image buffer to create two drawn rectangles, and then move the image buffer into the actual game at any time. The cool thing about image buffers is that they can be any size, whereas the front and back buffers must be as large as the screen.
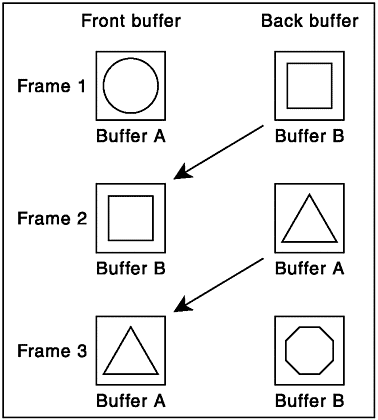
Buffers are commonly used in page flipping. Because I have already explained the process, I'll go over it very quickly with respect to buffers. Basically, you have two buffers, buffer A and buffer B. Buffer A is the front buffer and buffer B is the back buffer. While you are in the game, the image is drawn to buffer B. At the end of the frame, buffer A is swapped with buffer B, so the old frame, A, is now being drawn off screen. Buffer B is now being displayed. See Figure 6.4 for a visual aid. Notice that the back buffer and front buffer never actually change locations.
Figure 6.4. Buffers A and B.
This example brings up an interesting point: If the buffers are swapped each frame, shouldn't you have to alternate between drawing on the front buffer and drawing on the back buffer? The answer is no. Only the data is swapped between the two buffers, not the actual buffers themselves . This means that you only draw on the back buffer when producing animation.
SetBuffer
This function is very important, and it is integral to a page-flipping application. Usually, the SetBuffer function appears just after the Graphics call in any game. The SetBuffer command is defined like this:
SetBuffer buffer
See Table 6.1 for a description of the arguments.
Table 6.1. SetBuffer's Parameter
| Parameter | Meaning |
|---|---|
| buffer | Used to designate which surface will be drawn on: can be FrontBuffer() , BackBuffer() , or ImageBuffer() . Default is FrontBuffer() . |
Basically, if you plan to use page flipping, you will probably draw to the BackBuffer() . After you initialize the graphics, you will set up the BackBuffer() like this:
SetBuffer BackBuffer()
Pretty simple, huh? Well, before we go any further, let's discuss the three types of buffers:
-
FrontBuffer()
-
BackBuffer()
-
ImageBuffer()
FrontBuffer()
FrontBuffer() and BackBuffer() are pretty self-explanatory, but it is still imperative that we go over them. As stated before, when drawing on the screen, you draw to a buffer. In most gaming situations, you usually draw to the BackBuffer() . The reason is speed: when drawing the FrontBuffer() , your game can slow down tremendously.
The reason for the slowdown is easily defined. Think of a cat walking by a bush. Every time the cat moves a little (every frame), the background must be erased, and redrawn with different parts of the bush covered by the cat. This breaks down animation. Using BackBuffer() , the bush and cat are drawn hidden from the player, and simply displayed on the screen. You may be wondering why you would ever want to draw to the FrontBuffer() , and the reason is that sometimes you just want to draw straight to the screen. You don't really care about double buffering; you just want straight-up drawing. This would be useful when writing a program like demo06-02.bb. This program draws a bunch of lines to the screen.
;demo06-02.bb - Draws a bunch of random lines to screen. ;Initialize Graphics Graphics 800,600 ;Draw only to the front buffer SetBuffer FrontBuffer() ;Draw only to the front buffer SeedRnd(MilliSecs()) x While (Not KeyDown(1)) ;Set a random color Color Rand(0,255),Rand(0,255),Rand(0,255) ;Draw a random line Line Rand(0,800), Rand(0,600), Rand(0,800), Rand(0,600) ;Slow it down Delay(25) Wend
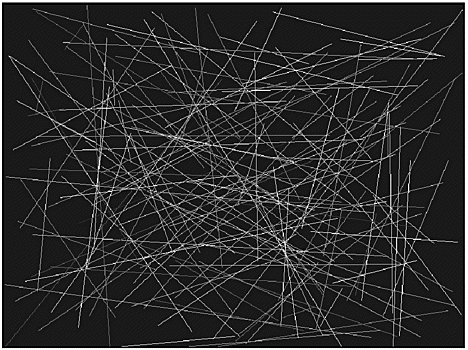
Figure 6.5 shows the output of this program. This program only draws to the front buffer. There is no reason why it should use page flipping, because it does not rely on animation.
Figure 6.5. The demo06-02.bb program.
NOTE
Because FrontBuffer() is default, omitting the line
SetBuffer FrontBuffer()
will change nothingthe program will still draw on the front buffer.
BackBuffer()
Using BackBuffer() is a little different. For starters, to set up the back buffer, you change the call to SetBuffer to:
SetBuffer BackBuffer()
NOTE
CAUTION
Be careful where you place the Flip command. Flip should always be placed near the end of the program. In the following example, you can see that Flip is located just after the DrawImage function. The reason for this is that if you have the Flip state ment occur before drawing the image, your program will always flip the blank animation onto the screen. Because Cls is used at the beginning of every loop, your frame will delete the spaceship image from the previ ous frame and have nothing in the back buffer when the next flip com mand arises. Of course, this problem can be easily solved by placing the DrawImage command near the top of your loop.
This will force the program to only draw on the back buffer.
When you have SetBuffer set to BackBuffer() , everything you draw will be offscreen . This means that whatever you just drew (in this example, the random line) will be invisible. This is the basis of page flipping; now, all you have to do is get that buffer to flip with the front buffer. To do this, use the Flip command. Flip looks like this:
Flip
This statement is very powerfulit exchanges all the data in the back buffer with all of the data in the front buffer.
Now, let's go back to demo06-01.bb in this chapterthe program with the badly animated ship. This program runs poorly because there is no page flipping; hence, no smooth animation. To fix this problem, we will first put in the flip command near the bottom of the loop. The new, fixed version of the game is named demo06-03.bb, and it is located on the CD. Following is the game loop from the game.
While Not KeyDown(1) ;Clear the screen ;move ship left and right ship\x = ship\x + Rand(-8,8) ;Move ship up And down ship\y = ship\y + Rand(-8,8) ;If ship goes off screen, move it back on If ship\x < 0 ship\x = 15 ElseIf ship\x > 800 ship\x = 790 ElseIf ship\y < 0 ship\y = 10 ElseIf ship\y >600 ship\y = 590 EndIf ;Draw the ship DrawImage(shipimage,ship\x,ship\y) Flip Wend
Wow, looks pretty cool, huh? Figure 6.6 shows a screenshot from the program. Let's go through the loop and see how everything works.
Figure 6.6. The demo06-03.bb program.
The first line after the opening test is
Cls ;Clear the screen
This is a very important part of a page-flipping program. Basically, it just clears the screen of anything that was drawn on it in previous frames. It may seem unnecessary, but if you don't include it, the game will look like Figure 6.7.
Figure 6.7. Demo06-03.bb without Cls .
As you can see, without Cls , trails of the spaceship are very obvious. The Cls forces all of these trails to be deleted at the beginning of every frame, so it looks like the spaceship is actually moving. Figure 6.7 shows how the previous program would look without Cls .
Just for kicks, you may want to change the color of the background. You can do that using the command ClsColor , from the previous chapter .
So, that's a basic overview of page flipping. Now, let's move on to working with image buffers.
Image Buffers
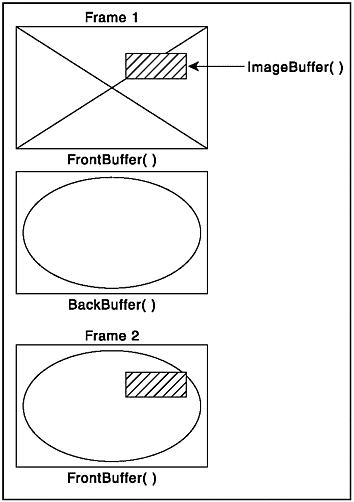
Image buffers are really cool to use, but kind of hard to understand. Say that you have a painting somewhere in your game, and you want your player to be able to paint on the painting. Well, using image buffers, you can simply have him draw on the painting, and the image will show up! Because the painting needs no flipping, the image buffer is just drawn on top of the entire image. It's kind of like a separate layerthe front buffer is drawn underneath it. See Figure 6.8 for an example.
Figure 6.8. Image buffers as layers .
You might also use an image buffer in a space simulator. On many space simulators, you have a mini map in the HUD. A mini map is just a small version of the entire playing field that shows where the enemies and power-ups are. Using an image buffer would be a good way to draw the mini map and plaster it on top of the HUD display.
There are two ways to use an image buffer. The first way is to take an image you already have and load it into the image buffer using LoadImage() . This allows you to draw on top of a pre-made image. The other way to do this is to create a blank image. Let's start with that.
CreateImage
When you create an image, you are just making a blank image. The image can be any size; it is not constrained to the size of the back buffer.
The declaration of CreateImage is
CreateImage(width,height,[frames])
NOTE
Why Do We Use Parentheses?
You may have noticed that on some functions we use parentheses around the parameters, and on others we don't. There is a pretty simple reason for this. Parentheses are required when the function returns a value. When the function does not return a value, the parentheses are optional. For example, LoadImage() requires parentheses because it returns the address of the loaded image like this:
image = LoadImage("image.bmp") whereas Text doesn't require parentheses at all:
Text 0,0, "No parentheses!"
When you write functions, it is always good practice to include parentheses, even if they aren't required.
NOTE
Refresher : Optional Parameters
You might have forgotten what an optional parameter is. An optional parameter is surrounded by brackets in the function definition and is not required. This means that you do not need to put any values in for it in your programit already has a default value. For example, in CreateImage , the default value for [frames] is 0. You can change it if you want, but you aren't required to.
See Table 6.2 for an explanation of the parameters. The CreateImage function returns the created image, so it must be set equal to an image handle. It might look something like this:
Table 6.2. CreateImage()'s Parameters
| Parameter | Description |
|---|---|
| width | The width in pixels of the created image |
| height | The height in pixels of the created image |
| [frames] | Optional, the number of frames in the created image, leave blank for now |
wallimg = CreateImage(200,200)
Okay, you now have a blank image. Right now, it is just pure black. So, let's put something in it.
The first thing we have to do is switch the buffer to the image buffer. How do we do this? Simple! Just use SetBuffer .
SetBuffer ImageBuffer(wallimg)
We have now selected the image. Let's draw a white square in it (RGB 255,255,255).
Color 255,255,255 Rect 0,0,200,200,1
Look closely at the call to Rect . Rect , if you recall, draws a rectangle using the coordinates you feed it. The top-left corner of the rectangle is located at the coordinate position given by the first two parameters, and the bottom-right corner of the rectangle is located at the coordinate position given by the third and fourth parameters. The final parameters define whether the rectangle is solid or unfilled. Since the call in the previous snippet draws a rectangle from (0,0) to (200,200), you probably expect it to draw a white box from the top-left corner of the program to (200,200); that is, the top-left corner of the screen. However, the image buffer is selected into memory because of the preceding call to SetBuffer ImageBuffer() instead of the front buffer. What actually happens is that the image buffer, instead of the front buffer, is being drawn on. Therefore, the rectangle is drawn onto the image buffer, which is offscreen. The size of the image buffer is 200 pixels x 200 pixels. (We chose this size above when we called CreateImage() .) Because it is 200x200, the entire square will be filled. If you don't quite understand what is going on, take a look at Figure 6.9.
Figure 6.9. Image buffers in memory.
NOTE
You may be wondering why we switched back to the front buffer. The fact is that if we didn't switch back, we would continue drawing on the image buffer. Any new text or shapes would be confined to the small 200x200 pixel box allocated for the image buffer. And guess what happens when we try to draw an image buffer on to itself? You guessed itabsolutely nothing!
If you remember from the previous section, to draw in a different color, you must first use the Color function. Here, the Color function sets the default color to white, and the Rect function draws in that color.
Next, we must set the program's selected buffer back to the front buffer. This is easily accomplished using SetBuffer .
SetBuffer FrontBuffer()
Remember, the three choices for SetBuffer are FrontBuffer() , BackBuffer() , and ImageBuffer() .
Alright, now we are back into the front buffer. To finish off the program, we have to draw the image buffer onto the main program. For this, we use the function DrawImage . If you remember, DrawImage is defined like this:
DrawImage handle,x,y,[frame]
See Table 5.5 from the preceding chapter for a description of the parameters. Here, all you have to do is plug in the handle ( wallimg ), and the x and y values. It looks like this:
DrawImage wallimg, 400,300
Pretty simple, huh? Take a look at the entire program (with comments). It's also on the CD as demo06-04.bb.
;;;;;;;;;;;;;;;;;; ;GPFK06-04.bb ;By Maneesh Sethi ;Demonstrates CreateImage ;No Input Parameters Required ;;;;;;;;;;;;;;;;;; ;Set up graphics mode Graphics 800,600 ;Set automidhandle to true AutoMidHandle True ;create the blank image wallimg = CreateImage(200,200) ;set the buffer to the image SetBuffer ImageBuffer(wallimg) ;make the color white Color 255,255,255 ;draw a rectangle from topleft to bottomright of buffer Rect 0,0,200,200 ;switch back to front buffer SetBuffer FrontBuffer() ;draw the image buffer DrawImage wallimg,400,300 ;wait for user To press a key Before exiting WaitKey
NOTE
TIP
Remember to comment your code often. It really helps you and others understand what you are trying to do. When you forget to comment your code, you will often forget what you were writing about. Refer back to Chapter 4 for more tips on com ments and style.
Looks pretty cool, huh? Figure 6.10 is a screenshot from the program. Let's go over a few things. I first start off with the graphics initialization. Next, I called AutoMidHandle with the parameter true . If you remember, AutoMidHandle centers the images onscreen, so you don't have to do it manually. Think about itif it weren't for AutoMidHandle , you would have to manually find the centering points! For a good exercise, try to find an equation that will help you find those centering points.
Figure 6.10. The demo06-04.bb program.

Next up, we called SetBuffer and started drawing on the image buffer. We set the color to white and drew a rectangle. Then we switched back to the front buffer. Finally, we drew the image on the front buffer so everyone can see it. WaitKey waits for the user to press a button so he can see the beauty that is a white box before the program closes .
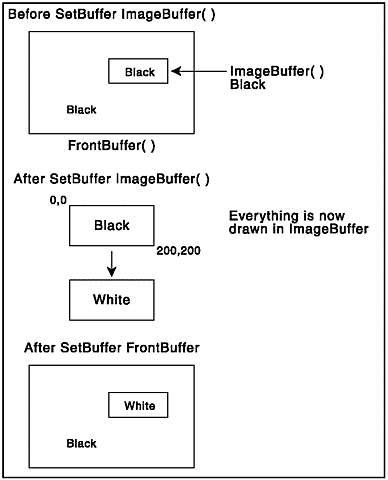
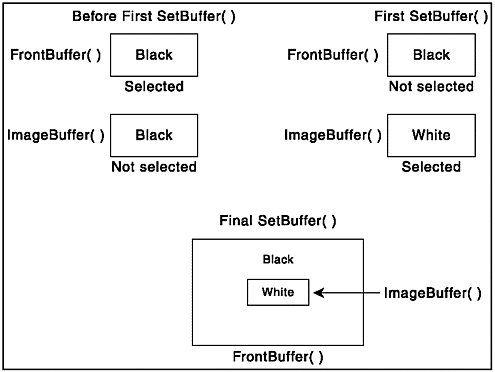
Some of this stuff may be getting tough to understand. See Figure 6.11 for a visual picture. As you can see, there are three checkpointsbefore the first SetBuffer , before the second SetBuffer , and at the end of the program. At the first point, the front buffer is selected and the blank image buffer is not visible. At the second point, the image buffer is selected and filled with the white rectangle and the front buffer is deselected. At the final checkpoint, the image buffer has been drawn onto the selected front buffer.
Figure 6.11. A diagram of demo06-04.bb.
Whew, that was a big section on image buffers, and we ain't done yet. The next chapter will teach you how to use image buffers in an even cooler fashion. (I'll give you a hint: it will show you parallaxing . When a word sounds like that, it must be cool.)
Before we move on, let's do some other stuff with these buffers.
SaveBuffer
Ever heard of screenshots? Well, screenshots are snapshots taken of a game during runtime. In other words, you are able to save a photo of what the game is displaying. SaveBuffer() was made for thiscall it and it takes and saves a photo of whatever is going on the screen.
The definition of SaveBuffer() is pretty much what you would expect:
SaveBuffer (buffer,filename$)
Table 6.3 has a description of each of the parameters. Basically, buffer is the buffer that you want to be saved, and filename$ is the filename of the saved image. Filename$ is usually a .bmp file.
Table 6.3. SaveBuffer()'s Parameters
| Parameter | Description |
|---|---|
| buffer | The buffer you want saved to the hard drive |
| filename$ | The filename of the bitmap file |
Your choice of inputs for buffer are limitedyou can only select FrontBuffer() , BackBuffer() , or ImageBuffer(buffer, [frame]) . This allows you to pick which image you want saved, so, if you had an image buffer as a painting on a wall, the player could save just the painting rather than the whole wall. Cool, huh? For example, try this: Add the line
SaveBuffer (FrontBuffer(), "screenshot1.bmp")
before the DrawImage command, and the line
SaveBuffer (FrontBuffer(), "screenshot2.bmp")
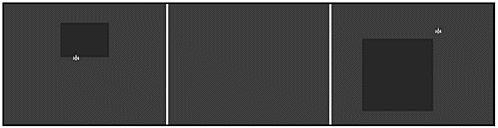
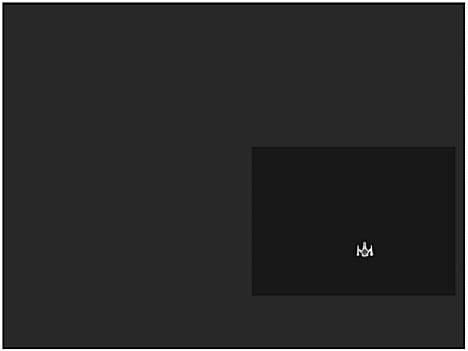
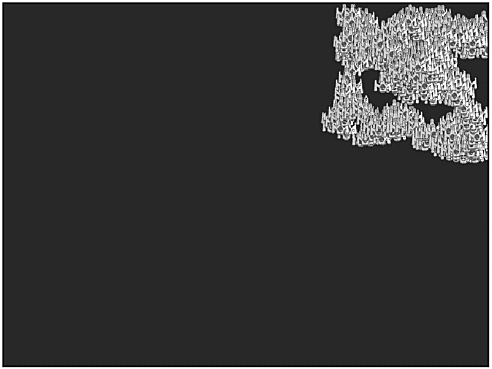
after the DrawImage command in demo06-04.bb. See Figures 6.12 and 6.13. Notice the difference? Because the buffer is still blank before DrawImage , screenshot1.bmp is just blank. However, in the second screenshot, the white box has been drawn. Therefore, you see the white box inside and the black outside.
Figure 6.12. SaveBuffer() before DrawImage .

Figure 6.13. SaveBuffer() after DrawImage .

Try messing around with the parameters of SaveBuffer() to see how the buffers look at different points in the program.
Okay, so let's use this function in a program. This is on the CD as demo06-05.bb. Let's take a program that draws random squares on the page. Pressing the F10 button will take a screenshot. Ready?
;demo06-05.bb - Demonstrates the usage of SaveBuffer Graphics 800,600 ;Seed the Random Generator SeedRnd (MilliSecs()) ;68 is keycode for f10 Const f10key = 68 ;Screenshot number, begin at one (it is an integer) snnum = "1" While Not KeyDown(1) ;Set up random color Color Rand(0,255),Rand(0,255),Rand(0,255) ;Draw a random rectangle Rect Rand(0,800),Rand(0,600),Rand(0,200),Rand(0,200),Rand(0,1) ;Wait a couple of second Delay 45 ;If user presses f10, take a screenshot If KeyHit(f10key) SaveBuffer(FrontBuffer(), "screenshot" + snnum + ".bmp") snnum = snnum + 1 ;Add 1 to the end of the filename EndIf Wend
NOTE
CAUTION
If you try to run this program off the CD, you will get an error when you take a screenshot. This is because it is impossible to write to a CD, so saving a screen- shot can't be done. If you want to try out this program, make sure you save it to your hard drive first.
Figure 6.14 is a screenshot from the program. Let's quickly review it.
Figure 6.14. The demo06-05.bb program.
We first start with an initialization. The constant f10key is set to the key code for the F10 key. We then set the variable snnum to 1 to symbolize the screenshot.
Inside the loop, we call Color and Rect to draw a random rectangle with a random color. The screenshot code appears next, following the If statement. The If statement checks if the F10 key has been hit. If so, it takes a screenshot.
The first line in the If control loop is SaveImage() . As you can see, this line takes a screen-shot of the front buffer. The string command works easily also: it makes the filename screenshot number .bmp , where number is the only part that changes. The next line adds on 1 to the end of the string, snnum$ .
Well, there you have it! Screenshots are really fun to use, and not only can they be used for taking pictures of the screen, but they can also be used for debugging. Say you are not sure what one of your image buffers looks like at one point in your program. Using SaveBuffer() , you can easily save the image and see what it looks like at that specific point in time!
Now we are going to move on to the exact opposite of SaveBuffer() LoadBuffer() .
LoadBuffer ()
LoadBuffer() has a multitude of uses. With LoadBuffer() , you can load a previously saved image back onto your program. Of course, the image can be anything; it doesn't have to have been saved by the same program.
LoadBuffer() is a lot like LoadImage() , except for one difference. With LoadImage , you load the image into a handle that you can assign around in the program, but with LoadBuffer() , you load the image directly onto a buffer. Because of this fact, LoadBuffer() is usually used to load a title screen. However, it can also be used to make a slideshow projector, or something like that.
LoadBuffer() is defined like this:
LoadBuffer (buffer, filename$)
Where buffer is the buffer you want the image loaded upon and filename$ is the name of the file you want opened. Table 6.4 also has a handy quick reference of the parameters.
Table 6.4. LoadBuffer's Parameters
| Parameter | Description |
|---|---|
| buffer | The buffer to which you will load the image |
| filename$ | The name of the file that will be loaded |
NOTE
While running this program, you may notice that the files load a bit slow. This is because it has to read the image buffers off the disk. A good exercise would be to read these buffers off the disk before beginning the slideshow in order to reduce time between slides. Try it!
Let's write a program that opens up all the screenshots provided by the previous listing (the SaveBuffer() example with the random rectangles), given that the files are in the same directory.
We will start with the initialization section from demo06-06.bb on the CD.
;demo06-06.bb - A slideshow of images ;Set up graphics Graphics 800,600 ;Set up counter for loading images snnum = 1 ;Grab images from center AutoMidHandle True
This just creates the variable snnum with 1 and sets up initialization mode.
Next, we enter the main loop. This part gets kind of tough, so let's take it slow.
;As long as another image exists, load it and display it ;Since we are loading it to the front buffer, it will be automatically displayed While (LoadBuffer(FrontBuffer(),"screenshot" + snnum + ".bmp") <>0) ;Write out the name of it Text 400,300,"Image screenshot" + snnum + ".bmp" ;Move to next image snnum = snnum + 1 WaitKey Wend
The test may look weird, but it's not that difficult. Remember that LoadBuffer() (and most other image functions) returns 0 if the image is illegal, and returns 1 if the image is legal. So, in this line, we are testing to see if this LoadBuffer() statement is legal. The first time through, it tries to load "screenshot1.bmp" to the screen. If that works, then the loop does not equal zero and continues through the loop so it can be displayed on the screen. If "screenshot1.bmp" is illegal, then the loop is skipped and the ending procedure is run.
The rest of the loop is pretty standard. It first displays some text stating the name of the image, and then the filename is updated. Finally, WaitKey is called so the user can choose when to switch to the next slide.
We have one last function to go over. Here we go!
FreeImage
FreeImage releases any image from memory. Simply put, whenever you load an image into your program, you are removing its value as a variable name. For example, you may load an image called skeletonimage . Well, say the game uses levels, and after you get to the second level, the skeletons look different. You can free skeletonimage and use that variable name for the new skeletons.
The declaration of FreeImage is
FreeImage handle
See Table 6.5 for a description of its parameter. FreeImage releases the memory that is used for the image. This can add speed and memory to your game.
Table 6.5. FreeImage's Parameter
| Parameter | Description |
|---|---|
| handle | The variable name of the image you wish to free |
Using FreeImage is very easy; just call it after you are done with an image. I'll show you the basics of it next. Say you have a bunch of images loaded, like this.
image1 = LoadImage ("image1.bmp") image2 = LoadImage ("image2.bmp") image3 = LoadImage ("image3.bmp) Well, when you finish with them, throw them away. So, say image1 is a title screen. You might do something like this:
;Display Title screen DrawImage 0,0,image1 FreeImage image1
Seems easy. Now if image2 and image3 are used until the end of the program, don't forget to free them.
While Not KeyDown(1) ... Wend FreeImage image3 FreeImage image2
So, even though it is the end of the program, I still release the final two images. Notice that I released them in the reverse order that I loaded them in. This is just a personal taste on my part; it doesn't really make a difference in what order you release images.
By the way, you should probably note that it isn't always necessary to use this function. If you never need to use the variable name, and you aren't worried too much about the speed and memory of your game, you might not need to use it. However, using it is very good style, and it is always good to brush up on your housekeeping skills. You never know when this function might keep your program running!
| [ LiB ] |
EAN: 2147483647
Pages: 94
If you may any questions please contact us: flylib@qtcs.net