Images
| [ LiB ] |
Whew, that was one big graphics call! Let's get into more specialized graphics stuff. This section will explain how to load an image, how to draw it onscreen, and the like. Are you ready?
LoadImage
The first call we will be using is LoadImage . This function loads the image of your choice into your program's memory. You must load an image before you can display it or manipulate it in your program. LoadImage is defined as this:
LoadImage(filename$)
Table 5.4 examines LoadImage's parameter. To load an image, just put the filename of the image in for filename$ (make sure the filename is in quotes), and assign it to a variable, like this:
Table 5.4. LoadImage's Parameter
| Parameter | Description |
|---|---|
| filename$ | The path of the image |
Global playerimage = LoadImage("playerimage.bmp") NOTE
Why .bmp?
Unfortunately, the demo version of Blitz Basic only allows you to use bitmap files for image processing. This means that you can't just open some image off your computer and use it, unless it has a .bmp extension. However, there is a simple way around this problem. Just take the jpeg, gif, or png file, and open it in Microsoft Paint or in Paint Shop Pro (which is included on the CD). Then, open the file, click Save As, and convert to a bitmap!
NOTE
Check out what I set the filename variable as. Making the filename just the name of the file (without adding any path info ) will only work if the image is in the same directory as the game. If not, you may need to include your drive information. It might look something like this:
Playerimage = LoadImage("c:\windows\desktop\playerimage.bmp") Even so, I suggest you keep all of your images in the same folder as the game because if you ever decide to distribute your game, the game won't work on other computers unless the user puts the images in the EXACT same folder as yours.
I usually name my image variable in such a way that I can easily see that it's an image. This means I begin my image names with its actual job (player in playerimage.bmp) and suffix it with "image."
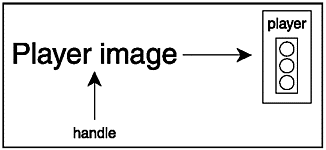
The name that you assign to the loaded image is called a handle. Basically, a handle is just an identifier that refers to an image in memory, like in Figure 5.7.
Figure 5.7. A handle to an image in memory.
Okay, now that we've got this LoadImage stuff down, its time to actually draw it!
DrawImage
It is pretty easy to guess what this function does: it draws images! Table 5.5 examines each parameter. Let's start off with the declaration.
Table 5.5. DrawImage's Parameters
| Name | Description |
|---|---|
| handle | The variable which holds the image |
| x | The drawn image's x coordinate |
| y | The drawn image's y coordinate |
| [frame] | Advanced, leave as 0 |
DrawImage handle,x,y,[frame]
DrawImage has a couple of parameters, so let's move on to a discussion of the handle variables .
Handle
This is a pretty easy-to-understand parameter. Remember when you loaded an image like this?
playerimage = LoadImage("player.bmp") Well, the handle is playerimage . So, when sending parameters to DrawImage , use the image handle as the DrawImage handle.
X and Y
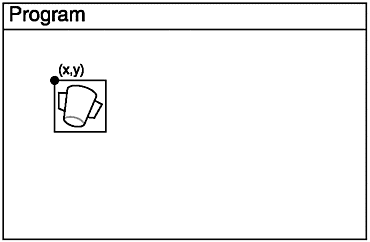
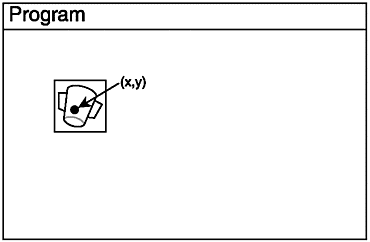
The x and y parameters work just like most x and y coordinates in Blitz Basic. Using DrawImage , your selected image is drawn at the x and y coordinates, as shown in Figure 5.8. Its top-left corner is located at the given x and y values. However, there is a way to center the image so that the image's center is located at x,y.
Figure 5.8. The image at x,y.
Very often, you will want to center the image. This is most useful when rotating images because rotating images around the top-left corner looks bad (not to mention trippy ) due to the fact that you would expect images to rotate around their center. Check out demo05-01.exe to see how an image looks when it is rotated around the top-left corner.
NOTE
What does "" mean? means "or." When I say AutoMidHandle truefalse , I mean AutoMidHandle can use either true or false .
Although actual rotation is a more advanced technique and will be explained in a later chapter, I am using it to illustrate the use of placing the x and y values in the center of the image. The actual function is called AutoMidHandle and is declared like this:
AutoMidHandle truefalse
To use this function and place the x and y values in the center of the image, call AutoMidHandle with the parameter true , like this:
AutoMidHandle true
Easy, huh? And to set the x and y location back to the top left, just call AutoMidHandle , like this:
AutoMidHandle false
Table 5.6 details the parameters, and Figure 5.9 shows how demo05-02.bb, which uses AutoMidHandle true, works. Look at the difference between Figures 5.8 and 5.9. In 5.8, you can see how the x and y coordinates are located at the top-left corner of the image. On 5.9, the x and y coordinates are in the center of the image. Try running demo05-02.bb and watch how it rotates from the center instead of from the left corner, as in demo05-01.bb.
Table 5.6. AutoMidHandle's Parameters
| Name | Description |
|---|---|
| true | Places the x and y coordinates in the center of the image. |
| false | Places the coordinates at the top-left corner of the image. |
Figure 5.9. The image at x,y with AutoMidHandle set to true .
Make absolutely sure that you place AutoMidHandle True before you load the image, otherwise the function won't work.
By the way, there is another function called MidHandle that is a lot like AutoMidHandle , except that it doesn't set the x and y coordinates to the center of all of the images. It only sets the x and y coordinates to the center of an image you choose. It is declared like this:
MidHandle image
The image handle you pass it will be reset to the center of the image. Use this if you only want one image handle to be in the center of the image, rather than all of them.
[Frame]
Okay, this command is very advanced. [Frame] allows you to draw images that are animated. It is unimportant right now, but we will be going over using animated images very soon!
CreateImage
This function is pretty cool. It allows you to create an image that looks like whatever you want, and use it just like a loaded image. For example, say you wanted to create an image with 100 dots on it. First, call the CreateImage function, which has a declaration like this:
CreateImage(width, height, [frames])
Width and height explain how big the image is; [frame] is used with animated images and should be set to 0 for now. To create the image, call CreateImage like this:
dotfieldimage = CreateImage(100,100,0)
Okay, you now have the handle to the image. Now, you have to populate the field with dots. The following is the full source for the program, which can also be found on the CD as demo05-03.bb:
;;;;;;;;;;;;;;;;;;;;;;;;;;;;;;;;;;; ; demo05-03.bb;;;;;;;;;;;;;;;;;;;;; ; By Maneesh Sethi;;;;;;;;;;;;;;;;; ; Creates an image and displays it! ; No input parameters required;;;;; ;;;;;;;;;;;;;;;;;;;;;;;;;;;;;;;;;;; ;INITIALIZATION ;Set up the graphics Graphics 640,480 ;Seed the Random Generator SeedRnd MilliSecs() ;CONSTANTS ;The length of each block Const LENGTH = 100 ;The height of each block Const HEIGHT = 100 ;The amount of dots in each block Const DOTS = 100 ;END CONSTANTS ;IMAGES ;Create the dotfield image dotfieldimage = CreateImage(LENGTH,HEIGHT) ;END IMAGES ;For each dot, draw a random dot at a random location For loop = 0 To DOTS ;For every star ;draw only on created image SetBuffer ImageBuffer(dotfieldimage) ;Plot the dot Plot Rnd(LENGTH), Rnd(HEIGHT) Next ;Set buffer back to normal SetBuffer FrontBuffer() ;END INITIALIZATION ;MAIN LOOP ;Tile the image until the user quits (presses ESC) While (Not KeyDown(1)) TileImage dotfieldimage Wend ;END MAIN LOOP
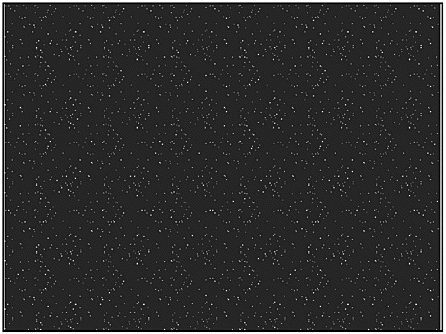
Figure 5.10 shows the created dot field.
Figure 5.10. The dot field.
There are a few new functions introduced in this program, and I'll go over them now. The first new function is ImageBuffer() .
ImageBuffer() acts a lot like BackBuffer() . You will learn how BackBuffer() allows you to draw on the back buffer instead of the front buffer, so that you can flip the buffers and create animation. Well, ImageBuffer() is just like BackBuffer() , but instead of drawing on a buffer, you are drawing on an image. ImageBuffer() is declared as this:
ImageBuffer(handle, [frame])
where handle is the handle of the selected image and [frame] is the chosen frame to draw on (leave as 0 for now). Drawing on an image buffer is a lot like Figure 5.11. As you can see, calling SetBuffer ImageBuffer(dotfieldimage) allows you to extract the image from the program and only draw on that. Then, when you finish, you call the SetBuffer function again. In this program, I used SetBuffer FrontBuffer() , only because there is no page flipping; however, in most games use SetBuffer BackBuffer() . Table 5.7 details ImageBuffer 's parameters.
Figure 5.11. SetBuffer ImageBuffer() .
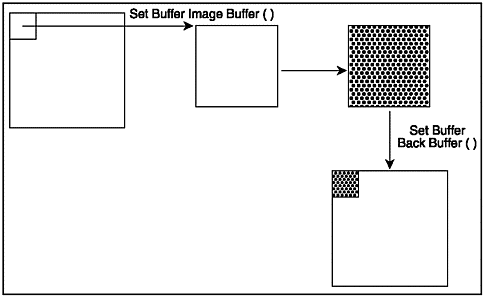
Table 5.7. ImageBuffer's Parameters
| Name | Description |
|---|---|
| handle | The handle of the selected image |
| [frame] | The chosen frame to draw on, leave as 0 for now |
The next function introduced is TileImage() . TileImage() is declared like this:
TileImage handle, [x], [y], [frame]
TileImage works like this: it takes an image you give it, and it places copies of it all across the programming board. Think of it like a chess boardthere are only two images on a chessboard, black and white. But these two images are tiled over and over until the entire board is filled with black and white tiles. See Figure 5.12 for a visual aid to tiling, and Table 5.8 for a list of each parameter.
Figure 5.12. The TileImage function.
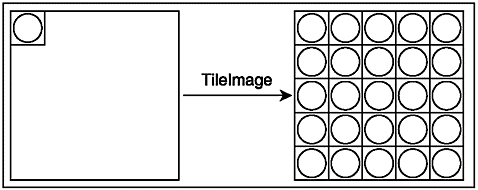
Table 5.8. TileImage's Parameters
| Name | Description |
|---|---|
| handle | The image you wish to tile |
| [x] | The starting x coordinate of the tiled image; 0 by default |
| [y] | The starting y coordinate of the tiled image; 0 by default |
| [frame] | The chosen frame to tile; 0 by default |
To tile an image, call TileImage with the handle of an image you wish to tile. Blitz Basic will take care of the rest. By the way, in later chapters, you will learn how to move the tiled field up and down to simulate movement.
MaskImage
Alright, the next function I want to go over is called MaskImage() . MaskImage() is defined like this.
MaskImage handle, red, green, blue
MaskImage() allows you to define a color of your image as transparent. What does that mean? Let me show you.
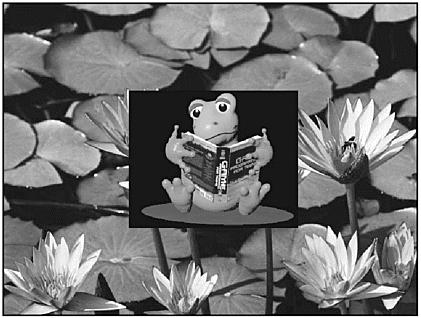
When you draw or create an image, you always have a border that is not part of the image. See Figure 5.13 for a description of the border. As you can see, the outer part of the image is not used, and should be discarded. You don't want the border to be shown, like in Figure 5.14, do you?
Figure 5.13. An unmasked image.
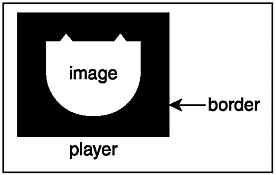
Figure 5.14. A drawn image with border.
NOTE
Because black is automatically masked by default, the image in Figure 5.14 does not have a purely black border. I added a tiny amount of blue to the image so that the background wouldn't be masked. The RGB value of this image's background is 0,0,10.
Calling MaskImage() can get rid of that border for you. Table 5.9 explains each parameter. Because the RGB value of this background is 0,0,10, call the MaskImage() function with the correct parameters.
Table 5.9. MaskImage Parameters
| Name | Description |
|---|---|
| handle | The image you wish to mask |
| red | The red value of the mask |
| green | The green value of the mask |
| blue | The blue value of the mask |
The full program is detailed next: ;;;;;;;;;;;;;;;;;;;;;; ;demo05-05.bb ;By Maneesh Sethi ;Demonstrates the use of masking ;No Input Parameters required ;;;;;;;;;;;;;;;;;;;;;; ;Initialize graphics Graphics 640,480 ;Load Background lilliesimage = LoadImage("lillies.bmp") ;Draw background DrawImage lilliesimage,0,0 ;Load the frog frogimage = LoadImage("frog.bmp") ;Center the frog MidHandle frogimage ;Mask the Frog Image MaskImage frogimage,0,0,10 ;Draw it in the center DrawImage frogimage,320,240 ;Wait for user to press a button WaitKey Figure 5.15 is a picture of this program. Beautiful, isn't it? It looks as if the frog is actually part of the image! On the CD, Demo05-04.bb is a program without masking, and demo05-05.bb is the same program with masking.
Figure 5.15. An image drawn with a mask.
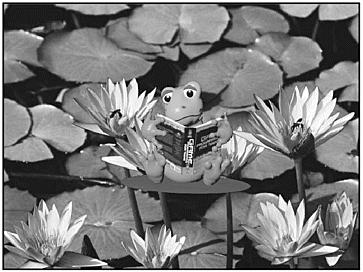
One thing to note: an RGB value of 0,0,0 is default. 0,0,0 is the color of black. This means that if your image is drawn with a black border, it will automatically be masked. In other words, try to make all your images have a black background so you don't need to worry about masking images.
| [ LiB ] |
EAN: 2147483647
Pages: 94
If you may any questions please contact us: flylib@qtcs.net