| Painting with brushes is another way to create digital imagery from scratch, and Photoshop gives you amazing flexibility in its Brush tool. Basic Brush Settings You've got a few ways to view brushes in Photoshop. Let's start with the simplest view containing the fewest options. When you click the Brush tool  in the toolbox, you'll notice that the Options bar changes to reflect the current tool's available settings. in the toolbox, you'll notice that the Options bar changes to reflect the current tool's available settings. Figure 4.30. The Brush tool options. 
By exploring these options, you'll find the most basic settings that can be applied to a brush: tip To change brush sizes quickly as you paint, press the left and right bracket keys. Press the [ key to reduce the brush size and the ] key to increase it. The increment of change depends on the brush size. A brush size between 0 and 100 pixels will change by 10-pixel increments each time you use this shortcut. A brush between 100 and 200 pixels will change by 25 pixels; a brush between 200 and 300 pixels will change by 50 pixels; and a brush between 300 and 2500 pixels will change by 100 pixels.
Master Diameter This setting controls the size of the brush. Enter a value in pixels or drag the slider to change the setting. Hardness This setting controls the size of the brush's hard center, or crispness. It is expressed as a percentage of the total brush size. Setting the hardness to 100 percent means that the brush's hard center extends out to the full width of the brushthe edge will be crisp. At 50 percent, the center (50 percent) of the brush is hard and the remaining portion (50 percent) becomes softer toward the edge of the brush. Mode This setting controls how the current brush affects the pixels in your image, like the Blend Modes you've used in the Layers palette. Opacity This setting controls the opacity of the brush. At 100 percent, the brush will be applied at full opacity. Anything less, and you'll begin to see through the brushstrokes. Flow Flow determines how quickly the brush applies paint. A lower setting produces a lighter stroke. Airbrush The Airbrush button  allows you to apply gradual tones to an image, simulating traditional airbrush techniques. allows you to apply gradual tones to an image, simulating traditional airbrush techniques.
Advanced Brushes Palette Here's where we get into the meat of Photoshop's powerful brush engine. The advanced Brushes palette contains the options for re-creating traditional media brushes as well as options that allow you to generate random textures and designs quickly. This is the palette in which you'll be spending most of your time when doing advanced painting in Photoshop. Starting from the top, let's work our way down the palette and see what each option can do for us. Brush Tip Shape You've already seen what the Diameter and Hardness settings can do. This view offers even more options regarding the tip of the brush. Angle and Roundness Angle specifies the angle at which the brush is applied to the canvas. Roundness specifies the elliptical shape of the brushfrom a perfect circle to a thin oval. Use these settings together to produce calligraphy-like effects with a round brush. Figure 4.31. With an Angle of 37 degrees and a Roundness of 36 percent, the brush is a narrow, slanted oval and will produce a calligraphic stroke. 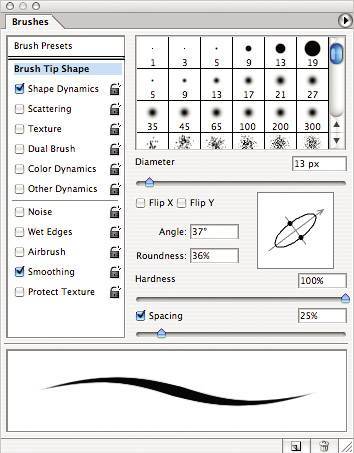
Spacing Spacing determines how closely the Brush tool spaces each brush mark. A small value produces very tight spaces between brush marks. A high setting makes the brush appear to skip as you paint. Shape Dynamics The Shape Dynamics section controls three aspects of the brush stroke appearance: size, rotation, and perspective. The variations for each parameter are specified with sliders. You'll see the word jitter used throughout the Brushes palette. Essentially, Adobe uses this term within certain brush settings to determine variation in the individual instances of the brush's tip. Think of it as the maximum range of allowable values. Jitter-based settings allow you to achieve random effects with brushes, as they produce different results each time. Scattering Scattering spreads copies of the brush tip's shape along the path of a stroke. Texture The Texture setting in the Brushes palette uses a pattern to make strokes appear as if they were painted on a textured canvas. Dual Brush The Dual Brush option adds another brush tip to the one selected as the Brush Tip Shape. The second tip is overlaid using the Blend Mode at the top of the Dual Brush section of the Brushes palette. This section is a cross between the Brush Tip Shape and Scattering sections. In addition to selecting the second brush tip and Blend Mode, you adjust the second tip for diameter, spacing, scattering, and count. Count refers to the number of times the second brush tip appears in each stroke of the initial brush tip. Color Dynamics The Color Dynamics section hosts more settings that really let you save time and randomize your brushes. Color Dynamics looks at the current foreground and background colors (set in the toolbox) and interprets colors between them based on the settings in this section. It then applies those colors randomly to each instance of the brush tip that is applied to the canvas. Other Dynamics Other Dynamics contains settings only for opacity jitter and flow jitter. These two settings operate just like the opacity and flow settings discussed earlier, but the added jitter lets you vary the application of them.
The various Control drop-down menus let you specify how you'd like to control the variation of certain elements of brushes. You can choose not to control, fade, or vary a brush based on Pen Pressure, Pen Tilt, and so on. Figure 4.32. These controls are available if you're using a pressure-sensitive drawing tablet. 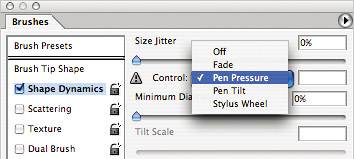
Pen controls are available only when you're using a pressure-sensitive digital drawing tablet rather than your mouse. A warning icon appears if you select a pen control but have not installed a tablet. Custom Brushes Custom brushes are a great way to enhance your creative painting options in Photoshop. They let you go beyond what Photoshop has provided and create a brush tip shape out of nearly any object you can imagine. Figure 4.33. Another stunner by Bert Monroy. In this Photoshop painting, the leaves were created using a customized brush tip and settings. 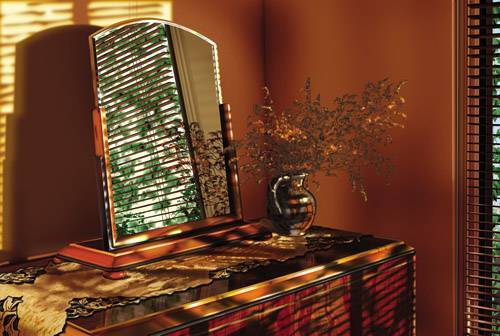
To create a new brush tip, use any selection tool to select the area of an image you'd like to use as a brush. Once it's selected, choose Edit > Define Brush Preset. Your new brush will now appear in the brush tip presets seen in the Brushes palette discussed previously. Saving your brushes to your computer is similar to saving the contents of any other preset in Photoshop. Once you have the custom brushes you've created in the Brushes palette, just expand the options menu at the right of the palette and select Save Brushes. Name the file accordingly, and your brushes can now be backed up and reloaded should you ever clear your current brushes or if Photoshop crashes and deletes the current settings. Saving your Brush tool presets is slightly different from saving the actual brush tips. Suppose you've created a complex brush preset using the advanced Brushes palette. You've got it just the way you want, but you realize it's time to create another brush preset. What do you do? You don't want to lose those settings and have to re-create them. Writing them down hardly seems like a good alternative. Never fear; Tool Presets to the rescue! To begin, create the brush you'd like to save, then open the Tool Presets palette (Window > Tool Presets). Choose New Tool Preset from the fly-out options menu. Give it a meaningful name, and you're set. Just as with brushes, you can save these Tool Presets. |