Shapes
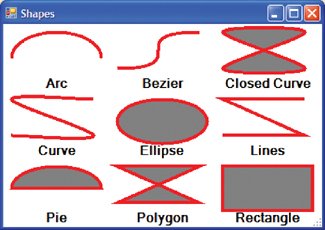
| Now that you know how to frame and fill shapes with pens and brushes, you might be interested in the shapes themselves. Figure 5.16 shows what's available. Figure 5.16. The Basic Shapes (See Plate 11) The edges of all the shapes in Figure 5.16 were rendered by one of several DrawXxx functions implemented by the Graphics object, including DrawArc and DrawEllipse. The shapes that can be filled were rendered using an appropriate FillXxx function, such as FillEllipse and FillPie. Not all shapes can be filled, because not all of them are closed shapes; for example, there is no FillCurve. However, all the open shapes (except the Bezier) have closed-shape equivalents; for example, a filled arc is called a pie. You could draw the Lines shape using multiple calls to DrawLine, but it turns out to be simpler to use DrawLines; this helper method can draw multiple lines at once, as the plural name suggests. DrawRectangle and DrawBezier have equivalent helpers: DrawRectangles and DrawBeziers, respectively. In addition to being convenient, these helpers handle the appropriate mitering at intersections that you'd otherwise have to do by hand. Finally, just as you can fill a single rectangle, you can fill multiple rectangles at once using the extra FillRectangles method. Lines and Beziers can't be filled and consequently don't have equivalent helper methods. CurvesMost of the shapes are specified as you'd expect. You specify the rectangle and the ellipse using an x, y, width, and height, or a Rectangle object. You specify the arc and the pie as with a rectangle, but you also include a start and a length of sweep, both specified in degrees (the shown arc and pie start at 180 degrees and sweep for 180 degrees). You specify the lines, polygon, and curves using an array of points, although the curves are a little different. The curve (also known as a cardinal spline) acts just like a set of lines, except as a point is approached, there's a curve instead of a sharp point. In addition to a set of points, you specify the curve using a tension, which is a value that determines how "curvy" the curve is around the points. A tension of 0 indicates no curve, and a tension of 0.5 is the default. You can set the tension as high as allowed by the floating-point type. Figure 5.17 shows some common variations. Figure 5.17. Curves Drawn with Various Values of Tension Figure 5.17 shows the same set of points (as indicated by the black dots and index number) drawn using the DrawCurve function with three different values of tension. As the tension increases, so does the amount of curve at each point. Unlike normal curves, Bezier curves are specified with exactly four points: one start point, followed by two control points, followed by an end point. If you use the DrawBeziers function to draw multiple curves, the end point of the preceding curve becomes the start point of the next. Figure 5.18 shows three Bezier curves drawn using the same set of points, but in different orders. Figure 5.18. Three Bezier Curves Drawn Using the Same Set of Points in Different Orders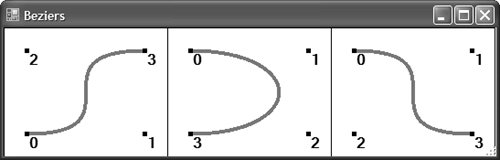 In each case, the Bezier is drawn between the start point and the end point, but the two control points are used to determine the shape of the curve by exerting more "control" over the curve as they get farther away. Smoothing ModesWhen drawing shapes, you may want the smooth rendering you've seen in the really cool applications. The shapes in Figures 5.16, 5.17, and 5.18 were all drawn without any kind of "smoothing," as evidenced by the jagged edges. The jagged edges are caused by the swift transition between the color of the shape being drawn and the color of the background. A technique known as antialiasing uses additional colored pixels to provide a smoother transition between the shape color and the background color, in much the same way that a gradient brush provides a smooth transition from one color to another. To turn on antialiasing for shapes subsequently drawn on the Graphics object, you set the SmoothingMode property: g.SmoothingMode = SmoothingMode.AntiAlias; The default value of the SmoothingMode property is SmoothingMode.None. In addition to the AntiAlias value, SmoothingMode has four other values: Default, HighSpeed, HighQuality, and Invalid. The first three are merely aliases for None, None, and AntiAlias, depending on your system settings, and Invalid cannot be set by you. Figure 5.19 shows the difference between using and not using antialiasing. Figure 5.19. The Effect of Changing the SmoothingMode from None to AntiAlias Notice that setting the SmoothingMode has no effect on the text drawn on the Graphics object. You set the rendering effects of text using the TextRenderingHint property, which I discuss in Chapter 6: Drawing Text. Saving and Restoring Graphics SettingsSetting the SmoothingMode in the preceding section is the first time we've changed a property on the Graphics object that affects subsequent operations. When you change a Graphics object property like this, you need to be especially careful. For example, consider the following: void DrawingWithHelpForm_Paint(object sender, PaintEventArgs e) { // Draw some smooth things DrawSomethingSmooth(e.Graphics); // Draw other things unsmoothed, or so I think... } void DrawSomethingSmooth(Graphics g) { // Make things draw smoothly g.SmoothingMode = SmoothingMode.AntiAlias; // Draw things... }The Paint event handler calls the DrawSomethingSmooth helper method and passes it the Graphics object, which is subsequently set to paint smoothly. However, when DrawSomethingSmooth returns, the Paint event handler is expecting to continue painting roughly, although that isn't the case. To avoid unexpected situations like this, it's a good idea to save the initial values of any properties you change on the Graphics object and restore them before the method returns: void DrawSomethingSmooth(Graphics g) { // Save old smoothing mode SmoothingMode oldMode = g.SmoothingMode; // Make things draw smoothly g.SmoothingMode = SmoothingMode.AntiAlias; // Draw things... // Restore smoothing mode g.SmoothingMode = oldMode; }As you'll see in further topics, a variety of Graphics object properties affect subsequent operations. This technique quickly becomes painful if you need to save and restore several of these properties. Luckily, you can save yourself the trouble by taking a snapshot of a Graphics object state in a GraphicsState object from the System.Drawing.Drawing2D namespace: void DrawSomethingSmooth(Graphics g) { // Save old graphics state GraphicsState oldState = g.Save(); // Make things draw smoothly g.SmoothingMode = SmoothingMode.AntiAlias; // Draw things... // Restore old graphics state g.Restore(oldState); }The Save method on the Graphics class returns the current state of the properties in the Graphics object. The call to Restore takes a GraphicsState object and sets the Graphics object to the state cached in that object. The code shows a pair of calls to Save and Restore, but it's not necessary to keep them in balance, something that's handy for switching a lot between two or more states. |


EAN: 2147483647
Pages: 216