Brushes
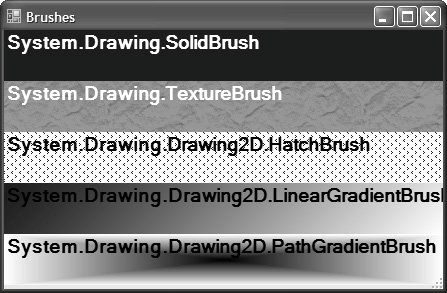
| The System.Drawing.Brush class serves as a base class for several kinds of brushes to suit a variety of needs. Figure 5.3 shows the five derived brush classes provided in the System.Drawing and System.Drawing.Drawing2D namespaces. Figure 5.3. Sample Brushes As you can see, each derived brush exhibits its own peculiarities, and they're worth delving into. Solid BrushesA SolidBrush is constructed with a color used to fill in the shape being drawn. As a convenience, because solid-color brushes are heavily used, the Brushes class contains 141 Brush properties, one for each of the named colors in the KnownColor enumeration. These properties are handy because their resources are cached and managed by .NET itself, making them a bit easier to use than brushes you have to create yourself:[6]
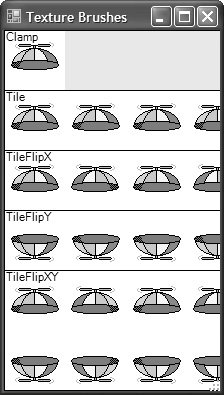
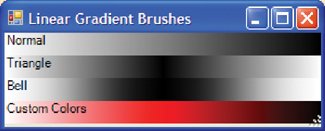
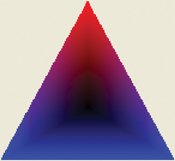
// Managed by .NET Brush whiteBrush = System.Drawing.Brushes.White; // Managed by your program using( Brush brush = new SolidBrush(Color.White) ) { ... }Similarly, all 33 system colors from the SystemColors enumeration are provided in the SystemBrushes class. This is handy if you want to use one of the system colors to create a brush but prefer to let Windows Forms handle the underlying resource. Texture BrushesA TextureBrush is constructed with an image, such as a bitmap: // Draw TextureBrush string file = @"c:\windows\santa fe stucco.bmp"; using( Brush brush = new TextureBrush(new Bitmap(file)) ) { ... }By default, the image is used repeatedly to tile the space inside the shape being drawn. You can change this behavior by choosing a member of the WrapMode enumeration: namespace System.Drawing.Drawing2D { enum WrapMode { Tile = 0, // default TileFlipX = 1, // flip image horizontally along X axis TileFlipY = 2, // flip image vertically along Y axis TileFlipXY = 3, // flip image along X and Y axes Clamp = 4, // draw only once } }Figure 5.4 shows the various modes. Figure 5.4. Various TextureBrush WrapMode Values Hatch BrushesA HatchBrush is used to fill space using one of several built-in two-color patterns, where the two colors are used to draw the foreground and the background of the pattern: // Draw HatchBrush using( Brush brush = new HatchBrush(HatchStyle.Divot, Color.DarkBlue, Color.White) ) { ... } Figure 5.5 shows the 56 hatches in the HatchStyle enumeration using black as the foreground color and white as the background color. Figure 5.5. Available Hatch Brush Styles Shown with Black Foreground and White Background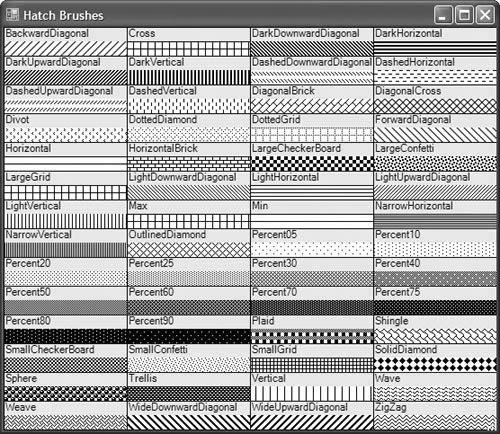 Linear Gradient BrushesA LinearGradientBrush is used to draw a smooth blending between two end points and between two colors. The resulting gradations are drawn at a specified angle: // Draw LinearGradientBrush Rectangle area = new Rectangle(x, y, width, height); Color startColor = Color.DarkBlue; Color endColor = Color.White; using( Brush brush = new LinearGradientBrush(area, startColor, endColor, 45.0f) ) { ... } The angle you specify can either be a float, as shown in the example, or one of four LinearGradientMode values: namespace System.Drawing.Drawing2D { enum LinearGradientMode { Horizontal = 0, // 0 degrees Vertical = 1 // 90 degrees ForwardDiagonal = 2, // 45 degrees BackwardDiagonal = 3, // 135 degrees } }The angle is used to set up a blend, which governs the transition between colors over the area of the brush along the angle of the line. You can set this blend either directly or indirectly. In the direct technique, you use a Blend property, which determines positions and factors of fallout between the two colors. To set the blend indirectly, you use a focus point for the end color and a fallout rate toward the start color, as shown in Figure 5.6. Figure 5.6. Normal, Triangle, Bell Linear Gradient and Normal Custom Color Brushes (See Plate 8) Notice that the normal linear gradient brush transitions between the start and end colors, whereas the triangle version transitions from the start color to the end color at some specified focus (in this example, it is set right in the middle). Furthermore, the bell shape transitions toward the end color using a normal bell curve distribution. The following code draws the first three brushes (notice the use of the SetBlendTriangularShape and SetSigmaBellShape methods to adjust the blend): using( LinearGradientBrush brush = new LinearGradientBrush( this.ClientRectangle, Color.White, Color.Black, LinearGradientMode.Horizontal) ) { // Normal: focus set at the end g.FillRectangle(brush, x, y, width, height); g.DrawString("Normal", this.Font, blackBrush, x, y); y += height; // Triangle: focus set in the middle brush.SetBlendTriangularShape(0.5f); g.FillRectangle(brush, x, y, width, height); g.DrawString("Triangle", this.Font, blackBrush, x, y); y += height; // Bell: focus set in the middle brush.SetSigmaBellShape(0.5f); g.FillRectangle(brush, x, y, width, height); g.DrawString("Bell", this.Font, blackBrush, x, y); y += height; ... } At the bottom of Figure 5.6, we're still transitioning from white to black, but we're transitioning through red in the middle. This is because we took over the blending with an instance of a ColorBlend object that lets us set custom colors and positions: // Custom colors ColorBlend blend = new ColorBlend(); blend.Colors = new Color[] { Color.White, Color.Red, Color.Black }; blend.Positions = new float[] { 0.0f, 0.5f, 1.0f }; brush.InterpolationColors = blend; g.FillRectangle(brush, x, y, width, height); g.DrawString("Custom Colors", this.Font, blackBrush, x, y); Path Gradient BrushesIn the unlikely event that your linear gradient brush is not defined for the entire shape you're drawing, the brush will be tiled just like a texture brush, as governed by the WrapMode. If you want to get even fancier than linear gradients along a single angle, you can use the PathGradientBrush, as shown in Figure 5.7. Figure 5.7. Four Sample Uses of the PathGradientBrush Class PathGradientBrush is defined by a set of points that define the surrounding edges of the path, a center point, and a set of colors for each point. By default, the color for each edge point is white, and for the center point is black. The gradient color transitions along each edge are defined by the points toward the center. Both triangle and square brushes were created this way: Point[] triPoints = new Point[] { new Point(width/2, 0), new Point(0, height), new Point(width, height), }; using( PathGradientBrush brush = new PathGradientBrush(triPoints) ) { int x = 0; int y = 0; g.FillRectangle(brush, x, y, width, height); } Point[] quadPoints = new Point[] { new Point(0, 0), new Point(width, 0), new Point(width, height), new Point(0, height), }; using( PathGradientBrush brush = new PathGradientBrush(quadPoints) ) { ... }Notice that although we defined the surrounding points in a Point array in both cases, we didn't define the center point explicitly. The center point is calculated based on the surrounding points; but it doesn't need to be in the midpoint between all points, as shown by the diamond brush and the following code: Point[] diamondPoints = new Point[] { ... }; using( PathGradientBrush brush = new PathGradientBrush(diamondPoints) ) { brush.WrapMode = WrapMode.Tile; brush.CenterPoint = new Point(0, height / 2); int x = 0; int y = height; g.FillRectangle(brush, x, y, width, height); }Notice that we use the CenterPoint property to set the gradient end point along the left edge of the diamond. The center of a path gradient brush doesn't even have to be inside the polygon described by the points if you don't want it to be. Notice also the use of the WrapMode property. By default, this is set to Clamp, which causes the brush to draw only once in the upper-left corner. The points on the brush are relative to the client area, not to where they're being used to fill, so we must set WrapMode if we want the brush to draw anywhere except in the upper-left corner. Another way to handle this is to apply a transform on the Graphics object before drawing, a technique described in Chapter 7. Although it's possible to describe a circle with a lot of points, it's far easier to use a GraphicsPath object instead. A GraphicsPath is actually a data structure that contains zero or more shapes (the GraphicsPath class is discussed in more detail later in this chapter). It's useful for describing an area for drawing, just as we're doing with the set of points describing our brush. The points are used by the PathGradientBrush to create a GraphicsPath internally (hence the name of this brush), but we can create and use a GraphicsPath directly: using( GraphicsPath circle = new GraphicsPath() ) { circle.AddEllipse(0, 0, width, height); using( PathGradientBrush brush = new PathGradientBrush(circle) ) { brush.WrapMode = WrapMode.Tile; brush.SurroundColors = new Color[] { Color.White }; // default brush.CenterColor = Color.Black; int x = width; int y = height; g.FillRectangle(brush, x, y, width, height); } }After we create an empty GraphicsPath object, notice the addition of an ellipse to the path before we use it to create a brush. The center of whatever set of shapes is in the path is used as the brush's center point, just as you'd expect, but the center color defaults to white when we use a GraphicsPath; that's why the code manually sets the CenterColor property to black. Notice also the use of the SurroundColors property, which is an array of colors, one for each point on the gradient path. If there are more points than colors (as is clearly the case when we're providing only a single color for all the points around the edge of a circle), the last color in the array is used for all remaining points. For example, this code draws a red gradient from the first point of the triangle but uses blue for the other two points, as shown in Figure 5.8: Figure 5.8. A PathGradientBrush with One Red Surrounding Point and Two Blue Ones (See Plate 9) using( PathGradientBrush brush = new PathGradientBrush(triPoints) ) { brush.SurroundColors = new Color[] { Color.Red, Color.Blue }; int x = 0; int y = 0; g.FillRectangle(brush, x, y, width, height); }Like linear gradient brushes, path gradient brushes allow you to adjust the blend as well as the colors used to transition between start and end points. |

EAN: 2147483647
Pages: 216