Data Exchange
| No matter what kind of form you have, you need to get data into it and out of it. Although it is possible for a form to update an application's data directly when the user presses OK or Apply, it is generally considered bad practice for anything except the main form of your application. The problem is that changes in one part of the application might adversely affect your code, so forms should be as stand-alone as possible.[2] This means that forms should have a set of properties they manage, letting the form's client populate the initial property values and pulling out the final values as appropriate, just as you saw earlier in the typical use of ColorDialog.
Because most properties managed by a form are actually properties of the controls hosted by a form, you may be tempted to make the control field declarations public to allow a form client to do this:[3]
LoanApplicationDialog dlg = new LoanApplicationDialog(); dlg.applicantNameTextBox.Text = "Joe Borrower"; // DON'T! DialogResult result = dlg.ShowDialog(); if( result == DialogResult.OK ) { /* user pressed OK */ }The problem with this approach is the same one you encounter when making any field public: If LoanApplicationDialog wants to change the way the applicant's name is displayed, such as from a TextBox control to a Label control, all users of the LoanApplicationDialog class must now be updated. To avoid this problem, the general practice is to expose public custom form properties that get and set the form's child control properties: string ApplicantName { get { return this.applicantNameTextBox.Text; } set { this.applicantNameTextBox.Text = value; } }The form client can access these properties in the same way it can access a field. However, unlike a field, getting or setting a property allows your form to change how the code executes without requiring a code change in the form client. Furthermore, using properties results in a simpler usage model for the form client, because you no longer need to concern yourself with the implementation details best left to the form: LoanApplicationDialog dlg = new LoanApplicationDialog(); dlg.ApplicantName = "Joe Borrower"; DialogResult result = dlg.ShowDialog(); if( result == DialogResult.OK ) { /* user pressed OK */ }Handling OK and CancelBefore data can be retrieved from the property of a modal form, ShowDialog must first return, and this means that the form must first be closed. To do this, you call the Form.Close function inside each button's Click event handler: void okButton_Click(object sender, EventArgs e) { this.Close(); } void cancelButton_Click(object sender, EventArgs e) { this.Close(); }After a form is closed, ShowDialog returns a value that specifies the condition under which the form was closed, allowing the form client code to respond accordingly. This value, exposed from a form as the DialogResult property, is one of the following DialogResult enumeration values: namespace System.Windows.Forms { enum DialogResult { None = 0, // default OK = 1, Cancel = 2, // result when calling Form.Close() Abort = 3, Retry = 4, Ignore = 5, Yes = 6, No = 7, } }A new form instance's DialogResult value defaults to None. A closed formwhether closed by the Close method, a click on the form's close button, or Alt+F4automatically has its DialogResult value set to Cancel. The Abort, Ignore, No, and Retry values are used mostly by MessageBox.Show, but you should feel free to use them for your own custom forms.[4] Of course, the desired value returned from ShowDialog when the OK button is pressed is OK, which our client code checks for:
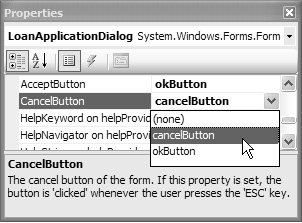
dlg.ShowDialog(); DialogResult result = dlg.DialogResult; if( result == DialogResult.OK ) { /* user pressed OK */ }As a coding shortcut, you can check the return value from ShowDialog, which happens to be the modal dialog's DialogResult property value: DialogResult result = dlg.ShowDialog(); if( result == DialogResult.OK ) { /* user pressed OK */ }To return a value other than Cancel from ShowDialog, you set the form's DialogResult property before closing the form: void okButton_Click(object sender, EventArgs e) { this.DialogResult = DialogResult.OK; this.Close(); }A call to the Close method is unnecessary when you set a form's DialogResult property, because a modal form interprets that to mean it should close automatically: void okButton_Click(object sender, EventArgs e) { this.DialogResult = DialogResult.OK; // Close automatically }The equivalent for a Cancel button is to set DialogResult to Cancel: void cancelButton_Click(object sender, EventArgs e) { this.DialogResult = DialogResult.Cancel; // Close automatically }With this code in place, clicking either OK or Cancel dismisses a form such as the one shown in Figure 3.4. Figure 3.4. A Sample Form Used as a Dialog Unfortunately, we don't have quite all the behavior we need from our OK and Cancel buttons. In Figure 3.4, notice that the OK button is not drawn as the default button. The default button is the one invoked when the Enter key is pressed, and it's typically drawn with a thicker border than nondefault buttons. In addition, the Cancel button should be invoked when the Esc key is pressed. Enabling this behavior is a matter of designating which buttons on the form should be invoked when Enter and Esc are pressed. You set these by configuring the form's AcceptButton and CancelButton, respectively, as shown in Figure 3.5. Figure 3.5. Using the Properties Window to Set a Form's AcceptButton and CancelButton This is handy because the Properties window allows you to choose from a drop-down list of all the buttons currently on the form, and because your choice is automatically persisted to InitializeComponent: // LoanApplicationDialog.Designer.cs partial class LoanApplicationDialog { ... void InitializeComponent() { ... this.AcceptButton = this.okButton; this.CancelButton = this.cancelButton; ... } } // LoanApplicationDialog.cs partial class LoanApplicationDialog : Form { public LoanApplicationDialog() { InitializeComponent(); } void okButton_Click(object sender, EventArgs e) { this.DialogResult = DialogResult.OK; } void cancelButton_Click(object sender, EventArgs e) { this.DialogResult = DialogResult.Cancel; } }When you use the Properties window to set the form's CancelButton property, you don't actually need to set the DialogResult property in the Cancel button's Click event handler. This works because when you set the form's CancelButton property, the Windows Forms Designer sets the DialogResult property of the Cancel button itself to DialogResult.Cancel, thereby obviating the need to handle the Cancel button's Click event. However, the Windows Forms Designer does not set the form's AcceptButton DialogResult property in the same manner, so you must manually change the OK button's default value of DialogResult.None to DialogResult.OK.[5]
With the DialogResult properties set for both the OK and the Cancel buttons, you can dismiss the form without having to handle their Click events at all: // LoanApplicationDialog.Designer.cs partial class LoanApplicationDialog { ... void InitializeComponent() { ... this.okButton.DialogResult = DialogResult.OK; ... this.cancelButton.DialogResult = DialogResult.Cancel; ... this.AcceptButton = this.okButton; this.CancelButton = this.cancelButton; ... } } // LoanApplicationDialog.cs partial class LoanApplicationDialog : Form { ... // okButton_Click handler not needed // cancelButton_Click handler not needed ... }Even though it's possible to implement the client event handlers for the OK and Cancel buttons, you can often get away with simply setting the form's AcceptButton and CancelButton properties and setting the DialogResult property of the OK button. This technique gives you all the data exchange behavior you need in a modal form (except for data validation, which is covered later in this chapter). Modeless Form DataModeless forms require a different strategy from that of modal forms to communicate user-updated data to the form's client. For one thing, setting the DialogResult property of a modeless form doesn't automatically dismiss it, as it does for a modal form. For another thing, because Show returns immediately, the client usage model is different. Finally, modeless forms acting as dialogs usually have Apply and Close buttons, so data entered into the form can be used before the modeless form even goes away. What's needed is a way to notify the client of a modeless form when the Accept button is pressed. Luckily, standard .NET events can be used for this purpose:[6]
// PropertiesDialog.cs partial class PropertiesDialog : Form { ... // Event to fire when Accept is pressed public event EventHandler Accept; void acceptButton_Click(object sender, EventArgs e) { // Fire event when Accept is pressed if( Accept != null ) Accept(this, EventArgs.Empty); } void closeButton_Click(object sender, EventArgs e) { this.Close(); } }In this example, PropertiesDialog exposes a public event called Accept using the standard EventHandler delegate signature. When the Accept button is pressed, the modeless form fires the Accept event to notify any interested parties that the Accept button has been pressed. The form client can subscribe to the event when the form is created: // Client creates, connects to, and shows modeless form void showProperties_Click(object sender, EventArgs e) { PropertiesDialog dlg = new PropertiesDialog(); dlg.Accept += Properties_Accept; dlg.Show(); } // Client handles event from form to access accepted values void Properties_Accept(object sender, EventArgs e) { PropertiesDialog dlg = (PropertiesDialog)sender; MessageBox.Show(dlg.SomeProperty); }The client subscribes to the Accept event after the form is created, but before it's shown. When the Accept button is pressed, the notification shows up in the client's event handler. By convention, the form passes itself when it fires the event so that the receiver of the event can use a simple cast operation to get back the reference to the form. The only thing left to do is to make the modeless form's Close button call the Close method, and you've got yourself a modeless form. |

EAN: 2147483647
Pages: 216