Drag and Drop of Multiple Data Items
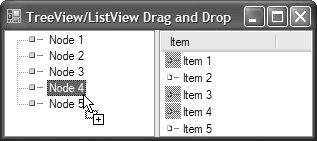
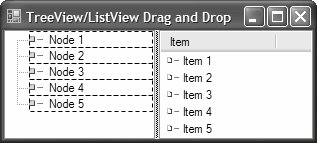
| From a drag-and-drop perspective, our examples so far have discussed controls that allow selection of single data items and, therefore, provide only a single piece of data for a drag-and-drop operation. For example, text box controls allow you to select only a single piece of text, whether a string or substring. However, several controls do allow selection of multiple data items and, consequently, allow multiple items to participate in a single drag-and-drop operation. TreeView and ListView are examples of such controls, and they are usually used in tandem for Explorer-style UIs. In these cases, a tree view is used to represent one or more arbitrary data containers, known as tree nodes, and a list view is used to display one or more arbitrary data items, known as listview items, that reside within each tree node. Moving and copying listview items around tree nodes is a common feature of Explorer-style UIs and is heavily dependent on drag and drop. As you might imagine, implementing drag and drop to support multiple items is a little more involved than the drag-and-drop scenarios you've seen. However, TreeView and ListView come with extra support, and we'll spend the rest of this topic exploring it. Dragging Multiple ListView ItemsAn Explorer-style UI is a great example for showing the most common multiple-data-item drag-and-drop operation: selecting and dragging one or more listview items from one tree node to another, as demonstrated in Figure E.11. Figure E.11. An Explorer-Style Move Drag-and-Drop Operation in Action This operation requires a solution that conforms to the following minimum set of behaviors:
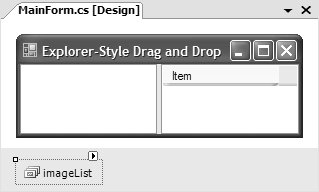
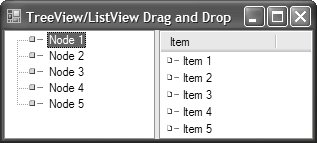
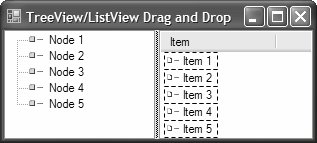
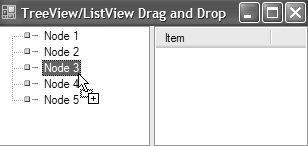
However, before we can tackle this flavor of drag and drop, we need to get the basics working. Pieces of an Explorer-Style UIFrom a control and component point of view, there are four essential UI pieces to an Explorer-style UI: a vertically oriented SplitContainer control, a TreeView control in the SplitContainer's left panel, a ListView control in the SplitContainer's right panel, and an ImageList component to provide images for tree nodes and listview items. This configuration is shown in Figure E.12. Figure E.12. The Four Basic UI Pieces of an Explorer-Style Application When the ImageList contains the images, you can specify image list indices for tree nodes from the Properties window for a TreeView, if you happen to know what the nodes are going to be at design time. However, you need to programmatically specify an image list index for each listview item: // MainForm.cs partial class MainForm : Form { public MainForm() { InitializeComponent(); #region Create test data // Create some test listview items, passing name and image index this.listView.Items.AddRange( new ListViewItem[] { new ListViewItem("Item 1", 1), new ListViewItem("Item 2", 1), new ListViewItem("Item 3", 1), new ListViewItem("Item 4", 1), new ListViewItem("Item 5", 1) } ); ... #endregion // Select first node this.treeView.Focus(); } }In this code, we use the ListViewItem's constructor overload that accepts a string item name and an integer image index. We could add tree nodes using .NET's TreeNode type (from the System.Windows.Forms namespace), but we need to consider how our tree nodes will be used. Fundamentally, they are containers for listview items; and consequently, we need to store which listview items are contained by which tree nodes. This association between tree nodes and the listview items is necessary so that we can update the list view to show only those items contained by the currently selected tree node. Although we could use a separate tree node and listview item data structure to store this information in tandem with our actual tree nodes and listview items, it's easier to store containment information directly in the tree node. One approach is to derive from TreeNode and add a publicly accessible listview item data store: // ItemHolderTreeNode.cs class ItemHolderTreeNode : TreeNode { List<ListViewItem> listViewItems = new List<ListViewItem>(); public ItemHolderTreeNode( string text, List<ListViewItem> listViewItems) { this.Text = text; if( listViewItems != null ) { this.listViewItems.AddRange( (IEnumerable<ListViewItem>)listViewItems); } } public List<ListViewItem> ListViewItems { get { return this.listViewItems; } set { this.listViewItems = value; } } }As you can see, ItemHolderTreeNode stores a collection of listview items in a generic List<T> that's exposed by the ListViewItems property of the same type. ItemHolderTreeNode's constructor accepts a string node name and the initial collection of listview items to contain. Now, we add our containment-supporting tree nodes and seed the first one with the initial collection of listview items: // MainForm.Designer.cs partial class MainForm { ... void InitializeComponent() { ... // treeView this.treeView.ImageIndex = 0; ... } ... } // MainForm.cs partial class MainForm : Form { public MainForm() { InitializeComponent(); #region Create test list view and tree view items // Create some test listview items List<ListViewItem> listViewItems = new List<ListViewItem>(); listViewItems.Add(new ListViewItem("Item 1", 1)); listViewItems.Add(new ListViewItem("Item 2", 1)); listViewItems.Add(new ListViewItem("Item 3", 1)); listViewItems.Add(new ListViewItem("Item 4", 1)); listViewItems.Add(new ListViewItem("Item 5", 1)); // Create some test treeview items, adding // listview items to first node ItemHolderTreeNode node1 = new ItemHolderTreeNode("Node 1", listViewItems); node1.Nodes.AddRange( new System.Windows.Forms.TreeNode[] { new ItemHolderTreeNode("Node 1", null), new ItemHolderTreeNode("Node 1", null), new ItemHolderTreeNode("Node 1", null), new ItemHolderTreeNode("Node 1", null), new ItemHolderTreeNode("Node 1", null)}); this.treeView.Nodes.Add(node1); ... #endregion // Select first node this.treeView.Focus(); } }As tree nodes are selected by the user, we update the ListView control to show the list-view items contained by the currently selected tree node, and this means leaning on the ItemHolderTreeNode's ListViewItems property. The best place to handle this is after a tree node is selected, at which point the TreeView fires the AfterSelect event: // MainForm.cs partial class MainForm : Form { ... void treeView_AfterSelect(object sender, TreeViewEventArgs e) { // Refresh selected tree node to display list item(s) RefreshSelectedTreeNode((ItemHolderTreeNode)e.Node); } void RefreshSelectedTreeNode(ItemHolderTreeNode treeNode) { if( treeNode == null ) return; // Remove current listview items this.listView.Items.Clear(); // Add selected tree node's listview items this.listView.Items.AddRange(treeNode.ListViewItems.ToArray()); } ... }AfterSelect is passed a TreeViewEventArgs object that contains the selected node. This code casts that node to get the ItemHolderTreeNode to access its ListViewItems property. The ListView's Items property is a ListViewItemCollection object that can be filled en masse via a call to its AddRange method. However, AddRange accepts only an array of ListViewItem objects, hence the ToArray call. Figure E.13 shows the initial UI state of the application at run time based on our work so far. Figure E.13. The Basic Explorer-Style Application This provides the minimum functionality we need to implement drag-and-drop for listview items that support both move and copy operations. Initiating a Drag OperationWe initiate a drag-and-drop operation in a similar fashion as we did earlier, although from a different event handler. When users drag a Label control's Text property data, the data is the Label control's UI. However, the area from which a listview item can be dragged is a combination of the width and height of its image and text content, as illustrated in Figure E.14. Figure E.14. ListView Item Drag Source UI Real Estate When a listview item is dragged, the list view detects that the user would like to drag something and fires the ItemDrag event so that you can handle initiation of a drag operation. ItemDrag is also implemented by TreeView for the same reason. Therefore, to initiate a move-and-copy drag operation for a listview item, we handle ListView's ItemDrag event using familiar code: // MainForm.cs partial class MainForm : Form { ... void listView_ItemDrag(object sender, ItemDragEventArgs e) { // Don't drag unless left mouse button is down if( (e.Button != MouseButtons.Left) ) return; // Get drag data ListView.SelectedListViewItemCollection dragData = this.listView.SelectedItems; // Set supported drag effects DragDropEffects supportedEffects = DragDropEffects.Copy | DragDropEffects.Move; // Start a drag-and-drop operation DragDropEffects dragEffect = this.listView.DoDragDrop(dragData, supportedEffects); ... } ... }The ItemDragEventArgs object passed to the ItemDrag event handler references the last selected listview item. To support drag and drop of multiple listview items, though we must specify the drag data to be all selected items, and this is why we use the SelectedItems property on our ListView object. Drag in ActionAfter a drag operation has begun, users need to know what will happen if they drop at any moment during an operation. First and foremost, we need to let them know whether they're going to get a move, a copy, a link, or no action. For this, we make sure that the cursor represents the appropriate icon. The best place to do this, as we discussed earlier, is in the DragOver event handler for our treeview drop target: // MainForm.cs partial class MainForm : Form { ... // KeyState Values (not available in Windows Forms) [Flags] enum KeyState {...} void treeView_DragOver(object sender, DragEventArgs e) { // Can't drop unknown data types if( !e.Data.GetDataPresent( typeof(ListView.SelectedListViewItemCollection)) ) { e.Effect = DragDropEffects.None; return; } // Can't drop outside of tree node if( !IsTreeNodeAtCursor(e.X, e.Y) ) { e.Effect = DragDropEffects.None; return; } // Show copy or move cursor KeyState keyState = (KeyState)e.KeyState; if( ((keyState & KeyState.CtrlKey) == KeyState.CtrlKey) ) { e.Effect = DragDropEffects.Copy; } else { e.Effect = DragDropEffects.Move; } } bool IsTreeNodeAtCursor(int x, int y) { return GetTreeNodeAtCursor(x, y) != null; } TreeNode GetTreeNodeAtCursor(int x, int y) { Point pt = this.treeView.PointToClient(new Point(x, y)); TreeViewHitTestInfo hti = this.treeView.HitTest(pt); return hti.Node; } ... }If the cursor isn't over a tree node or isn't a collection of items from a list view, the drag effect is set to None. To determine whether the mouse cursor is currently over a tree node, the DragOver handler code relies on a couple of helper methods: IsTreeNodeAtCursor and GetTreeNodeAtCursor. These helpers use the tree view's definition of the area of a node, which comprises the maximum height of the image and text content, and the width from the start of the node content to the edge of the treeview control, as shown in Figure E.15. Figure E.15. Tree Node Drop Target UI Real Estate If the tree view knows the type of data it's going to get and if it's in the area of a node, we look at the Ctrl key state to determine whether we should show the Copy or the Move drag effect. In addition to keeping the mouse cursor showing the current operation, we want to highlight the target tree node to let users know where their drop operation will happen. To do this, we handle the GiveFeedback event for the drop source to detect whether we are over a tree node and, if we are, to select it: // MainForm.cs partial class MainForm : Form { ... void listView_GiveFeedback(object sender, GiveFeedbackEventArgs e) { // Select tree node if dragging over one Point pt = Cursor.Position; TreeNode node = this.GetTreeNodeAtCursor(pt.X, pt.Y); if( node != null ) { this.treeView.SelectedNode = node; } // Focus() forces the selection UI to be rendered this.treeView.Focus(); } bool IsTreeNodeAtCursor(int x, int y) { ... } TreeNode GetTreeNodeAtCursor(int x, int y) { ... } }Figure E.16 shows this code in action. Figure E.16. Dynamic Tree Node Selection and User-Driven Drag Effect Changes One problem you may have noticed is that you can't see the listview items contained by the tree node being dragged from. This is because the code in the AfterSelect event updates the list view for each selected tree node as the drag data is dragged over a tree node. To view the drag source list view during a drag operation, we need to disable the tree view's selection-handling code until after the drop: // MainForm.cs partial class MainForm : Form { ... bool dragging = false; void listView_ItemDrag(object sender, ItemDragEventArgs e) { ... // Start a drag-and-drop operation this.dragging = true; DragDropEffects dragEffect = this.DoDragDrop(dragData, supportedEffects); this.dragging = false; ... } void treeView_AfterSelect(object sender, TreeViewEventArgs e) { // Refresh listview control only if not dragging if( this.dragging ) return; // Refresh selected tree node to display dropped item(s) RefreshSelectedTreeNode((ItemHolderTreeNode)e.Node); } ... }If users don't cancel the drag operation mid-drag by pressing the Esc key (behavior intrinsically supported by the drag-and-drop infrastructure), they'll drop their data on a tree node, and this will require some processing on your part. Completing a Drag OperationDrag-and-drop completion needs to be handled by both the drop target and the drop source. For our drop target, this means handling the TreeView control's DragDrop event, capturing the drag data, and adding it to the drop target tree node. We also need to ensure that the list view is updated to show the new set of listview items contained by that node. The following code encompasses this logic: // MainForm.cs partial class MainForm : Form { ... void treeView_DragDrop(object sender, DragEventArgs e) { // Don't drop if attempting to drop at a nondroppable location if( !this.IsTreeNodeAtCursor(e.X, e.Y) ) return; // Get drag data ListView.SelectedListViewItemCollection dragData = (ListView.SelectedListViewItemCollection)e.Data.GetData( typeof(ListView.SelectedListViewItemCollection)); // Move or copy listview item(s) to the drop target tree node ItemHolderTreeNode targetNode = (ItemHolderTreeNode)this.GetTreeNodeAtCursor(e.X, e.Y); foreach( ListViewItem item in dragData ) { targetNode.ListViewItems.Add(item); } } ... }We implement both copy and move operations for our tree view by adding the dragged listview items to the drop target tree node's ListViewItems collections. For our list view, handling completion on the drop source means removing data from the drag source tree node for a move operation, and refreshing the currently selected tree node to display the dragged listview items: // MainForm.cs partial class MainForm : Form { ... void listView_ItemDrag(object sender, ItemDragEventArgs e) { ... // Remember source tree node TreeNode dragSourceTreeNode = this.treeView.SelectedNode; ... // Start a drag-and-drop operation this.dragging = true; DragDropEffects dragEffect = this.listView.DoDragDrop(dragData, supportedEffects); this.dragging = false; // Move if required if( dragEffect == DragDropEffects.Move ) { foreach( ListViewItem item in this.listView.SelectedItems ) { ((ItemHolderTreeNode)dragSourceTreeNode).ListViewItems.Remove( item); } } dragSourceTreeNode = null; // Refresh drop target tree node to display dropped item(s) RefreshSelectedTreeNode( (ItemHolderTreeNode)this.treeView.SelectedNode); } ... }This completes the functionality required to provide the minimal solution for dragging multiple listview items and dropping them onto tree nodes. For a full-blown Explorer-style UI, we'd also like to show the items being dragged during a drag operation. The implementation of that functionality is beyond the scope of this book, but I recommend an article by Chris Sano titled, "Custom Windows Forms Controls: ColorPicker.NET" (MSDN Online, March 2005) for the GDI+ magic required to show what the user is dragging.[4]
|
EAN: 2147483647
Pages: 216