Resources
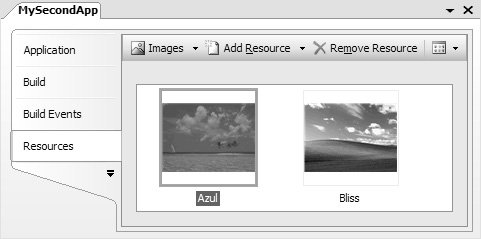
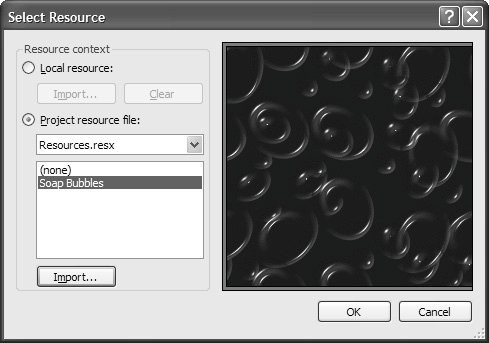
| Application and user settings data is used to control an application's look and feel, as well as its behavior, while remaining separate from the code itself. Alternatively, this kind of application and control data can be stored as part of an assembly's resources. A resource is a named piece of data bound into the executable (EXE) or dynamic link library (DLL) at build time. For example, you could set the background image of a form in your application by loading a bitmap from a file: // ResourcesForm.cs partial class ResourcesForm : Form { public ResourcesForm() { InitializeComponent(); this.BackgroundImage = new Bitmap(@"C:\WINDOWS\Web\Wallpaper\Azul.jpg"); } }Unfortunately, the problem with this code is that not all installations of Windows have Azul.jpg, and even those that have it may not have it in the same place. Even if you shipped this picture with your application, a space-conscious user might decide to remove it, causing your application to fault. The only safe way to make sure that the picture, or any file, stays with code is to embed it as a resource. Resources can be conveniently embedded in two ways. First, you can use the Resource Editor, which can be opened by right-clicking on your project in Solution Explorer and choosing Properties | Resources. The Resource Editor provides a simplified UI, shown in Figure 1.16, that allows you to manage resources and, just as important, see what your resources will look like at design time. Figure 1.16. The Resource Editor With the Resource Editor, you can add new and existing resources in a variety of ways, including using the drop-down list shown in Figure 1.17, pasting them from the Clipboard, or dragging and dropping onto the Resource Editor itself. Figure 1.17. Adding a Resource with the Resource Editor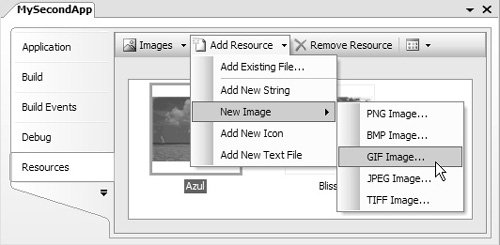 All resources added to and managed by the Resource Editor are categorized by resource type. You can use the drop-down list shown in Figure 1.18 to navigate between categories. Figure 1.18. Viewing Resource Categories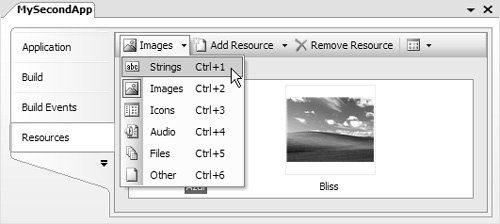 In addition to the categories you would expect to findstrings, images, icons, text files, and sound filesthere is another category, Other, for extra resource data such as component-defined serialization of design-time data. Depending on the category, you can even view your resources in one of several ways. For example, you can display image resources using the List, Details, or Thumbnails view. By default, string resources added with the Resource Editor are embedded in Resources.resx, a resource file located in the Properties folder of a Windows Forms project. Other resources are copied into a local project folder named "Resources" and linked (rather than embedded) with a file path reference stored in Resources.resx. As with settings, VS05 exposes your resources as strongly typed properties of the Resources class. Here's the abridged version: internal class Resources { ... internal static Bitmap Azul { get; } ... }Apart from the advantage of compile-time type checking, the code you write to use resources is simple: // Load strongly typed image resource this.BackgroundImage = Properties.Resources.Azul; If you are currently working on a form, control, or component, you can avoid having to write this code: Set the value of many properties by using the Properties window directly. For example, to set the background image for a form, you merely press the ellipses (" . . . ") button in the Properties window next to the BackgroundImage property, opening the Select Resource dialog shown in Figure 1.19. Figure 1.19. Selecting a Resource for a Form Property This dialog allows you to import or select a resource from the form itself (if you choose Local Resource) or from your project's Resources.resx file (or any additional .resx files you may have added). This action causes the image to be shown in the Designer and generates the code that loads the resource at run time: // Form1.cs partial class Form1 : Form { public Form1() { InitializeComponent(); } } // Form1.Designer.cs partial class Form1 { ... void InitializeComponent() { ... this.BackgroundImage = Properties.Resources.Azul; ... } }As you can see, the generated code is pretty much the same code you'd write yourself. For more details about resources and their relationship to localization and internationalization, see Chapter 13: Resources. |
EAN: 2147483647
Pages: 216