| Once the video source is connected, you can control the camera or tape deck by using controls in the Final Cut Pro interface. As you screen and preview the material, you can set an In and Out point to identify the area you want to capture. Marking source material for capture is very similar to marking clips for editing. You will learn other approaches to the capture process later in this lesson. Opening and Sizing the Capture Window All capturing is done in the Log And Capture window in Final Cut Pro. The Log And Capture window has two main areas: the preview area on the left, where you screen and mark your source tape, and the Logging area on the right, where you log information about your clips and make selections about where and how you will capture footage. 1. | Choose File > Log And Capture, or press Cmd-8.
NOTE If you are capturing HDV format, you will see a slightly different Log And Capture window. 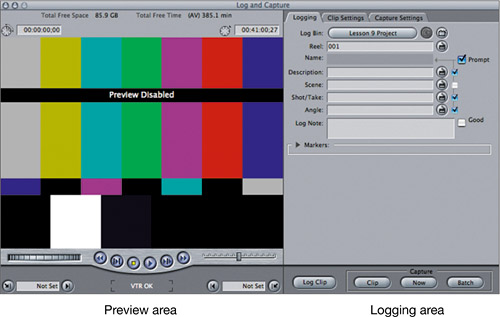 NOTE If you see the following message appear, it means your playback source device is not properly connected to your computer's FireWire port. When you click OK, the Log And Capture window will open but you will only be able to simply log clips or use a non-controllable device. If you want to capture from a FireWire device, close the Log And Capture window, turn on the capture device, then reopen the Log And Capture window. 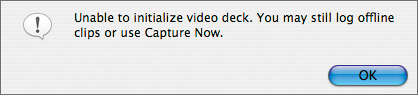
The preview area of the Log And Capture window defaults to the size of the Canvas window. To change the size of the Log And Capture window, you must first change the size of the Canvas window, or the Viewer and Canvas windows together. (You need to do this while the Log And Capture window is closed.)
| 2. | Close the Log And Capture window by clicking its Close button in the upper left of the window.
| 3. | To make the Log And Capture window larger, first choose Window > Arrange > Two Up to enlarge the size of the Viewer and Canvas together.
| 4. | Choose File > Log And Capture to reopen the window again.
A much larger Log And Capture window is displayed.
|
Playing the Source Tape The preview area of the Log And Capture window is used to play your source material and set In and Out points. If the capture device is connected through FireWire or a third-party capture card with a device control cable, you will have direct control of the device, meaning you can play and control it from within the Final Cut Pro interface. If not, you will have to control the device manually. 1. | To get started viewing the source material, put a source tape into your camera or deck.
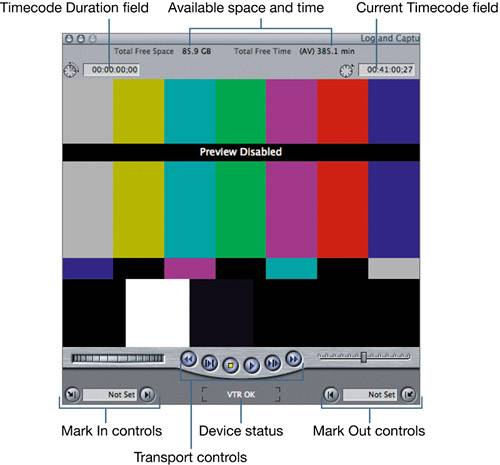 The preview area is similar in layout to the Viewer window. It has Timecode Duration and Current Timecode fields above the image area, a set of transport controls below the image area, plus shuttle and jog controls. The marking controls are in the lower left and lower right of the preview area. Between the marking controls is a device status area that indicates whether you have control over the capture device. In addition, the total amount of free hard drive space and time appears in the upper-middle area of the screen. The preview area is similar in layout to the Viewer window. It has Timecode Duration and Current Timecode fields above the image area, a set of transport controls below the image area, plus shuttle and jog controls. The marking controls are in the lower left and lower right of the preview area. Between the marking controls is a device status area that indicates whether you have control over the capture device. In addition, the total amount of free hard drive space and time appears in the upper-middle area of the screen.
| 2. | In the preview area, click the Play button to play the tape.

NOTE When you capture into Final Cut Pro through FireWire, you can choose to preview the audio through FCP, which you will do later in this lesson, or you can monitor it through headphones or speakers plugged into your device. | 3. | Click the Stop button to pause the tape.
| 4. | Click the Stop button again to stop the tape.
When a tape in a camera or deck is stopped, the tape unwraps from the video heads. But the image in the preview area displays a freeze-frame of the most recent frame played.
TIP Pausing your tape is more efficient than stopping it completely. But leaving the tape in pause mode too long can damage the tape or cause video drop-outs. | 5. | Press the spacebar to play the tape, and the Play button lights up.
| 6. | Press the spacebar again to pause the tape, and the Stop button lights up.
| 7. | Click the Rewind or Fast Forward buttons to move quickly backward or forward.
| 8. | Rewind your source tape to the beginning to prepare for the capture process.
|
Marking and Viewing Source Material Marking a tape source is similar to marking a clip in the Viewer. In fact, you use the same marking controls or shortcut keys (I and O). The primary difference is that when you mark a clip in the Viewer, you make tight marks around the action you want to edit into the sequence. When you capture a clip, you mark a few seconds before the action and a few seconds after the action. This adds the additional pad, or handles, to the clip that you can use when adjusting edits in the Timeline. In the preview mark area are Mark In and Mark Out buttons, Go To In Point and Go To Out Point buttons, and timecode fields for the In and Out points. The transport controls appear under the image as they do in the Viewer. 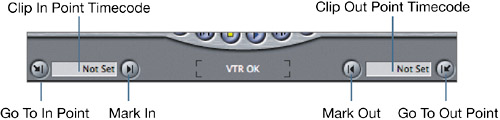
1. | Play the tape to the section you want to capture.
| 2. | Press the spacebar, or click the Play (or Stop) button, to pause the tape at this point.
| 3. | Click the Mark In button, or press the I key, to set an In point.
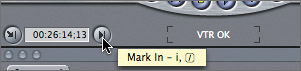
The timecode for your mark appears in the Clip In Point Timecode field. Unlike the Viewer marks, this mark will not appear in the image area, and there is no scrubber bar to scrub to the marks.
| 4. | To adjust this mark and create a 3-second clip handle, click in the Clip In Point Timecode field, type 3. (minus three followed by a period), and press Return.
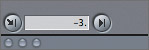
Typing 3. sets a new In point 3 seconds earlier than the previous mark, giving you a 3-second pad, or handle, before the desired action begins.
NOTE You may not need to create extra pad if your original mark allowed for pad prior to the action you want to use in editing. | 5. | Press the spacebar, or click the Play button, to move forward to where this portion of the action ends. Then press the spacebar to pause at this location.
| 6. | Click the Mark Out button at this point, or press the O key, to set the Out point.

| 7. | To create extra pad after the Out point, type +3. (plus three followed by a period) in the Clip Out Point Timecode field, and then press Return to add a 3-second handle to the Out point of this clip.
TIP When setting an Out point, you can also let the tape play past the end of the action a few seconds and set an Out point on the fly. | 8. | To see the marked portion, in the preview area, click the Play In To Out button.
| 9. | Click the Go To In Point or Go To Out Point button to go to the In or Out point.
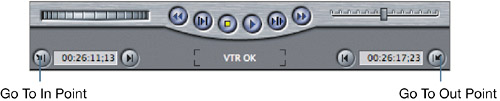
Moving to the exact In or Out point can be a good double-check that you are capturing all the action you need in the clip.
| 10. | Click the Play Around Current Frame button to see the area around the playhead position.
|
|