Flylib.com

Books Software


Selecting Tracks in the Timeline

 < Day Day Up > 

Selecting Tracks in the Timeline

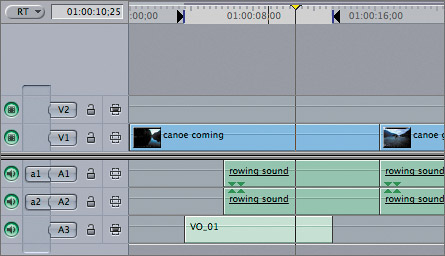
In the previous exercise, you positioned the playhead over a video clip and pressed X to find its duration. But what if your producer turns to you and says, "How long is the VO_01 narration clip?" To find a specific point, you need a vertical and horizontal reference. The playhead provides the vertical reference point in the Timeline, and you can use a track selection control to identify the specific track, or horizontal reference.

1.

Move the playhead over the middle of the canoe coming clip, and press X.

In this case, the playhead is actually over one video and three audio clips. The Canvas Timecode Duration field displays the duration of the video clip on the V1 track. The V1 track has the highest priority when it comes to track selection. Since you are looking for the length of the clip on A3, you must deselect the other tracks and point to the A3 track.

2.

In the Timeline track control area, click the V1 Auto Select control.

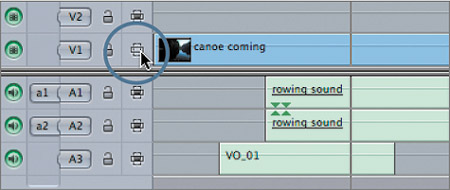
The video clip within the marked selection becomes deselected, and the highlighted area now includes only the audio clips.

3.

Make sure the playhead is over the first rowing sound clip, and press X to mark this clip.

With the V1 track deselected, and with no clips on the V2 track, Final Cut Pro defers to the first audio track—A1—marks that clip, and displays its duration in the Canvas Timecode Duration field.

4.

Toggle off the Auto Select controls for the A1 and A2 tracks.

In the Timeline, the rowing sound clip is no longer highlighted.

5.

Press X.

Now the VO_01 clip is marked, and its duration is displayed. The track selection priority always begins with V1 and continues upward through the other video tracks, then defers to A1 and continues downward through the remaining audio tracks.

6.

Toggle on the Auto Select control for all the video and audio tracks, and press Option-X to remove all marks from the sequence.

TIP

To toggle off or on all video or audio tracks but one, Option-click that track's Auto Select control.


 < Day Day Up > 
 < Day Day Up > 

Deleting Clips and Gaps

You may have created a perfect sequence, but if it's a minute and a half too long, you're in trouble. Deleting material from your sequence is another reason to mark a clip or area in the Timeline. You can mark and delete an entire clip, a portion of a clip, or a portion of the entire sequence, which might include several clips. You can delete a clip and leave a gap the length of the clip behind. Or you can delete a clip and the gap at the same time, shortening the sequence in the process. Before you get started, look at the Canvas Timecode Duration field to determine the current length of the sequence.

This sequence's duration is 1:10:00 (1 minute and 10 seconds). Let's say your producer wants the sequence cut down to 1 minute. You must cut 10 seconds out of this sequence by either deleting one or more clips in their entirety, or by shaving a few seconds from several different clips. As always before making major changes, it's a good idea to create a backup of this sequence.

1.

In the Browser, Ctrl-click the Canoe Club sequence and choose Duplicate from the shortcut menu. Name the new sequence Canoe Club Short , and double-click it to open it in the Timeline.

2.

Move the playhead to the head of the sequence, and set an In point at this location.

You will begin by deleting the portion of the canoe coming clip that has no audio under it.

3.

Position the playhead on the frame just before the VO_01 clip begins, and press O to set an Out point.

NOTE

Remember that when you drag the playhead with snapping on, it will snap to the first frame of the VO_01 clip. You must then back up one frame. Use the overlays in the Canvas to guide you.

In the Canvas Timecode Duration field, a 3:18 duration appears. In the lower right of the Canvas image area, the last frame overlay appears. In this case, the last frame is the last frame of the gap area before the VO_01 clip.

NOTE

When the playhead is over a first or last frame of any clip in the Timeline, that overlay will appear in the Canvas image area even if the overlay is not related to the current image.

4.

To remove this portion of the canoe coming clip, press the Delete key on your keyboard.

TIP

If you have a clip selected in the Timeline and press Delete, the selected clip will override the In and Out marks. You can deselect all clips by pressing Cmd-Shift-A.

Removing a portion of the clip also removes , or lifts , all material between the In and Out marks in the Timeline and leaves a gap . This would be helpful if you wanted to edit other material to this location. However, it did not actually shorten the sequence.

NOTE

If you get an "Operation not allowed" dialog, make sure that you've turned on the Auto Select controls for all tracks. If you pressed the wrong delete key, you can press Cmd-Z to undo your action.

5.

Play from the beginning of the sequence through this gap.

Whenever a gap in the sequence occurs, Final Cut Pro will continue to play through it, acting as if it were a black clip. Gaps are not clips, but you can select and delete them like clips.

6.

Click in the gap before the first video clip, and press Delete. You can also choose Sequence > Lift.

Selecting and deleting a gap will remove the gap from the sequence. But you can delete material and the gap in one step.

7.

Press Cmd-Z twice to return the deleted portion of the clip and the Timeline marks. Now choose Sequence > Ripple Delete, or press Shift-Delete. If you are using an extended keyboard, you can also press the Forward Delete key.

The clip, along with the gap, is removed, and all the clips that follow are moved up in its place, creating a ripple effect in the Timeline. Check the Canvas Timecode Duration field to see the new duration.

8.

Move the playhead over the canoe going clip, and press X to mark this clip's length.

This clip's duration is 6:12, which is the amount you need to cut to bring the sequence down to 1 minute.

9.

To delete the video clip and the audio sound effect under it, press Shift-Delete.

All selected clips between the In and Out points are deleted, along with the space they occupied. The duration in the Canvas Timecode Duration field displays 59;28 (59 seconds and 28 frames ), which gets you very close to a 1-minute duration.

NOTE

The Auto Select controls determine which tracks are included in certain Timeline operations. If the V1 Auto Select control were toggled off, for example, only the audio would be deleted in step 9, and the video would be left alone.


Project Practice

To continue practicing marking and deleting in the Timeline, press Cmd-Z to undo the last delete. Then mark and delete portions of the sequence as you like, to bring the sequence down to 1 minute. When you're finished, close this sequence by Ctrl-clicking the Canoe Club Short sequence tab and choosing Close Tab from the shortcut menu. Close the Canoe Club sequence the same way.

 < Day Day Up >