| One of the most common output options you'll choose for your completed sequences is to export a media file that can be digitally distributed. You can choose to export a high-quality file to import into special-effects applications, burn on a DVD, or archive on a FireWire drive. You can also experiment with lower-quality file formats for delivery on the Internet through email or on a cell phone. Often you will want to export multiple versions of your project for delivery in a number of different ways. Final Cut Pro utilizes QuickTime as its standard media format. You can export using several different QuickTime-compatible file formats. The specific type of compression or decompression you choose during exporting is called a codec, short for compression/decompression. You can choose to export using the current codec for Final Cut Pro clips and sequence material, or you can use a different QuickTime codec for other types of video, audio, or graphics files. Understanding File Formats Before getting into the specific steps of exporting, let's review some of the common compression types you might use when exporting from a Final Cut Pro project. Video Formats DV-NTSC and DV-PAL codecs are used to capture video and audio from FireWire devices, such as camcorders, decks, and analog-to-DV converter boxes. The data rate is 3.6 megabytes per second (MB/sec). DVCPRO 50 is similar to the DV codec, but it has higher quality and a larger data rate 7 MB/sec. MPEG-2 is a compression standard used most commonly on commercial DVDs. HDV is an MPEG-2 based high-definition video format that records on a DV cassette tape. MPEG-4 (.mp4) is used for Internet posting, streaming, and wireless devices. It has high quality and low data rates, which allow its file size to stay relatively small. H.264 is based on MPEG-4 and provides the highest quality at the lowest data rate (or smallest file size). It encodes with about twice the efficiency of the MPEG-2 format, allowing better quality at the same data rate. It is very versatile and can be used for Web video as well as for high-definition DVD projects. AVI (.avi) is the standard video and audio file format for Windows-compatible computers.
Audio Formats AIFF (.aif) is a high-quality format that is native to Final Cut Pro and many OS X audio applications. It is also used for audio output for DVD use. AAC (.m4p) is the Apple format for downloading music from the iTunes Music Store. It is similar to MP3 but is a higher quality with a reduced file size. It is often used in MPEG-4 multimedia files, and it can support surround sound. Wave (.wav) is the standard audio file format for Windows-compatible computers.
Still Image Formats JPEG (.jpg) has variable compression levels, which makes it an excellent format for Web sites. Photoshop (.psd) can contain multiple layers and be imported into Final Cut Pro as a single layer or with multiple layers intact. PICT (.pct) is a widely used, high-quality graphic file format that can contain an embedded alpha channel. This is the format of choice for single-layer graphics in Final Cut Pro. TIFF (.tiff or .tif) is designed for use in desktop publishing. This format can also be used to convert a Final Cut Pro clip to an image sequence, converting each frame to a separate file. Other file formats supported are BMP (.bmp), PNG (.png), and TGA (.tga).
Exporting a QuickTime Movie The most basic way to export from Final Cut Pro is to use the QuickTime Movie option. This option is set up to output a clip, sequence, or marked portion of a sequence using current or preset sequence settings. By using the current settings, you create a QuickTime file at the same settings and quality as your clips and sequences; no extra media compression is necessary. This allows Final Cut Pro to export your clips quickly with virtually no quality loss. Use this option when you want a full-quality version of your sequence to archive or to import into other applications or, for example, when you want to burn a DVD in iDVD. 1. | In the Racing Promo sequence, set an In point at the beginning of the sequence and an Out point right before the second group of interview narration clips start at 1:00:15;11.
This marks approximately 15 seconds of the sequence, starting from the beginning.
| 2. | Choose File > Export > QuickTime Movie.
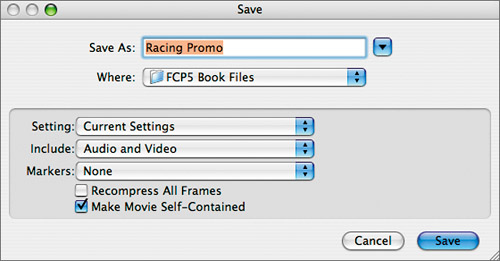
A Save window opens with the name of this sequence automatically entered in the Save As field.
| 3. | Add DV to the end of the filename, navigate to the Media folder, and select the Exports folder as the destination for the new media file.
TIP Adding DV or another descriptive name to your files when exporting will help you remember what settings were used for that file. This will give you a way of comparing how the quality of your clips changes when you use different compression settings. | 4. | Make sure Current Settings is selected in the Setting pop-up menu. The Include pop-up menu should be set to Audio and Video, and the Markers pop-up menu should be set to None.
NOTE The Markers pop-up is where you can select markers that may have been created for a DVD or Soundtrack Pro audio project. | 5. | Leave the Recompress All Frames box unchecked.
When enabled, this option will recompress all frames in the selected export item. This can introduce additional compression artifacts to the file and increase the export time. If Final Cut Pro ever has trouble processing certain frames in your clips, exporting with this option enabled may be a good troubleshooting technique.
| 6. | Make sure the Make Movie Self-Contained box is checked.
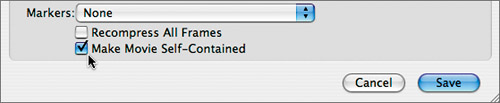
There are two types of QuickTime movies: One is self-contained, and the other is not. A self-contained QuickTime movie can play on your computer or anyone else's because it contains all of the media elements (not just the clip links) from your hard drive that are in the clip or sequence. However, you can also export a QuickTime movie without making it self-contained. This enables you to create and play the movie on your computer but not on anyone else's unless it, too, has all of the media files on its hard drive. A self-contained movie is a larger file size because the media files are contained within the movie.
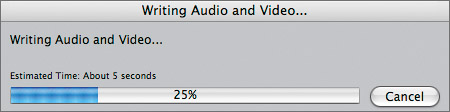
| 7. | Click Save.
A window appears with a progress bar as the clip is being exported. Sometimes, especially with audio files, the exporting is so quick that no window appears.
| 8. | To view this clip in a QuickTime Player, press Cmd-H to hide Final Cut Pro. In the Finder, navigate to the FCP5 Book Files > Media > Exports folder, and double-click the Racing Promo DV clip.
Because you created this clip with Final Cut Pro settings, it opens within the application.
| 9. | Close the Racing Promo DV clip window by clicking the Close button in the upper-left corner.
NOTE Once you've exported a sequence, you can import it into a project, and then view and edit it as you would any other clip. |
Exporting Using QuickTime Conversion Using the QuickTime Movie export function works for many situations when you want to use preset sequence settings. But there are times when you need to convert what you're exporting to a specific file type perhaps to an audio file such as AIFF, or to a file you can play on the Web. In Final Cut Pro, you have numerous file type options for exporting your finished sequence. Keep in mind there is always more than one way to configure your export settings. Preparing media for digital distribution is an exercise in compromise between quality and performance the higher the data rate, the higher the quality, but the poorer the performance. Through practice and trial and error, you can decide for yourself the correct balance based on your distribution medium and your intended audience. In this exercise, you will export a movie for the Web using the QuickTime H.264 compressor. 1. | In the Timeline, mark the first 10 seconds of the Racing Promo sequence.
You will export this portion of the sequence using a different format than the current sequence settings.
| 2. | Choose File > Export > Using QuickTime Conversion.
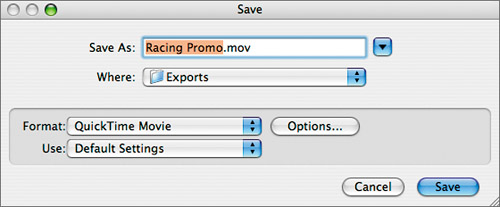
A Save window opens with the name of this sequence automatically entered in the Save As field, along with the QuickTime suffix, .mov.
| 3. | In the Save As field, add H264-web to the filename. If it's not already the destination, navigate to the Media > Exports folder as the destination for this file.
| 4. | With QuickTime Movie as the default format, click the Options button next to the Format pop-up menu.
The Movie Settings window opens, displaying the current settings for Video, Sound, and Internet Streaming.
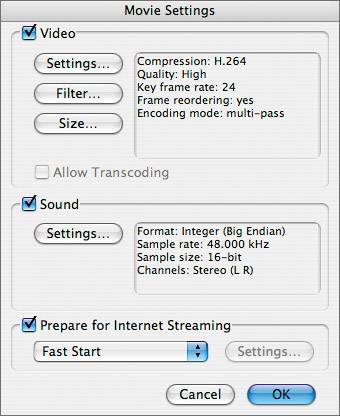
NOTE Each option in the Format pop-up has its own variety of settings. For example, if you choose Still Image, you can choose a format, such as BMP, TIFF, or Photoshop, to export a single frame from a clip or sequence. | 5. | In the Video section, click the Settings button.
The Standard Video Compression Settings window opens, displaying the current compression settings.
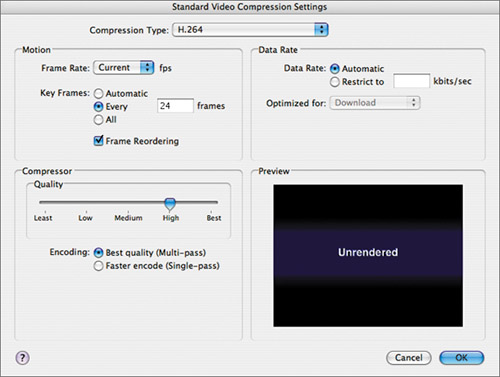 | 6. | Make sure H.264 is chosen for Compression Type, restrict the Data Rate to 400 kilobits per second, and leave the other settings at their defaults. Click OK.
| 7. | In the Movie Settings window, click the Size button. When the Export Size Settings window appears, click Use Custom Size. Enter a custom size of 320 pixels for width and 240 pixels for height.
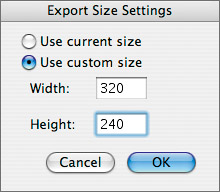
NOTE These pixel dimensions are one of the standards for smaller-sized movie files. | 8. | Click OK to close the Export Size Settings window, and then click OK again to close the Movie Settings window.
NOTE When preparing video for the Web, you should also experiment with different Format settings for your audio by clicking the Settings button under the Sound section. Audio doesn't take up as much space as video, but it can still impact the performance of a Web movie. | 9. | With all settings selected in the Save window, click Save.
Because QuickTime conversion is processor-intensive, it may take several moments for Final Cut Pro to finish exporting your video.
| 10. | When the export is complete, press Cmd-H to hide Final Cut Pro. Navigate to the Media > Exports folder, and double-click the Racing Promo H264-web file.
This movie opens in QuickTime Player, where you can view it. You can also import this movie file into Final Cut Pro and compare it to the QuickTime movie you exported earlier in this lesson.
| 11. | In the dock, click the Final Cut Pro icon to return to the application.
TIP You can use these steps and settings to post a movie for download on the Web. |
Exploring QuickTime Movie Export Options During editing, you may want to export a low-resolution sample of your sequence to send to your producer for approval, or you may need to send your sequence to another system that accepts only certain formats. In these situations, it is important to find out what format is required, and then use the following steps to export your sequence in that format. 1. | In the Timeline, press Option-X to remove the In and Out points in the Racing Promo sequence. In the Browser, select this sequence.
When you want to export a sequence in its entirety, you can simply select it in the Browser. However, if there are In or Out points in the sequence, only that portion of the sequence will be exported.
| 2. | Choose File > Export > Using QuickTime Conversion.
| 3. | Leave the default name as is, Racing Promo.mov. Navigate to the Exports folder, leave the default format on QuickTime Movie, and click the Options button.
| 4. | In the Movie Settings window, click the Video Settings button. When the Standard Video Compression Settings window appears, click the Compression Type pop-up menu.
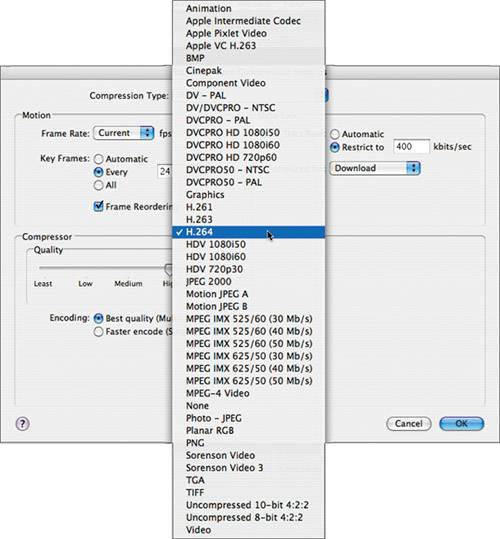 A long list appears of the available codecs on your computer. Different codecs are good for different types of situations. Ask the person for whom you are creating the QuickTime movie which codec to use, or experiment with different codecs to find the one that's best for you. A long list appears of the available codecs on your computer. Different codecs are good for different types of situations. Ask the person for whom you are creating the QuickTime movie which codec to use, or experiment with different codecs to find the one that's best for you.
NOTE Once you choose a codec, you will also need to adjust the settings for that codec. Again, experiment to find the optimal settings for your situation. | 5. | Click Cancel to close the various windows.
|
|