| Once you have created and adjusted your multiclip as necessary, you can move on to the editing process. Editing multiclips is a little different than editing single clips. With multiclip editing, you edit the multiclip to the Timeline and then make editing choices about when you want to cut to a different angle. You can even edit between angles on the fly, in real time, directly in the Timeline. This is similar to productions such as music performances or football games, during which a director or technical director chooses between camera inputs on a video switcher. The output of the video switcher is often broadcast live. Editing a Multiclip to the Timeline Except for one important difference, getting a multiclip into the Timeline is the same as it is when you edit a single clip. You position the playhead in the Timeline, patch the source controls, and mark your multiclip in the Viewer, if you want to edit only a portion of it. You can even click the Overwrite or Insert edit buttons in the Canvas to make the edit. The only difference is that when you choose the drag-and-drop approach to making the edit, either dragging the image to the Canvas Edit Overlay or directly to the Timeline, you must use the Option key. 1. | In the Viewer, set an In point just after the audio pop at the head of the multiclip. Move the playhead toward the end of the multiclip, and set an Out point where all the images are still in view.
| 2. | Make sure the CD track In Points clip is the active audio source and has a green highlight around it. Click the wide right clip as the active video angle.
| 3. | In the Timeline, make sure the playhead is at the beginning of the sequence, and that the video and audio source controls are patched to the V1, A1, and A2 destination tracks.
| 4. | To edit the multiclip into the Timeline, click the red Overwrite edit button in the Canvas. You can also use the drag-and-drop approach, but you must hold down the Option key as you drag.
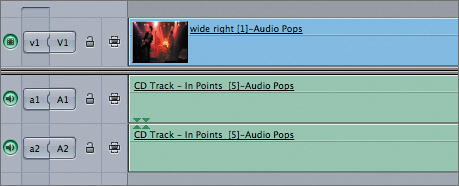
In the Timeline, a stereo audio track appears along with one video track. Multiclips are contained within one track in the Timeline. The audio is the CD Track In Points audio that was selected prior to making the edit. The video is the active video angle you selected prior to making the edit.
NOTE Think of the multiclip in the sequence as a layer cake. The top layer is visible, but you can switch to a different layer beneath it at any time. | 5. | Play the sequence.
When you play the sequence, you see only the active angle, or the top layer, play in the Canvas. To see the other angles play in the Viewer at the same time, you have to change the playhead sync.
NOTE Although you can double-click the multiclip in the sequence to open it in the Viewer, you still need to perform the following step to see all the angles play simultaneously. | 6. | In the Canvas, click the Playhead Sync pop-up and choose Open. You can also choose View > Playhead Sync Open, or press Ctrl-Shift-O. Play the multiclip again.
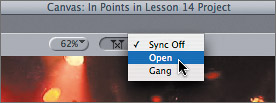
With this option, Final Cut Pro literally opens the multiclip into the Viewer and keeps it open as you continue editing so you can see all the angles as many as 16 play at once. Notice in the Viewer scrubber bar that the two rows of dots, or sprocket holes, appear as they do when you open a single clip from the Timeline.
TIP To ensure that you see all angles play in the Viewer during multiclip editing, make sure you have Multiclip Playback checked in the Timeline RT pop-up and the Playhead Sync set to Open. | 7. | Without playing the multiclip, click the different angles in the Viewer to see each one appear in the Canvas.
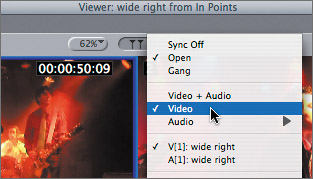
In the Timeline V1 track, the thumbnail image changes whenever you switch to a different angle, as does the angle name on the clip. However,since the switching mode is set to Video in the Playhead Sync pop-up menu, the audio track doesn't change.
NOTE In the Timeline, make sure the multiclip is deselected. Anytime the multiclip is selected in the Timeline, many of the multiclip functions are disabled. | 8. | You can also switch angles by using a shortcut menu. Move the playhead to the head of the sequence and Ctrl-click the multiclip on the V1 track. From the shortcut menu, choose Active Angle, and then choose Gilly_cuguitar from the submenu.
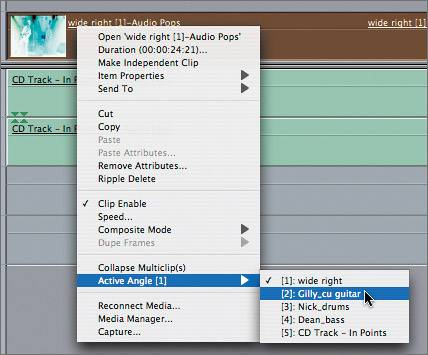
This menu lists the clip names along with their angle numbers.
| 9. | To switch angles on an extended keyboard, click the numbers between 1 and 4 to switch between the different video angles.
As in many Final Cut Pro functions, there is yet another way to switch between the camera angles. There is a preset button bar layout you can load to use in multicam editing.
TIP If you haven't already saved your customized button bar layout, take a moment to do that so you can load it back into the interface when you complete this lesson. | 10. | To load the preset multiclip button bars, choose Tools > Button Bars > Multiclip.
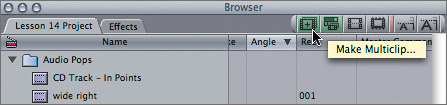
New buttons have been added automatically to the button bars in each window. These buttons are placed in the most logical window to help you with that function. For example, a Make Multiclip button appears in the Browser, and a Show Multiclip Overlays button appears in the Viewer.
| 11. | Move your pointer over some of the new multiclip buttons to familiarize yourself with these options.
| 12. | In the Timeline button bar, there are three sets of multiclip buttons; each set has a different color. Click the far-left gray button, and then click the button to the right of it. Now move your pointer over each of the first eight buttons.
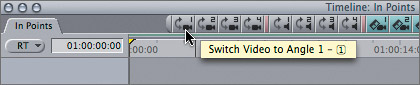
These eight gray buttons are really just two sets of four buttons, with each set divided by a spacer. The first four buttons switch to video angles 1 through 4; the second four switch to audio sources 1 through 4.
|
Cutting Between Angles in a Multiclip In the previous exercises, you clicked a camera angle in the Viewer to switch to it and make it the active angle. In this exercise, you will cut between angles to create edit points in the multiclip. In order to understand and observe everything that is happening when you cut to a different multiclip angle, in this exercise you will move the playhead to a specific location where you want to make an edit and then cut to an angle. In the next exercise, you will cut from angle to angle in real time. 1. | To coordinate the steps in this exercise with the angle layout in your own Viewer, move the playhead in the Timeline to the head of the sequence and position the clips as they appear in the following image.
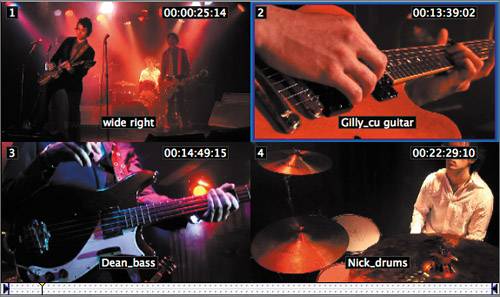
| 2. | To start the sequence with the close-up guitar shot, use any method you like to switch to the Gilly_cu guitar angle. As the active angle, this image will appear in the Canvas when you select it, as well as in the Timeline thumbnail image on the V1 track.
| 3. | Play the sequence, and stop when the band comes in. Position the playhead where you want to cut to the next angle, perhaps close to 1:00:06:06.
| 4. | To cut to angle 1 at this location, move your pointer into the Viewer and click the angle 1 image in the upper-left corner.
In the Timeline, an edit point is created on the multiclip at the playhead location. Now you see a different thumbnail image for each portion of the multiclip.

NOTE You can cut to angles using similar methods as when you switched to angles. | 5. | Play the new edit. Then move the playhead about 4 seconds past this edit point, where you will cut to the next angle.
NOTE Throughout these steps, general times will be used as a simple reference for creating new edit points. You can choose more specific cut points if you like. | 6. | To cut to the Dean_bass angle 3 clip at this location, move your pointer over the Cut Video To Angle 3 button (the third cyan-colored button in the Timeline button bar). Click this button, then play the new edit.
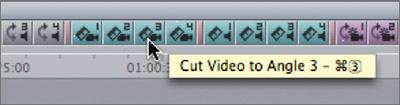
The eight cyan buttons cut to video angles 1 through 4 or audio angles 1 through 4.
NOTE The icon for this function is a razor blade over a video camera. Applying this button at the playhead location creates a new edit point in the multiclip, just as the Razor Blade tool does to single clips. | 7. | Move the playhead forward another 4 seconds from the edit point you just created to the next cut point. This time, if you have an extended keyboard, press Cmd-4, using the number pad, to cut to the angle 4 clip, Nick_drums. If you don't, just click this clip in the Viewer.
| 8. | Move the playhead 4 seconds forward from the previous edit point, and press Cmd-1 on the number pad to cut to the angle 1 clip, wide right, or click this clip in the Viewer.
 | 9. | Move the playhead over the second clip in the multiclip. Change this angle to a different angle using any of the switching methods.
Once an edit has been made in the multiclip, you can change the active angle at that location by moving the playhead to the clip and switching to a different angle.
|
NOTE When you edit a multiclip into a sequence that has additional audio and video tracks of other sources, keep in mind that cutting and switching multiclip angles follows the Auto Select controls.
Project Practice Before you move on to cutting angles in real time, practice switching or cutting angles in the current sequence. Or delete the multiclip from this sequence and repeat the process to edit the multiclip again. To refine the precise location of each edit point, you can use the Roll tool, and the individual angles will all stay in sync. TIP To remove an edit you just created, press Cmd-Z.
Cutting Multiclip Angles Live Finally, you can put on your director's hat and let the footage roll as you cut to different angles in real time. This is often called cutting on the fly. To do this, you have to be somewhat of a multitasker. You watch the individual images in the Viewer and position your fingers over the number pad of your keyboard. When you see an angle in the Viewer you want to cut to, you Cmd-click that angle number. Remember, you can always go back to any edit in the multiclip and switch to a different angle. You can also adjust edit points with the Roll tool. 1. | In the Browser, create a new sequence in the Sequences bin, and name it Cutting Live. Open this sequence in the Timeline.
| 2. | In the Browser, double-click the Audio Pops multiclip to reopen it in the Viewer. If necessary, reset the In and Out points where all the angles are in view. Click the Gilly_cu guitar clip to begin with that angle.
When you reopen the multiclip from the Browser, the Viewer scrubber bar does not contain the sprocket holes as it does when you are viewing the multiclip from the Timeline.

| 3. | Edit this multiclip to the head of the sequence. Remember to hold down Option if you use the drag-and-drop approach.
| 4. | Double-check that the Viewer Playhead Sync is set to Open.
At this point, you are ready to play the sequence and begin cutting live. But before you start, take a moment to think through your plan of action. (Even directors rehearse themselves by taking a closer look at their camera angles before the event begins.) What camera angle do you want to cut to after the guitar close up? Do you want to cut to the wide shot in the middle of the guitar introduction? It may be helpful to play the music track a Synchronizing Camera Angles by Timecode few times as you watch the angles in the Viewer, and begin to formulate ideas.
When you do cut to a new angle in the following step, you will see blue markers appear in the Timeline ruler area at your cut points. When you stop playing the sequence, these markers become edit points in the multiclip.
 TIP Before you begin cutting, you can rehearse by playing through the sequence and switching angles. Switching also places blue markers in the Timeline ruler area, but does not cut the multiclip. | 5. | When you're ready, play the sequence and get ready to press Command and the angle number you want to cut to next, or click that image in the Viewer.
When you stop playing the sequence, edit points appear at the blue marker locations.
 |
TIP To undo the live cuts and return to the single-angle multiclip, press Cmd-Z.
Project Practice If you'd like to keep working with this portion of the music video, create a different version by adding a new angle to the multiclip from the Audio Pops bin. Cut the music video live using the process just outlined. You will work with a new section of the music video in the following exercise. |