| Although this is a book about editing with Final Cut Express HD, it's always helpful to understand certain terminology regarding how the subject was framed in the shot and how the camera moved. This allows you to discuss the footage more precisely during the editing process. The following sections discuss a few frequently used terms. Identifying Camera Moves A camera can be used in many ways. It can be locked down, pointing at a subject or object so that there is no movement; it can follow a subject as he or she moves left or right or stands up and lies down; or it can move back and away from a subject to include other action. Follow these steps to see examples of camera movement: 1. | In the Lesson 2 Media folder in the Finder window, select and play the high 5 clip.
In this zoom in, the camera view magnifies, and Jimbo and his dad seem to get bigger and bigger.
| 2. | Select the jimbo and board clip and play it.
In this zoom out, Jimbo seems to get smaller as the camera pulls back, and the image area expands to include more of the scene around it.
| 3. | In the Cooking folder select the pizza cooking clip and play it.
In a pan shot like this, the camera lens moves left or right horizontally.
| 4. | Select the strawberry cake clip and play it.
In a tilt shot like this, the camera lens moves up or down vertically.
|
Identifying Shot Composition However the camera may be moving, the size of the main subject in the shot is another consideration in video storytelling. The positioning of the subject in relation to the rest of the image is called framing or shot composition. Here are some examples of framing terminology. In telling a story with video or film, you often begin by using a shot that is wide enough to indicate where the subject is. This is referred to as a wide shot or an establishing shot. 1. | In the Lesson 2 Media folder, select surfer-ws and play it.
This is a wide shot of a surfer on a beach. In the wide shot, you can see where he is located and some of the ocean behind him. This gives the viewer a sense of place.
| 2. | Select surfer-ms and play it.
In this medium shot, the surfer's size makes it appear as if the camera has moved forward a few feet. In fact, it has only zoomed in to make the surfer appear larger in the frame.
| 3. | Select surfer-mcu and play it.
In this medium close-up shot, we seem to have come even closer as the surfer is framed around his chest. Again, the camera zoomed in to get a tighter shot.
| 4. | Select surfer-cu and play it.
In this close-up shot, or CU, the surfer's face is framed tightly. You can also zoom in even closer for an extreme close-up, or ECU, for example, having just his face, or even one eye, fill the frame.
| | | 5. | Select surfer-two and play it.
In this two shot, the frame gives equal importance to two subjects.
As you begin to review your material, think in terms of what shots will convey your message or story most effectively. You can use some of the shortcut references, such as CU for close-up, when labeling your footage or when making a list or log sheet of shots on your tape.
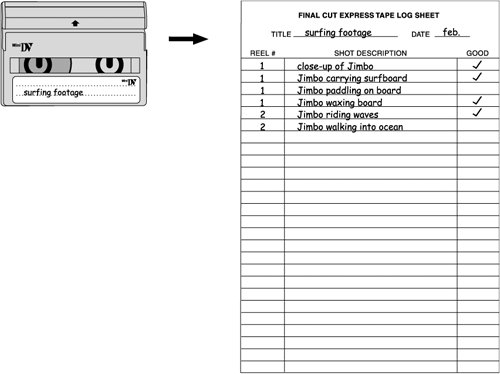 Creating a good labeling system for your source material is highly recommended for any type of project, especially larger editing projects. In Lesson 11, you will learn how Final Cut Express provides tools for keeping your clips organized. Creating a good labeling system for your source material is highly recommended for any type of project, especially larger editing projects. In Lesson 11, you will learn how Final Cut Express provides tools for keeping your clips organized.
|
|