| You have just looked at a series of video dissolve transitions. When you create a dissolve between two audio clips, you lower the volume gradually, or fade down on, the outgoing audio as you raise the volume, or fade up, the incoming audio. These two fades overlap and create a cross fade. An audio cross fade is the equivalent of a video dissolve. Both are considered transitions and have their own folders of options. But there are fewer options to setting up an audio cross fade, so let's start there. Viewing the Effects Tab and Menu The Effects tab in the Browser is where all the transitions are stored for both video and audio. But these same transitions can also be selected from the Effects menu. Audio transitions, or cross fades, can be found in either of these locations. 1. | From the Lesson 14 Project tab, open the Audio Cross Fades sequence and play it.
Different portions of the three-minute vacation.aif music track have been edited together so that each video clip has a different clip of music beneath it. Nice concept, but the music is abrupt as it cuts from clip to clip.
Note If you want to preserve the original Audio Cross Fades sequence to work with at another time, duplicate it and rename the copy My Audio Cross Fades. | 2. | Select the Effects tab in the Browser. If View as List is not selected for this tab, Ctrl-click in the Effects tab's empty gray area under the Name column and choose View as List from the shortcut menu.
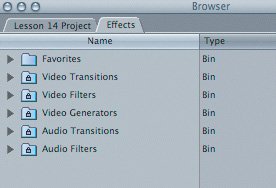 The Effects tab has six bins. All of the Final Cut Express effects are organized into these bins. There are three bins for video effects, two for audio effects, and one for favorite effects.
| | | 3. | Click the disclosure triangle next to the Audio Transitions folder to view the contents.
 There are two audio cross fades in this bin: 0 dB and +3 dB. Notice in the Length column that each of the dissolves has a default length, or duration, of 00:00:01;00, or 1 second. The Cross Fade (+3 dB) transition is underlined because it is the default audio transition.
The two types of audio cross fades have a difference that may or may not be noticeable, depending on the material you are editing. A 0 dB cross fade has a slight dip in the audio level at the midpoint of the transition. The +3 dB cross fade is designed to produce a fade without having a dip in the middle of the transition.
Tip When working with audio, experiment with your options to get the best possible sound. At the end of this exercise, you can experiment with the 0 dB and +3 dB cross fades to determine which is the better choice for your sequence. | 4. | Choose the Effects menu.
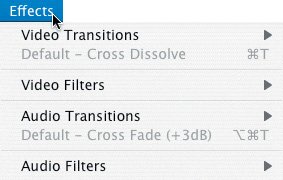 Four of the Effects bin titles also appear here: Audio and Video Transitions and Filters.
| | | 5. | From the Effects menu, choose the Audio Transitions submenu.
The two audio cross-fade options that appear here also appeared in the Effects tab in the Browser.
| 6. | Slide the pointer off the menu and click back in the interface.
|
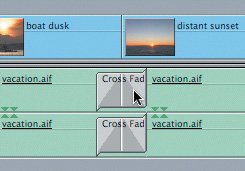
Applying a Cross Fade Applying an audio cross fade is a good way to smooth out any rough sound you may have in your sequence. For example, you might have strong background noise in a clip (called ambient sound). Cutting to that clip might seem jarring. Or you could be working with different sources of music in a sequence but don't want to cut from one to the other. In both cases, creating a cross fade between two audio sources can be an effective solution. Audio cross fades are applied to the edit point between two adjacent audio clips. If an audio clip has two tracks that are a stereo pair, applying a cross fade to one track will automatically apply it to the other track. 1. | In the Timeline, park the playhead before the edit point between the first two clips, bird fly by and boat dusk. Press Option-+ to zoom in to that area of the sequence.
| 2. | On the A1 track, click the edit point between these first two clips.
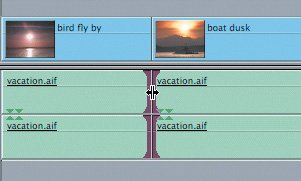 These two tracks are a stereo pair, so the edit points in both tracks become highlighted.
| | | 3. | From the Effects menu, choose Audio Transitions > Cross Fade (0 dB).
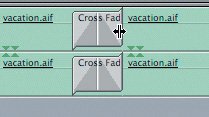
 A transition icon appears over the edit point of both clips in the stereo pair. You may need to zoom into this area to see all the text on the Cross Fade icon.
| 4. | Play this portion of the sequence to hear the cross fade.
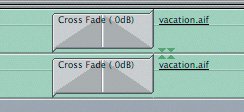
The abrupt cut has been smoothed out considerably by the audio cross fade.
Tip Sometimes it's easier to concentrate on just the sound if you're not seeing the video cutting abruptly in the V1 track. Try disabling the V1 track for these exercises by clicking the Visible control in the Time-line track area. When you apply a cross fade from the Effects tab in the Browser, you don't have to select the edit point first. You can simply drag and drop it onto the edit point in the Timeline.
| 5. | From the Effects tab in the Browser, drag the Cross Fade (+3 dB) icon onto the audio edit point between the second and third vacation.aif clips, under the boat dusk and distant sunset video clips, and release it. Play this transition.
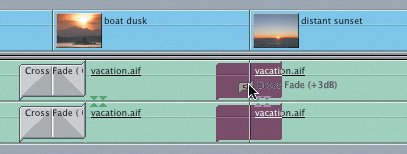 | | | 6. | Apply the same transition from the Effects tab to the audio edit point between distant sunset and blue surf.
Tip If you are zoomed in to the Timeline, a convenient way of moving the sequence is to press H for the Hand tool and drag the sequence left until you see the next edit point. Don't forget to press A to return to the default Selection tool. |
Project Tasks 1. | Add the +3 dB audio cross fade to the remaining audio edit points.
| 2. | Press Shift-Z to display the entire sequence in the Timeline, and play the sequence.
| 3. | Press Cmd-S to save these changes to your project.
|
Changing Transition Durations Once you have reviewed a transition, you might decide the transition rate or duration needs to be longer or shorter. The cross-fade transition you applied in the previous exercise had a default transition rate of one second. But you can give a cross fade whatever duration you want, as long as there is enough clip material or handles to cover it. | | 1. | In the current sequence, double-click the right side of the second cross fade.
 Tip Always click one side or the other of a cross fade. If you click in the middle, the edit point itself will be selected. 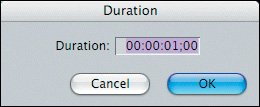 A small transition Duration dialog box appears with the default of 1 second. This duration is already highlighted, so you can begin typing a new duration without first clicking in the box.
| 2. | Enter 2. (two period), and press Tab or Return to enter that amount. Then click OK to accept the duration change.
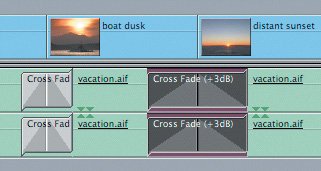 The second transition icon is twice as wide as the original one, indicating the longer transition duration. By comparison, the first cross fade in the sequence has a one-second transition.
| 3. | Play the transition.
Another way to change the cross fade transition duration is using a shortcut menu.
| | | 4. | Ctrl-click one side of the first audio Cross Fade icon.
A shortcut menu containing several transition options appears.
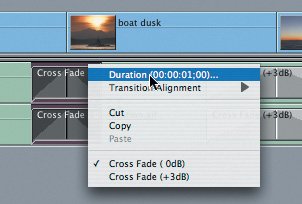 | 5. | Choose Duration.
The same Duration dialog box appears for you to enter a new duration.
| 6. | Enter 75 (frames) and press Return, and then click OK. Play the transition.
You can enter a duration by typing the amount in seconds using a period or zeros, or you can enter the total number of frames. For example, if your video is 30 frames per second, typing 75 would give you a 2.5-second transition.
There is a third way to change transition durations. This approach drags the edge of the transition, just as you drag the edge of a clip to lengthen or shorten it.
| 7. | In the third cross fade, move the pointer over one of the cross-fade edges.
 The pointer changes to a left-right resize arrow.
| | | 8. | Drag the left or right edge out to extend the length of the duration to 1:20.
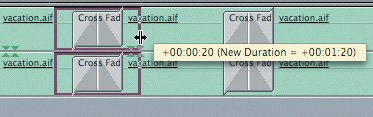 The pop-up information box appears with the amount of the change and the new total transition duration.
| 9. | Play the transition.
|
Copying and Pasting Transitions If you have applied a transition to an edit point and like it enough to use it elsewhere, you can copy and paste it to any other edit point in the sequence. Or you can move it from one edit point to another. 1. | Delete each cross fade in this sequence except the second. You can do this one at a time by selecting a cross fade and pressing Delete. Or you can Cmd-click each one until they are all selected and then press Delete.
| 2. | Drag the edge of the remaining transition icon so that the cross fade has a 20-frame duration.
Tip When dragging a transition to reduce its duration, you may want to turn snapping off temporarily (keyboard shortcut, N) to give you greater control. You can do this as you drag. | 3. | Select this transition, and press Cmd-C to copy it.
You can also choose Edit > Copy, or Ctrl-click the transition and choose Copy from the shortcut menu.
| | | 4. | Ctrl-click the next transition and choose Paste from the shortcut menu.
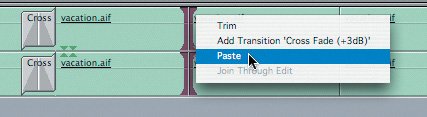 | 5. | This time, select the next edit point and press Cmd-V to paste the transition. You can also choose Edit > Paste.
Note You can continue to paste the originally copied transition because it is held in the computer Clipboard until you copy something else. | 6. | Paste this transition to the remaining edit points in this sequence, and play the sequence.
|
Project Tasks 1. | Change the first audio transition to one second.
| 2. | Delete the other audio transitions in the sequence.
| 3. | Copy the first transition and paste it to all the other edit points.
| 4. | Close the current Audio Cross Fades sequence.
| 5. | Press Cmd-S to save your project.
|
|