Building and Deploying Applications
| | ||
| | ||
| | ||
There are two basic ways to deploy a web application. You can either let OC4J repackage your application from a WAR package to an EAR package or you can use an EAR package. Let's take a look at a very simple application packaged in a WAR file:
WAR Applications
In this example, the application's Servlet is mapped to an *.html URL pattern and will simply print "Hello world" to the response stream.
The directory structure for this application is shown in Figure 10-1.
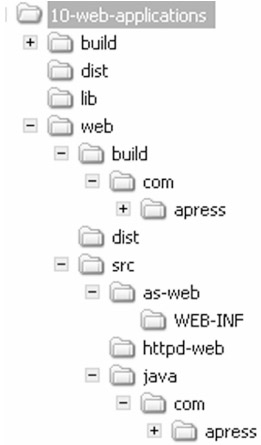
Figure 10-1: Directory structure for the HelloWorld application
The various directories are described in Table 10-1.
| Directory | Description |
|---|---|
| /build | Contains Java class files that generated during the build process. |
| /dist | Contains the distributable application package. |
| /lib | Contains JAR files used by the application. |
| /Web | Contains files specific to the web component of the application. |
| /Web/build | Contains Java class files for the web component. |
| /Web/dist | Contains the distributable package for the web component (typically the WAR file). |
| /Web/src/as-web | Contains source codes for the application server (typically JSP files); this directory must also contain the WEB-INF directory with the web.xml application descriptor. |
| /Web/src/httpd-web | Contains files that can be served by the HTTP server (typically static content such as images, HTML files, stylesheets, and so on). |
| /Web/src/java | Contains the Java code for the application's web component. |
Now that you have the directory structure for the application, you can implement a simple Servlet and create the application descriptor.
The Servlet will print "Hello world" to the response stream, regardless of any request parameters, as shown here:
package com.apress.oc4j.Webapplications; import java.io.IOException; import javax.servlet.ServletException; import javax.servlet.http.HttpServlet; import javax.servlet.http.HttpServletRequest; import javax.servlet.http.HttpServletResponse; public class SampleServlet extends HttpServlet { protected void doGet(HttpServletRequest request, HttpServletResponse response) throws ServletException, IOException { response.getOutputStream().print("Hello World"); } protected void doPost(HttpServletRequest request, HttpServletResponse response) throws ServletException, IOException { doGet(request, response); } } There's nothing in the Servlet code worthy of special attention. Similarly, the web.xml descriptor is very basic, as shown here:
<?xml version="1.0" encoding="ISO-8859-1"?> <!DOCTYPE web-app PUBLIC "-//Sun Microsystems, Inc.//DTD Web Application 2.3//EN" "http://java.sun.com/dtd/web-app_2_3.dtd"> <web-app> <display-name>OC4J Sample Web Application</display-name> <description>Chapter 10 sample application</description> <servlet> <servlet-name>sample</servlet-name> <servlet- class>com.apress.oc4j.webapplications.SampleServlet</servlet-class> <load-on-startup>1</load-on-startup> </servlet> <servlet-mapping> <servlet-name>sample</servlet-name> <url-pattern>*.html</url-pattern> </servlet-mapping> <session-config> <session-timeout>10</session-timeout> </session-config> <welcome-file-list> <welcome-file>index.html</welcome-file> </welcome-file-list> <error-page> <error-code>404</error-code> <location>/error.htm</location> </error-page> </web-app>
To build the application, you need to write an Ant build script. Using the rules in the build.xml file, Ant will compile the Java sources and assemble the WAR file.
The build.xml file
<project name="sample" basedir="." default="dist-war"> <!-- configure the basic directory properties --> <property name="dir.web.java.src" value="web/src/java"/> <property name="dir.web.as-web.src" value="web/src/as-web"/> <property name="dir.web.httpd-web.src" value="web/src/httpd-web"/> <property name="dir.web.build" value="web/build"/> <property name="dir.web.dist" value="web/dist"/> <property name="dir.lib" value="lib"/> <property name="dir.dist" value="dist"/> <path id="project.classpath"> <fileset dir="${dir.lib}"> <include name="*.jar"/> </fileset> </path> <!-- Create needed directories --> <target name="init"> <mkdir dir="${dir.dist}"/> <mkdir dir="${dir.web.build}"/> <mkdir dir="${dir.web.dist}"/> </target> <!-- Compile the sources --> <target name="compile-web" depends="init"> <javac srcdir="${dir.web.java.src}" destdir="${dir.web.build}" debug="on" debuglevel="lines,vars,source"> <classpath refid="project.classpath"/> <exclude name="**/Test*.java"/> <exclude name="**/AllTests.java"/> </javac> </target> <target name="dist-web" depends="compile-web"> <delete file="${dir.dist}/sample.war"/> <war warfile="${dir.web.dist}/sample.war" webxml="${dir.web.as-web.src}/WEB-INF/web.xml" > <classes dir="${dir.web.build}"> <include name="**/*.class"/> </classes> <lib dir="${dir.lib}" includes="*.jar"/> <fileset dir="${dir.web.as-web.src}"> <include name="**/*.xml"/> <include name="**/*.jsp"/> <exclude name="**/web.xml"/> </fileset> <fileset dir="${dir.web.httpd-web.src}"> <include name="**/*"/> </fileset> </war> </target> </project> Running Ant will result in the creation of a simple.war file in the /web/dist directory. This means that you have the first application and you can deploy it. Provided that you haven't changed the default settings, go to http://localhost:1810/ to open up Application Server Control, as shown in Figure 10-2.
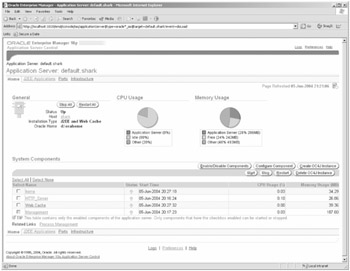
Figure 10-2: Application Server Control main page
Then click the instance name to which you wish to deploy the application and select the Applications tab, as shown in Figure 10-3.
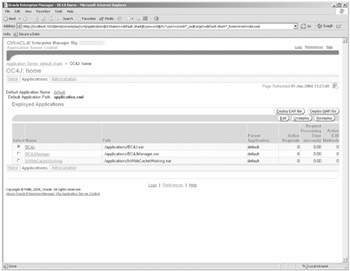
Figure 10-3: OC4J list of applications
Then click the Deploy WAR File button to start the deployment. Because OC4J needs to convert the WAR file into an EAR file, you'll need to provide the application name and URL to which you want to map the application. Locate the WAR file and set the Application Name setting to sample and the Map to URL setting to /sample . OC4J will wrap the WAR file into an EAR file and deploy it. When OC4J deploys the application, it will be listed among other applications, as shown in Figure 10-4.
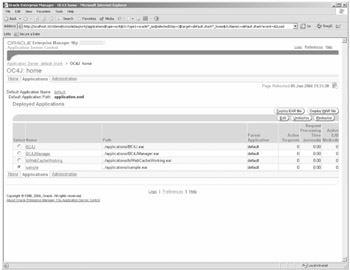
Figure 10-4: Deployed applications in OC4J Application Server Control
Notice that even though you have deployed the application as a WAR file, OC4J wrapped it into an EAR file and deployed the EAR.
Depending on the HTTP_Server configuration, the application will be accessible on http://localhost/sample/<anything>.html . Because the URL pattern mapping in the application says "all .html requests are mapped to SimpleServlet," you'll see a nice "Hello world" message, as shown in Figure 10-5.
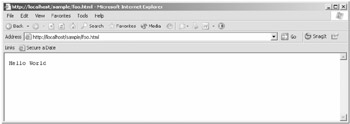
Figure 10-5: The SampleServlet web application in action
EAR Applications
To take full advantage of OC4J's features and to simplify the deployment, you'll modify the build procedure to produce an EAR file instead of a WAR file, as shown in Figure 10-6.
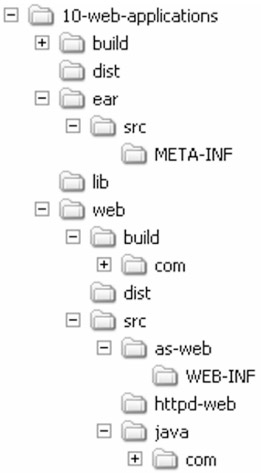
Figure 10-6: Revised project diectory structure for packaging as EAR file
You should add another directory, /ear . This includes the META-INF directory, which contains the application.xml descriptor. The descriptor specifies the application's name and configures the web module, as described in the following code sample:
<?xml version="1.0"?> <!DOCTYPE application PUBLIC "-//Sun Microsystems, Inc.// DTD J2EE Application 1.2//EN" "http://java.sun.com/j2ee/dtds/application_1_2.dtd"> <application> <display-name>Chapter 10 sample application</display-name> <module> <web> <web-uri>sample.war</web-uri> <context-root>/sample</context-root> </web> </module> </application>
You'll also need to modify the build.xml file to instruct and create an EAR file, as shown in the following code sample:
<project name="sample" basedir="." default="dist-ear"> <!-- configure the basic directory properties --> <property name="dir.web.java.src" value="web/src/java"/> <property name="dir.web.as-web.src" value="web/src/as-web"/> <property name="dir.web.httpd-web.src" value="web/src/httpd-web"/> <property name="dir.web.build" value="web/build"/> <property name="dir.web.dist" value="web/dist"/> <property name="dir.ear.src" value="ear/src"/> <property name="dir.lib" value="lib"/> <property name="dir.dist" value="dist"/> <path id="project.classpath"> <fileset dir="${dir.lib}"> <include name="*.jar"/> </fileset> </path> <!-- Create needed directories --> <target name="init"> <mkdir dir="${dir.dist}"/> <mkdir dir="${dir.web.build}"/> <mkdir dir="${dir.web.dist}"/> </target> <!-- Compile the sources --> <target name="compile-web" depends="init"> <javac srcdir="${dir.web.java.src}" destdir="${dir.web.build}" debug="on" debuglevel="lines,vars,source"> <classpath refid="project.classpath"/> <exclude name="**/Test*.java"/> <exclude name="**/AllTests.java"/> </javac> </target> <target name="dist-web" depends="compile-web"> <delete file="${dir.dist}/sample.war"/> <war warfile="${dir.web.dist}/sample.war" webxml="${dir.web.as-web.src}/WEB-INF/web.xml" > <classes dir="${dir.web.build}"> <include name="**/*.class"/> </classes> <lib dir="${dir.lib}" includes="*.jar"/> <fileset dir="${dir.web.as-web.src}"> <include name="**/*.xml"/> <include name="**/*.jsp"/> <exclude name="**/web.xml"/> </fileset> <fileset dir="${dir.web.httpd-web.src}"> <include name="**/*"/> </fileset> </war> </target> <target name="dist-ear" depends="dist-web"> <delete file="${dir.dist}/sample.ear"/> <ear destfile="${dir.dist}/sample.ear" appxml="${dir.ear.src}/META-INF/application.xml"> <fileset dir="${dir.web.dist}"> <include name="**/*.war"/> </fileset> </ear> </target> </project> Running Ant using the new build file will produce a simple.ear application placed in the /dist directory. To deploy the created EAR file, go to OC4J Application Server Control, click the instance name to which you want to deploy the application, select the Applications tab, and click the Deploy EAR File button. Locate the EAR file, specify the application's name and click Continue. OC4J will process the EAR file and suggest a URL mapping from the /META-INF/application.xml file, although you're free to replace it with one of your own. Just as in the WAR deployment, the application will be listed among other applications and you can test it by going to http://localhost/sample/foo.html . The result should be "Hello world," with the exception that this time it comes from the EAR application that you've built.
EAR Deployment Mechanics
You know how to deploy an applicationthat's the first step. Let's take the next step and explore what OC4J does behind the scenes when you tell it to deploy an EAR file. OC4J will decompress the EAR file and the WAR file inside it into a directory of the same name as the one you specified in the Application Name field the earlier. You can see an example of this in Figure 10-7.
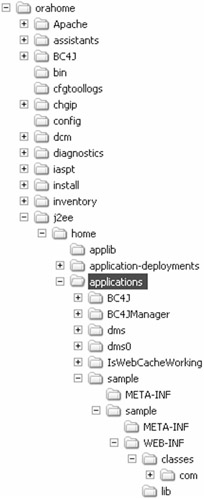
Figure 10-7: OC4J home directory and deployed sample application
Typically, an application will be decompressed in the orahome/j2ee/<instance-name>/applications/<application-name> directory. On inspection of the directory structure in orahome/j2ee/home/applications/sample/ , you can tell that you've deployed an application called "sample" into the "home" instance. To check that this is indeed the correct directory, let's create a static.htm file and place it into orahome/j2ee/home/applications/sample/ . The content of the file isn't relevant; when the file is in the directory, you can try accessing it by navigating to http://localhost/sample/static.htm , as shown in Figure 10-8.
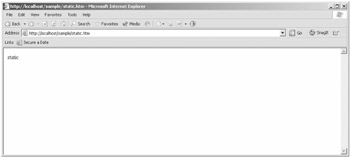
Figure 10-8: Static file served by OC4J
Notice that the file extension is htm , not html ; HTML files are handled by the Servlet. Renaming the file to static.html and refreshing the page will result in a "Hello world" message printed by the Servlet.
Now that you know what OC4J does to deploy an application, you can use it to speed up the development. Programming a web application involves a mix of writing Java code that controls the logic and content creation, which in turn controls how the application is presented to the user . Any change to the logic must result in a rebuild of the application and in redeployment in order to effectively get the changes to the OC4J server.
Even though you can change the class files in the WEB-INF/classes directory, there's no guarantee that OC4J will reload the changed class. It's therefore necessary to build and redeploy the entire application if the Java code changes.
For example, if you changed the SimpleServlet to print the equally infamous string Foobar! instead of Hello world then you would need to recompile the Java code and repackage the application, resulting in a new EAR file. Next, you could undeploy and then deploy it from scratch, but that would be unnecessarily complicated. Instead, you can select the application in the application list and click Redeploy, thereby specifying the new EAR file. OC4J will redeploy the application in a single step.
Changes to a JSP page, however, need not necessitate redeployment of the whole application. Let's take a look at that now.
Updating JSPs
If you take the time to explore the uncompressed directory, you must be wondering where the temporary files, such as compiled JSP pages are. The uncompressed directory structure, /home/applications/sample/ , isn't the actual working directory. The working directory is in the application-deployments subdirectory, as shown in Figure 10-9.
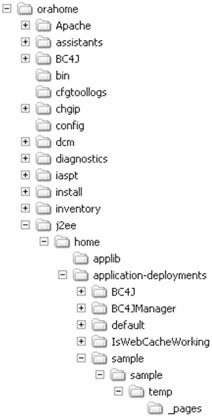
Figure 10-9: The application-deployments directory
This structure looks much more familiar. OC4J generated all the additional application descriptors and temporary directories for the JSP pages. Even though OC4J runs the application from this directory, don't modify any files in it.
To start from a well-defined point, let's remove the sample application from the OC4J instance by selecting it and clicking Undeploy.
Then redeploy the application using the procedure described in the "EAR Applications" section. The application is now deployed and it contains an index.jsp file in the sample.war directory. To verify that the new application is deployed, go to http://localhost/sample/index.jsp . OC4J will compile the JSP page and display its contents.
Let's now change the content of the JSP page that doesn't require any additional logic (for example, correcting a spelling mistake). You'll change it in the project directory; but you don't want to redeploy the entire application just because you've changed a single JSP file. You can take advantage of the fact that OC4J decompresses the application. You'll overwrite the JSP page in orahome/j2ee/home/applications/sample/sample/index.jsp . Providing you haven't changed the configuration of the JSP container in the instance, OC4J will detect that the JSP file has been changed and recompile it. The entire process is relatively painless andmost importantdoesn't require redeployment of the application
| | ||
| | ||
| | ||
EAN: 2147483647
Pages: 150