Installation Resources
|
| < Day Day Up > |
|
Installing Oracle E-Business Suite is a resource intensive endeavor. Oracle has suggested minimums for things like disk space, temp space, memory, and spare disk space for staging the CDs. These minimums differ depending on OSs and can be found in the installation manual for the version and OSs that you are installing. Plan high. It is easier to live with a little too much space and knowing you have room to grow than too little space and having to allocate or buy more to proceed. You will need approximately 15 GB in a staging area; this should be enough to copy over the contents of the CDs required for the installation. However, if you are doing a multi-node installation and you have different OSs on different nodes, you will need this amount on each OS for that OS's respective sets of files. If you cannot map a drive from one server to another or if you cannot NFS mount a staging directory from one server to another within the same OS set, you will need 15 GB on every server to use for staging.
Oracle suggests at least 650 MB available in a temp directory. I have never been able to get an installation to be happy with just this minimum requirement. Having 1 GB free in whatever directory you are using for temp space would allow you to err on the safe side.
The database that is installed with RapidWiz can be installed in 25 to 30 GB of space, but this is the bare bones database; allocating 40 to 50 GB to the directory structure where these database files will reside would not be overallocating, especially if you are implementing a significant number of modules. Allocating 1.5 to 2 times the recommended minimum, in this case, will give you room to get all of the data required into the system, migrate your data from whatever system you are moving from, and should give you some slack for the first year or so.
Another 15 GB should be allocated for each set of "Oracle Homes," Apps layers, and 9iAS that you will be maintaining (these will end up distributed between <sid>ora, <sid>appl, and <sid>comn and depending on how many servers you have involved in your installation, can be distributed over several physical boxes as well).
These are the suggested sizes that Oracle includes in its manuals, adjusted somewhat for growth and for what really might occur. What usually is not included in planning documentation, and therefore is not included in many companies' planning, is the amount of extra space that you will need. You will need to allocate, on whatever physical server your Concurrent Managers will reside, space to maintain a certain period's worth of logs and out files for Concurrent Manager runs (i.e., the reports that are generated from the Concurrent Manager jobs and the errors that are generated when one of the Concurrent jobs fails).
While you are planning the space for your implementation, plan for space that you will need in the near future for your patching requirements as well. Even if you install the latest major release of Oracle E-Business Suite, you will have to apply patches. The farther from the release date, the more patches you are apt to have to install to bring you up to the most current releases of all minipacks. Patches come zipped. You need to have enough space in a patch directory for the downloaded patches in their zipped form as well as their unzipped form. Having 20 or 30 GB available for just this purpose would not be extreme overallocation for this patch-staging directory. Sound like a lot? The 11.5.8 upgrade patch downloads with a size of 1.5 GB and unzips to over 7 GB. That is one patch. While most patches are not this big, being able to accommodate one that is without having to worry about having sufficient disk space will make your life easier in the not too distant future. It is not uncommon to have to patch a fresh installation before it is fully functional. You may have to patch it several times before you get your implementation to go live. Even reading through the installation documentation, you usually uncover the need to install help patches, Self-Service Framework patches, other minor fix patches, and newly released minipacks that have to be applied even on top of the new fresh installation.
Planning for the Apps database is much like planning for any other database. You will need space for archive logs for your production database, space for online backups, and space for other custom scripts and files that you use for tuning and administering the database.
Getting Ready
Stage the CDs
It does not matter what OS you are using — one on which you can easily change out the CDs or one where changing means unmounting and remounting — you will want to stage the CDs locally on the computer. Either dedicate a permanent directory to the CDs (you could reuse the space later for patches) or put them in a temporary directory where you have enough disk space or whatever your company policy is for this kind of thing. When you need anywhere from 8 to 14 CDs staged for a typical installation, the disk space is significant. Disk to disk access is faster throughput than CD to disk and you will not have to change out the CDs several times during the installation (this could free you up to run the installation from somewhere besides the terminal attached to the server).
Having them staged in one central location will help with multiple installations, too. You can NFS mount the directory on UNIX or map a drive on Windows. If you are installing three or four environments, staging the CDs once will save space and create a central patching directory for all environments, too.
The staging directory structure is most easily understood and maintained if it is laid out with some thought and planning.
-
Oracle 8i: This one is used for the required Oracle files on the Apps tier server. You can name the uppermost directory for this set of CDs something logical like ora8.
Disk_1 Ora8-< Disk_2
-
Tools: This is where you will stage the CDs containing the Apache server installation. This has to be on the tier with your application files.
Disk_1 Tools-< Disk_2
-
Appl_top: This directory is where you will put the CDs for the apps pieces, including the Concurrent Manager installation, so this directory and staged CDs need to be on all of your platforms.
Disk_1 Appl_top-< Disk_2
-
Database: This directory will stage the CDs that install the database binaries as well as the database data files that make up the preseeded database. This only has to be on the database tier.
Disk_1 Appsdb< Disk_2
-
RapidWiz: This directory stages the infamous red CD, the one that runs RapidWiz, which on the database tier, runs runInstaller. This CD must be staged on every platform as it is the means by which all pieces of your installation will run.
RedCD - Disk_1
Make Sure You Have All of the Other Software Installed
If you are installing on UNIX, you need to make sure that you have JDK and your C++ compiler installed on the server. If you are installing on Windows, you need both of these pieces as well as MKS Toolkit. If these are not installed correctly and you do not have the paths to the executables, you will run into problems and end up with an incomplete installation that ends with errors.
Know What Ports and Server Names You Are Going to Use
"Getting prepared" means planning. You need to plan what ports and server names you are going to use for each instance. If you have a server named Bullwinkle and one named Rocky, you can use port 8000 on both Rocky and Bullwinkle, but not on two different instances on Rocky. It would be better to select entirely different port numbers for each instance, regardless of whether they are located on the same or different servers. This is done for simplicity and security. For instance, if you are going to have four instances — Vis, Dev, Test, and Prod — you will need four different sets of port numbers. You do not just need Listener ports. You need Apache ports, database ports, Forms ports, Reports ports, and others. Each service's port needs to be different from the others on each server and should be different from one installation to the next. You need to determine where you want your database files. Do you want to have all of your files (i.e., control, data, redo, rollback, and index) in the same mount point or directory? How do you want your middle tier files divided up? Will you be putting them all under one major upper level directory or will they be individual directories in the root directory? None of this is really a big undertaking, but it does mean that you need a plan.
Make Sure That You Have Sufficient Space Allocated for the Base Installation with Room to Grow
The installation takes a lot of planning and a lot of room. The database files need about 40 GB for the base, preseeded database files and enough room to grow for the first several months. You need to lay down the RDBMS binaries in their own Oracle-Home. That will take another 4 to 6 GB, depending on which version of the database you are going to stop with (8.1.7.3 is what most of the installations install, but 9.2.0.# is currently what is supported in most configurations. As of early 2003, Oracle 8i will soon be desupported).
Keep the Configuration Files
Once you saved the configuration files that RapidWiz created (see Table 9.1), put them in a central location where they are sure to be backed up and where they are safe. Make several copies and keep them with each piece of the installation. Make a copy and keep it in on your local PC; make one on each of several different places on a network file server. Document where you have stored at least a couple of copies of these files. The files are small, but critical. They hold all of the configuration information on your implementation. If for any reason you need to reinstall an identical configuration later, this file will be necessary. When you clone using adclone, this file is required for the clone to work correctly. If you were not the person who did the initial installation, you will be able to find considerable valuable information about your configuration in this file, information that Oracle Support will often ask for when they are troubleshooting problems.
|
[GENERAL] CONFIGURED_ENVS=VIS CONFIGURATION_FORMAT=11.5.0 [VIS] VIS.DBS_HOST=ws41 VIS.DBS_ORASID=VIS VIS.DBS_ORASEED=Vision Demo VIS.DBS_ORANAME=VIS VIS.DBS_DBCHARSET=WE8ISO8859P1 VIS.DBS_DEFTERR=AMERICA VIS.DBS_DBPORT=1523 VIS.DBS_PLATFORM=Windows NT VIS.DBS_APPLTOP=d:\visappl VIS.DBS_APPLTOP2=d:\visappl VIS.DBS_APPLTOP3=d:\visappl VIS.DBS_APPLTOP4=d:\visappl VIS.DBS_CHARSET=WE8ISO8859P1 VIS.DBS_COMNTOP=d:\viscomn VIS.DBS_ORA816=d:\visdb\8.1.7 VIS.DBS_ORA806=d:\visora\8.0.6 VIS.DBS_ORAWDB=d:\visora\iAS VIS.DBS_DBFS1=d:\visdata VIS.DBS_DBFS2=d:\visdata VIS.DBS_DBFS3=d:\visdata VIS.DBS_DBFS4=d:\visdata VIS.DBS_JAVATOP=d:\viscomn\java VIS.DBS_PORTALTOP=d:\viscomn\portal VIS.DBS_JDKTOP=d:\viscomn\util\jre\1.1.8 VIS.DBS_TEMP=d:\viscomn\temp VIS.DBS_NTUSER=applmgr VIS.DBS_NTPASS=applmgr VIS.DBS_DOMAIN=your.company.com VIS.DBS_MKS=C:\mksnt VIS.DBS_MSDEV=C:\VC98 VIS.DBS_JDKHOME=C:\java\jdk1.3.1 VIS.DBS_APPL_TOPbase=d:\ VIS.DBS_COMN_TOPbase=d:\ VIS.DBS_ORA_TOPbase=d:\ VIS.DBS_DATA_TOPsys=d:\ VIS.DBS_DATA_TOPlogs=d:\ VIS.DBS_DATA_TOPdata=d:\ VIS.DBS_NTUSERbase=applmgr VIS.DBS_NTPASSbase=applmgr VIS.DBS_DOMAINbase=your.company.com |
|
VIS.ADM_HOST=ws41 VIS.ADM_PLATFORM=Windows NT VIS.ADM_APPLTOP=d:\visappl VIS.ADM_APPLTOP2=d:\visappl VIS.ADM_APPLTOP3=d:\visappl VIS.ADM_APPLTOP4=d:\visappl VIS.ADM_CHARSET=WE8ISO8859P1 VIS.ADM_COMNTOP=d:\viscomn VIS.ADM_ORA816=d:\visdb\8.1.7 VIS.ADM_ORA806=d:\visora\8.0.6 VIS.ADM_ORAWDB=d:\visora\iAS VIS.ADM_DBFS1=d:\visdata VIS.ADM_DBFS2=d:\visdata VIS.ADM_DBFS3=d:\visdata VIS.ADM_DBFS4=d:\visdata VIS.ADM_JAVATOP=d:\viscomn\java VIS.ADM_PORTALTOP=d:\viscomn\portal VIS.ADM_JDKTOP=d:\viscomn\util\jre\1.1.8 VIS.ADM_TEMP=d:\viscomn\temp VIS.ADM_NTUSER=applmgr VIS.ADM_NTPASS=applmgr VIS.ADM_DOMAIN=your.company.com VIS.ADM_MKS=C:\mksnt VIS.ADM_MSDEV=C:\VC98 VIS.ADM_JDKHOME=C:\java\jdk1.3.1 VIS.ADM_APPL_TOPbase=d:\ VIS.ADM_COMN_TOPbase=d:\ VIS.ADM_ORA_TOPbase=d:\ VIS.ADM_DATA_TOPsys=d:\ VIS.ADM_DATA_TOPlogs=d:\ VIS.ADM_DATA_TOPdata=d:\ VIS.ADM_NTUSERbase=applmgr VIS.ADM_NTPASSbase=applmgr VIS.ADM_DOMAINbase=your.company.com VIS.CON_HOST=ws41 VIS.CON_RPCPORT=1528 VIS.CON_REPSPORT=7002 VIS.CON_PLATFORM=Windows NT VIS.CON_APPLTOP=d:\visappl VIS.CON_APPLTOP2=d:\visappl VIS.CON_APPLTOP3=d:\visappl VIS.CON_APPLTOP4=d:\visappl VIS.CON_CHARSET=WE8ISO8859P1 VIS.CON_COMNTOP=d:\viscomn |
|
VIS.CON_ORA816=d:\visdb\8.1.7 VIS.CON_ORA806=d:\visora\8.0.6 VIS.CON_ORAWDB=d:\visora\iAS VIS.CON_DBFS1=d:\visdata VIS.CON_DBFS2=d:\visdata VIS.CON_DBFS3=d:\visdata VIS.CON_DBFS4=d:\visdata VIS.CON_JAVATOP=d:\viscomn\java VIS.CON_PORTALTOP=d:\viscomn\portal VIS.CON_JDKTOP=d:\viscomn\util\jre\1.1.8 VIS.CON_TEMP=d:\viscomn\temp VIS.CON_NTUSER=applmgr VIS.CON_NTPASS=applmgr VIS.CON_DOMAIN=your.company.com VIS.CON_MKS=C:\mksnt VIS.CON_MSDEV=C:\VC98 VIS.CON_JDKHOME=C:\java\jdk1.3.1 VIS.CON_APPL_TOPbase=d:\ VIS.CON_COMN_TOPbase=d:\ VIS.CON_ORA_TOPbase=d:\ VIS.CON_DATA_TOPsys=d:\ VIS.CON_DATA_TOPlogs=d:\ VIS.CON_DATA_TOPdata=d:\ VIS.CON_NTUSERbase=applmgr VIS.CON_NTPASSbase=applmgr VIS.CON_DOMAINbase=your.company.com VIS.FRM_HOST=myhost VIS.FRM_WEBPRT=8002 VIS.FRM_WLSNR=VIS VIS.FRM_FORMSPRT=9002 VIS.FRM_METDATAPRT=9012 VIS.FRM_METREQPRT=9022 VIS.FRM_PLATFORM=Windows NT VIS.FRM_APPLTOP=d:\visappl VIS.FRM_APPLTOP2=d:\visappl VIS.FRM_APPLTOP3=d:\visappl VIS.FRM_APPLTOP4=d:\visappl VIS.FRM_CHARSET=WE8ISO8859P1 VIS.FRM_COMNTOP=d:\viscomn VIS.FRM_ORA816=d:\visdb\8.1.7 VIS.FRM_ORA806=d:\visora\8.0.6 VIS.FRM_ORAWDB=d:\visora\iAS- VIS.FRM_DBFS1=d:\visdata VIS.FRM_DBFS2=d:\visdata |
|
VIS.FRM_DBFS3=d:\visdata VIS.FRM_DBFS4=d:\visdata VIS.FRM_JAVATOP=d:\viscomn\java VIS.FRM_PORTALTOP=d:\viscomn\portal VIS.FRM_JDKTOP=d:\viscomn\util\jre\1.1.8 VIS.FRM_TEMP=d:\viscomn\temp VIS.FRM_NTUSER=applmgr VIS.FRM_NTPASS=applmgr VIS.FRM_DOMAIN=your.company.com VIS.FRM_MKS=C:\mksnt VIS.FRM_MSDEV=C:\VC98 VIS.FRM_JDKHOME=C:\java\jdk1.3.1 VIS.FRM_APPL_TOPbase=d:\ VIS.FRM_COMN_TOPbase=d:\ VIS.FRM_ORA_TOPbase=d:\ VIS.FRM_DATA_TOPsys=d:\ VIS.FRM_DATA_TOPlogs=d:\ VIS.FRM_DATA_TOPdata=d:\ VIS.FRM_NTUSERbase=applmgr VIS.FRM_NTPASSbase=applmgr VIS.FRM_DOMAINbase=your.company.com VIS.WEB_HOST=myhost VIS.WEB_SERVLETPORT=8882 VIS.WEB_TCFPORT=15002 VIS.WEB_PLATFORM=Windows NT VIS.WEB_APPLTOP=d:\visappl VIS.WEB_APPLTOP2=d:\visappl VIS.WEB_APPLTOP3=d:\visappl VIS.WEB_APPLTOP4=d:\visappl VIS.WEB_CHARSET=WE8ISO8859P1 VIS.WEB_COMNTOP=d:\viscomn VIS.WEB_ORA816=d:\visdb\8.1.7 VIS.WEB_ORA806=d:\visora\8.0.6 VIS.WEB_ORAWDB=d:\visora\iAS VIS.WEB_DBFS1=d:\visdata VIS.WEB_DBFS2=d:\visdata VIS.WEB_DBFS3=d:\visdata VIS.WEB_DBFS4=d:\visdata VIS.WEB_JAVATOP=d:\viscomn\java VIS.WEB_PORTALTOP=d:\viscomn\portal VIS.WEB_JDKTOP=d:\viscomn\util\jre\1.1.8 VIS.WEB_TEMP=d:\viscomn\temp VIS.WEB_NTUSER=applmgrVIS.WEB_NTPASS=applmgr VIS.WEB_DOMAIN=your.company.com |
|
VIS.WEB_DOMAIN=your.company.com VIS.WEB_MKS=C:\mksnt VIS.WEB_MSDEV=C:\VC98 VIS.WEB_JDKHOME=C:\java\jdk1.3.1 VIS.WEB_APPL_TOPbase=d:\ VIS.WEB_COMN_TOPbase=d:\ VIS.WEB_ORA_TOPbase=d:\ VIS.WEB_DATA_TOPsys=d:\ VIS.WEB_DATA_TOPlogs=d:\ VIS.WEB_DATA_TOPdata=d:\ VIS.WEB_NTUSERbase=applmgr VIS.WEB_NTPASSbase=applmgr VIS.WEB_DOMAINbase=your.company.com VIS.BASE_LANG=US - American_English VIS.ENV_LANGS={US - American_English} VIS.PRODUCTS={FND} [GENERAL] |
Installation
Installation of all pieces of Oracle E-Business Suite is accomplished through the Java-based, menu-driven wizard type process called RapidWiz. Before you run this, you will need to have the users created at the OS that will own the different pieces of the application. These users will need to be part of the DBA group. The group does not need to be named DBA, but there needs to be a group to which all of the DBAs or Apps DBAs and all of the owners of the software pieces belong. Figure 9.2 shows the first screen that you are presented with when you start RapidWiz. From here, you tell the installer whether you are going to be doing a new installation or reconfiguring an installation that you have gone through already. This is the utility through which you also add new products to your license and languages to your implementation. Through this screen you allow the rest of RapidWiz to help walk you through the rest of your installation. It is easier to complete an installation if you have already made some decisions before starting. First, you should decide the names you want to call your instances.
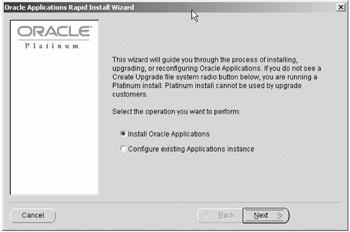
Figure 9.2: RapidWiz Startup Screen
Figure 9.3 shows your first decision. Are you going to install all pieces on one server, on two nodes, or on multiple nodes? If you are going to put your Concurrent Managers on the server with your database and all other pieces on a second, separate server, the two node option is the one you will likely choose. It allows for some added flexibility over single node installs, but also allows for central administration for medium to smaller large-scale implementations.
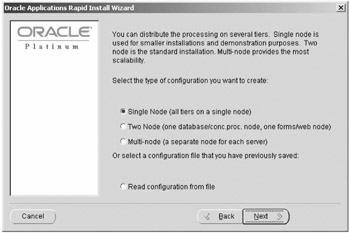
Figure 9.3: Node Installation Screen
As you can see in Figure 9.4, the two node installation assumes that you are putting your Concurrent Managers on the same server as the database tier. Multi-node installation allows, but does not require, a separate server for each piece of the installation.
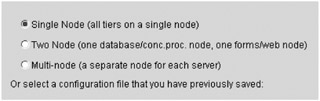
Figure 9.4: Two Node Concurrent Manager Assumptions
Figure 9.5 is the next menu that you will be presented with, regardless of which type of installation you choose. This is where you decide if you are going to install one, two, or three instances with one run of the installer (or at least configure them; you can install them after you have saved the configuration file). You can name the instance anything you want; you are constrained only by the allowable number of characters in a SID name. You can change the name of the instance on this screen and select what kind of installation it is: a fully populated preconfigured installation with the Vision Demo data or the bare bones version that installs with a fresh installed database selection.

Figure 9.5: Multiple Concurrent Installations
Figure 9.6 and Figure 9.7 show examples of the screens on which you choose which pieces of Oracle E-Business Suite you are installing that you have licensed. Looking at Figure 9.6, you see where you can opt to use Suite Licensing, where you would choose Projects, for example. RapidWiz would automatically select all of the subobjects under Projects (e.g., Project Costing, Project Billing, Internet Time, etc.) and install and license them all for you.
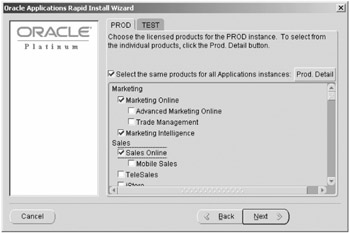
Figure 9.6: Suite Licensing
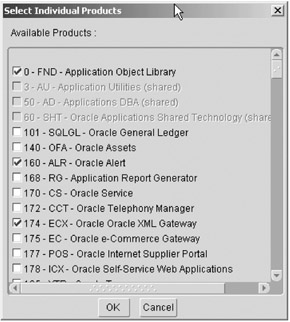
Figure 9.7: Component Licensing
Using the component applications licensing option gives you the freedom and flexibility to select only Project Costing and Billing if those are what you need, but none of the others under Projects Suite. This adds flexibility in your licensing options, as well. If you select the Prod Detail button in Figure 9.6, it brings up a screen like the one in Figure 9.7 where you can select an even finer grain of subobjects for installation.
RapidWiz knows what support pieces of other, not fully licensed products are needed for your implementation to provide the information you need and it installs these, as well. They are installed not as fully licensed, but as shared components. RapidWiz also knows what the core pieces of Oracle E-Business Suite are. These pieces should not be unselected as the core product and technology stack will likely not function as anticipated. If you do unselect them, you may have to uninstall and reinstall your installation.
If you chose the Vision Demo database as the database type from the screen in Figure 9.5, you will not see either of the product installation screens. By default the Vision Demo database configures all of the modules fully installed. This limits the work that Oracle has to do in figuring out what data to populate into the tables for you; RapidWiz populates them all.
Figure 9.8 shows country specific functionalities that you may want to install from the initial installation. If you are currently doing business in any of the provided countries and you anticipate the need to provide specific functionality in those countries' languages or custom features for those countries, it would be easiest to install those functionalities at this point and not have to install them later.
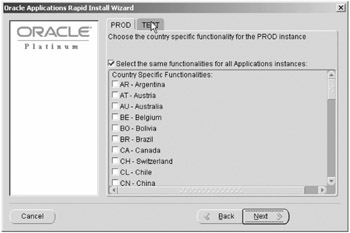
Figure 9.8: Country Specific Functionality
Figure 9.9 shows the next screen, on which you can select the different character sets available and the means by which you can install languages other than the primary American English base language. If you want to be able to present screens to end users in their native language, you will want to install this capability at this point rather than having to go back and add the functionality later. Be careful what character set you install. If you choose US7ASCII, you will be limited in what characters you can store in the database. Even if you intend to use English as your only language, you will likely want to choose a more robust character set, so if you have to change later, it will be less difficult.
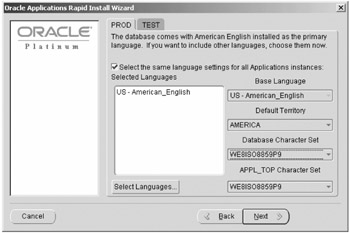
Figure 9.9: Character Set Choice
Figure 9.10 allows you to alter the database name, SID, character set chosen, and all ports for the given installation. To limit the chance of hacking, Oracle defaults the Web port to 8000. However, anyone who has installed Financials or read much of the publicly available documentation will know this. You can change this port to be more obscure than it already is which makes your installation harder for hackers to compromise. However, it will be easier for you to remember ports if you maintain a port definition scheme. If you change Web port to 8150, you might want to set Forms port to 9150, and Reports port to 7150 for consistency. Further, you may want to change your database port as well. This may be particularly important if you have other Oracle databases configured and they are on port 1521.
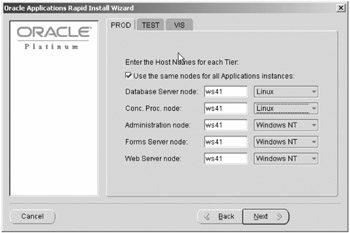
Figure 9.10: Instance Review Settings
Figure 9.11 and Figure 9.12 are examples of some of the configuration choices that you will have to make for an installation. Appl_top, Common_top, Ora_top, Data_top (for the system files, for the log files and many control scripts, for the database connectivity files, and for the database's data files), user ID that will own the application files and database files, that user's password, and the domain of the server in your installation. Your host name, domain name, and ports that you select will all combine together to be the connection string to allow the end users to log on to the application (http://host.domain.name:port).
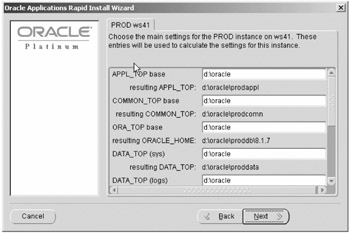
Figure 9.11: Single Node Installation Directory Decisions
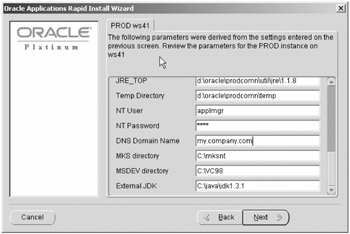
Figure 9.12: Instruct Installer where MKS Toolkit, Java, and C++ Are on Windows
Figure 9.11 shows an example of a single node installation. The placing of the system data files, redo logs, data and index files are common installation decisions for an apps installation. This is particularly true if the files are on a Raid device that distributes the files across several physical disks and controls the placement of the files at the OS level.
Figure 9.12 shows how you tell the installer where you will find the MKS Toolkit, C++ compiler, and JDK on the server. If these paths are not correct, RapidWiz will not proceed until you have correctly identified the paths to these products.
Figure 9.13 and Figure 9.14 give you one last chance to change the derived values for all configurable parameters involved in your installation. This gives you the flexibility of letting RapidWiz make certain decisions for you, but gives you the chance to make better decisions when it is ready to be done. It also allows you to change the default locations for where Oracle infers you would have installed MKS Toolkit, your C++ compiler (MSDEV = Microsoft C++ in a Windows installation), and Sun's JDK installation for your server. Figure 9.14 shows the same information that would be gathered for a UNIX/Linux installation.
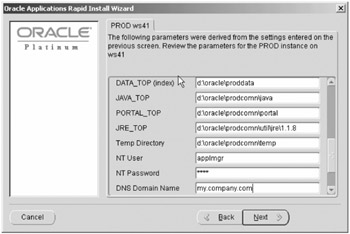
Figure 9.13: Windows Last Chance to Change
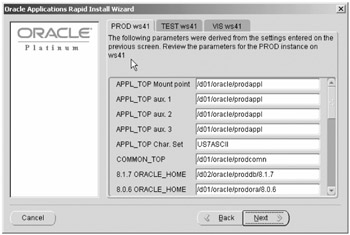
Figure 9.14: Linux Last Chance to Change
You can choose to not only divide the database and services between multiple physical servers, but you can also divide the pieces and nodes between different OSs. Figure 9.15 shows an example of a multi-node installation that would distribute the services across several servers and several OSs.
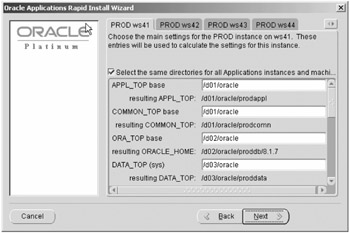
Figure 9.15: Multi-Node Installation on Multiple Servers
Figure 9.16 and Figure 9.17 show examples of the choices that would be made for directory structures on each server. Figure 9.18 shows what the screen would look like that you would go through to double-check your configuration choices in this multi-middle tier configuration. Double-check these, regardless of what configuration you choose. Make sure that RapidWiz's conclusions are the ones that you really want. Careful planning will pay off here. If you know what you (generally) want your directory structure to look like, what subdirectory names you want to use, what naming standards you want to (or have to) stick with, you can quickly and easily make those changes here and they will be implemented for you. Also, make sure that you only have the pieces of the installation on each server that you really want on each server. If you have chosen to put your Concurrent Managers on Solaris and your database on Linux, make sure that on the tab for Solaris you do not have any DATA_TOP choices relevant to that machine defined. While this happening is rare, double-checking at this point would be a good choice. Be sure of the character set defined on each of the tabs on this screen. The character set for each piece must match. Now is when you want to make your changes. Now is when it will be the easiest to make changes with the lowest potential impact. Here it means changing a value. Finding out the choice was wrong a month from this point could set you back additional disk space as well as the time, effort, and aggravation of changing. If you find that you made the completely wrong choice, you may not be able to change and still capture all of the characters that your users have chosen to use.

Figure 9.16: Multi-Node Multi-Server Input Screen 1
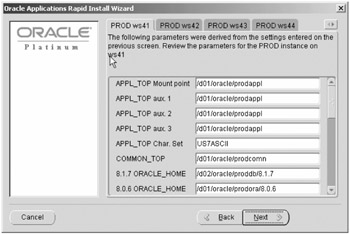
Figure 9.17: Multi-Node Multi-Server Input Screen 2
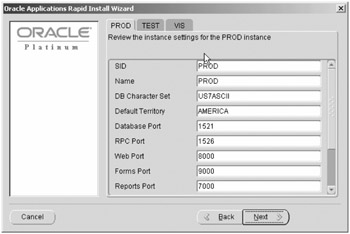
Figure 9.18: Multi-Node Multi-Server Last Chance to Change
If you have the path wrong to any of the required components (C++, JDK, or MKS Toolkit if you are on Windows) or if any of the components that are specified as required in the Oracle documentation are not in the location you specify in the configuration screens, RapidWiz will complain. You will get errors similar to those in Figure 9.19. Figure 9.19 shows the errors as they would be presented following the checks. Green check marks indicate that the component passed the preinstallation check. It passed the logic test as far as the servers are concerned. Red exclamation points indicate that some part of the marked component failed to pass the preinstallation check. If this happens, you will have to go back and start over with the installation, making the correct changes along the way. If the pieces are not in place, you will have to get them, install them, and start over. If they are not there at all, you will save your time and typing if you use the control file created by the first run; it will have saved all of the answers you chose for the installation.
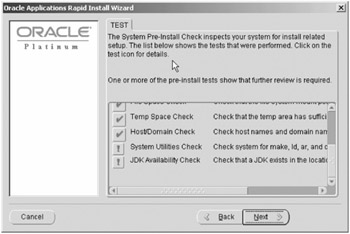
Figure 9.19: Installation Error Screen
Selecting the button containing the red exclamation point will allow you to see the details of exactly what failed to pass the check. In the case of Figure 9.20, it indicates that MKS Toolkit was not installed and the which UNIX command did not return any valid information (which it will not until MKS brings the UNIX-like environment to the Windows OS). In the case of Figure 9.21, it indicates that JDK was not found in the location specified and you would either have to install it if it is not installed or fix the path in the configuration screen if it is installed.
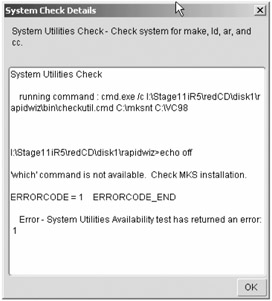
Figure 9.20: Error Detail Screen MKS Toolkit
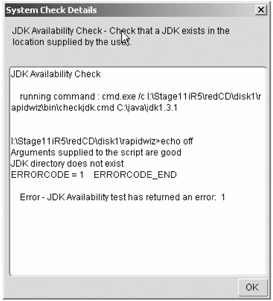
Figure 9.21: Error Detail Screen JDK Not Found
You may get an error in the temp space check if you do not have enough free space in your temp directory. This may occur even if you have specified a temp directory that has the minimum suggested temp space allocated, particularly on a UNIX installation. Occasionally Oracle will decide that the installation will require more than the suggested minimums for temporary files. The extra space can easily approach 2 GB. If you can find a place for it to use for this purpose that has 2 GB free, you should not have any troubles. The following two commands will reset your temporary space to wherever you want to put it that has enough space to let Oracle do everything it needs to do in the installation.
$ export TEMP=<Place where you have a bunch of free space> $ export TEMPDIR=<same place as TEMP>
One nice thing to remember is this installation will do nearly everything for you on all of your nodes. It will provide you with customized startup and shutdown scripts for your server processes. It will create all of your environment variables that have to be set for you to get your work done efficiently and effectively. It will use the information you have given it on these menus and create your database and its services as well as all of the pieces of the application that you are installing. You still will have considerable work to do, but you will be well on your way.
Uninstallation
Regardless of how careful you are and how sure you are that you have gotten everything exactly right, at some point, you will likely have to uninstall a failed installation.
|
| < Day Day Up > |
|
EAN: 2147483647
Pages: 122