Using the WebFacing Environment API
In this section, you want to enhance the WebFaced user interface without impacting the 5250 user interface. To do this, you have to add logic to your RPG program to help you determine whether the program is invoked from a browser or a 5250 terminal.
How the WebFacing Environment API Works
First, let's investigate how the WebFacing environment implements the API. It is provided as a service program, for which you have to invoke the QqfEnvironment procedure. This procedure returns a 1 if the application is running in the WebFaced environment, and it returns a 0 if it is running in a 5250 environment. The return data type is an integer.
Here is an example of how to use the WebFacing environment API in an RPG program:
D* The Prototype for the procedure DWebFaced PR 10I 0 Extproc('QqfEnvironment') C* Invoke the procedure and use the return value in a condition C If WebFaced = 1 C* Code to be executed when WebFaced UI is used C C Else C* Code to be executed when 5250 UI is used C C EndIf * The D spec contains the Prototype, which defines the procedure name and the procedure interface. This procedure does not expect parameters; it only returns an integer value. The RPG name to execute this procedure is WebFaced.
The first C spec executes the procedure and uses the return value in the condition. If the return value is 1, then the program runs in the WebFacing environment; otherwise , it runs in the 5250 environment.
Now you will add the WebFacing environment API to the ORDENTR member.
Changing the ORDENTR Member
In the Remote Systems tree view,
-
Expand the QRPGLESRC source file in the wflabxx library.
-
Double-click the ORDENTR member to invoke the LPEX editor.
After a moment, the editor window with the member loaded appears in the workbench.
-
Scroll down to the end of the D specs , around line 90.
-
Add a line by pressing the Enter key.
-
In the new line, key in the prototype as shown in Figure 16.7.
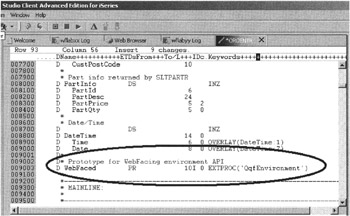
Figure 16.7: Editor with added prototype -
Add comments if you want.
| Tip | The procedure name is case sensitive; you need to type it exactly as shown. |
Now you have to add the logic that uses the QqfEnvironment procedure.
In the ORDENTR member (still in the editor), scroll down to line 192. After the line that formats the Customer name field, add the logic for the WebFacing condition as shown in Figure 16.8.
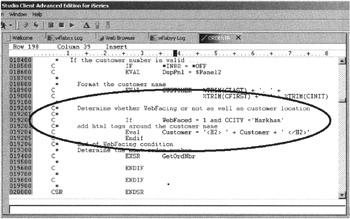
Figure 16.8: Editor with additional lines of logic
The first line invokes the procedure using the name WebFaced. The return value of WebFaced will be 1 if the application runs in a WebFacing environment. The "and" clause causes this condition to be true for customers from the city of Markham:
C* Determine whether WebFacing or not, as well as customer location C* C If WebFaced = 1 and CCITY ='Markham'
The next line adds H2 HTML tags to the Customer name field with the customer name embedded between the HTML tags:
C* add HTML tags around the customer name C Eval Customer = '<H2> ' + Customer + ' </H2>' C Endif C* End of WebFacing condition * Determine the next order number ...
This will work well in the browser, and the H2 tags will not display as output text, because in the Customer Web settings field you specified that you will supply the HTML yourself. The WebFacing conversion creates the correct code to take the values of the Customer name field and send them to the browser as part of the HTML data stream.
Before you close the file, do not forget to add the Endif operation code,
-
Save the changes and exit the editor.
In the Remote Systems tree view,
-
Right-click the ORDENTR member that you just changed.
-
Select the Compile option from the pop-up menu, as shown in Figure 16.9.
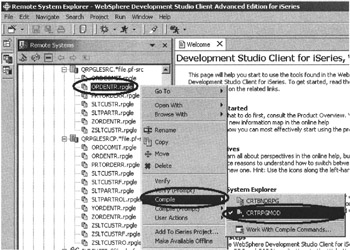
Figure 16.9: Creating a module from member ORDENTR
You need to bind the QQFENV Service Program, which contains the procedure QqfEnvironment, into the program you create. Therefore, you first need to create a module.
-
Select the CRTRPGMOD option from the submenu.
The module is created. To work with the module now, in the Remote Systems tree view,
-
Right-click the wflabxx library.
-
Select the Refresh option from the pop-up menu.
Now the ORDENTR module shows up in the Remote Systems tree view, as shown in Figure 16.10.

Figure 16.10: Remote Systems tree view with ORDENTR module
-
Right-click the ORDENTR module.
-
Select the Create option from the pop-up menu.
-
Select the Program option from the submenu.
The Create Program (CRTPGM) dialog (Figure 16.11) opens.
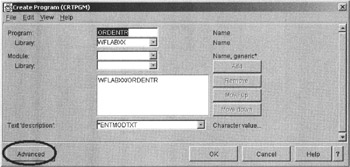
Figure 16.11: CRTPGM prompt with basic parameters
-
Click the Advanced push button to show all possible parameters (Figure 16.12).
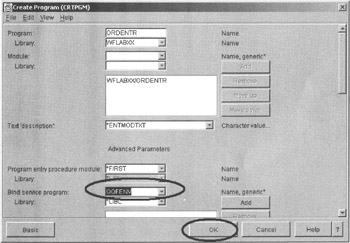
Figure 16.12: CRTPGM prompt with additional parameters -
Enter the Service Program name QQFENV in the Bind service program entry field.
-
Click the OK push button to start program creation.
Check the iSeries Commands Log for the completion message (Figure 16.13).
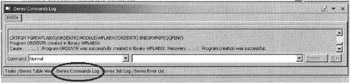
Figure 16.13: Completion message for CRTPGM command
If the program is created, you are ready to go back to the WebFacing perspective and finish up this task. Otherwise, find out what went wrong by checking the messages and the job log.
| Tip | The Remote Systems tree view also allows you to work with the iSeries job and look at the job logs. |
Converting the ORDENTD Member
You have altered the ORDENTD display file source to change the length of the Customer name field and apply the program-supplied HTML Web setting. Now you need to reconvert the member.
Switch to the WebFacing perspective:
-
Click the WebFacing perspective icon on the workbench taskbar, as shown in Figure 16.14.
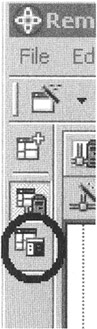
Figure 16.14: WebFacing perspective icon on the workbench taskbar
In the WebFacing perspective,
-
Expand the wflabxx project.
-
Expand the DDS icon.
-
Right-click the ORDENTD member.
-
Select the Convert option from the pop-up menu.
After the conversion completes successfully, you can run the application.
Running the Web Application
Now you can see the new feature of your application in action.
-
Right-click the wflabxx project icon.
-
Select Run on Server from the pop-up menu.
-
Run the application.
-
Click Prompt.
-
Select Weiss, Claus from the list to obtain the screen shown in Figure 16.15.
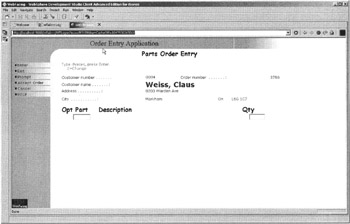
Figure 16.15: Customer name with applied header style
You will notice that the customer name is displayed in a large bold font since the style for heading 2 is defined that way.
-
Now press command key 6 to accept the order, so that you can select a different customer.
-
Press command key 4 to select a customer.
-
Select Farr, George from the list of customers. Your screen should look similar to Figure 16.16.
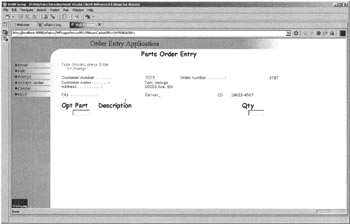
Figure 16.16: Customer name displayed with normal font because customer location is not Markham
Since George is based in Denver according to this database, this customer name is displayed in regular font.
You might want to test the 5250 user interface to make sure that it still works.
EAN: 2147483647
Pages: 153
- Linking the IT Balanced Scorecard to the Business Objectives at a Major Canadian Financial Group
- A View on Knowledge Management: Utilizing a Balanced Scorecard Methodology for Analyzing Knowledge Metrics
- Measuring ROI in E-Commerce Applications: Analysis to Action
- Technical Issues Related to IT Governance Tactics: Product Metrics, Measurements and Process Control
- Managing IT Functions