Converting iSeries Source Members to Web Files
Converting iSeries Source Members to Web Files
WebFacing conversion is performed inside Development Studio Client. If the product is not already up and running, open it now from the Start menu.
Selecting the Project and Source Members
If a WebFacing perspective displaying your project is not visible, you need to
-
Open the WebFacing perspective.
| Tip | Check the sidebar of the workbench for the WebFacing perspective icon. If you find it, click the icon to switch to the WebFacing perspective. Icons show perspectives that are open but not presently active. It is good practice to avoid having too many instances of the same perspective open. If you restrict yourself to one open instance of a perspective, you will improve the performance of the workbench. It is good to keep this in mind since there is no limit set to the number of perspectives you can have open. Figure 4.1 shows the icons on the side-bar of the workbench. In this instance, the Remote System Explorer perspective is active. 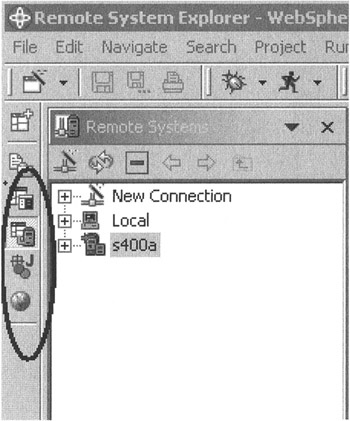 Figure 4.1: Open perspectives on workbench sidebar |
Figure 4.1 shows the workbench with four perspectives open:
| |
|
| |
|
| |
|
| |
|


 To switch to the WebFacing perspective, which is already open but not active, select its icon from the sidebar.
| Tip | |

To begin conversion in the WebFacing perspective,
-
Select the WebFacing project you worked on in the previous exercise, wflabxx .
-
Expand this project by clicking the plus sign (+) beside its icon in the WebFacing Projects tree view.
You should see a DDS folder in the expanded tree. If you do not see a DDS folder, you might be in the Navigator view and not in the WebFacing Projects view (see Figure 4.2).
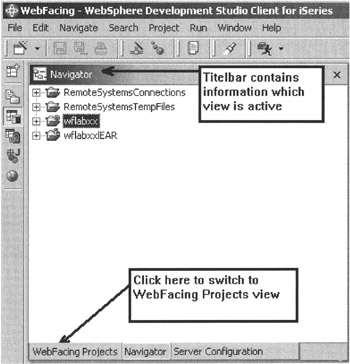
Figure 4.2: Navigator view active
If the view title bar is not WebFacing Projects, locate the WebFacing Projects tab at the bottom of the view, and click it once. Now the WebFacing Projects view is active and you should be able to find the DDS folder.
-
Expand the DDS folder so that you can see all three of the members that you selected in the Chapter 3 exercise, Creating a WebFacing Tool Project, as shown in Figure 4.3.
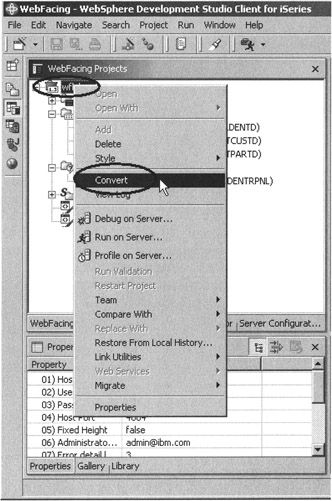
Figure 4.3: WebFacing project ready to convert
Starting the WebFacing Conversion
From here you can select individual members or a collection of members to convert.
In this exercise you will convert all of your DDS and panel group members by choosing the WebFacing project icon as the starting point for the conversion. Later on in the book, you will have the opportunity to convert just a single source member.
-
Right-click the wflabxx project icon .
-
Select Convert from the pop-up menu.
The conversion process begins. This will take some time; be patient.
A progress dialog displays, indicating what members are being converted, as shown in Figure 4.4.
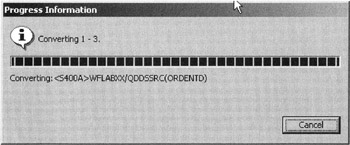
Figure 4.4: Conversion progress dialog
When the progress dialog disappears, WebFacing conversion has finished.
Analyzing the Conversion Logs
Notice the conversion log in the right pane, as shown in Figure 4.5.
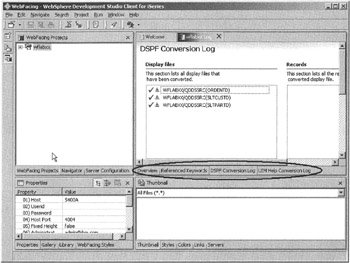
Figure 4.5: Conversion log
The bottom of the log displays the following tabs:
-
Overview
-
Referenced Keywords
-
DSPF Conversion Log
-
UIM Help Conversion Log
The Overview Page
The Overview page (Figure 4.6) contains information about the overall conversion process for a WebFacing project.
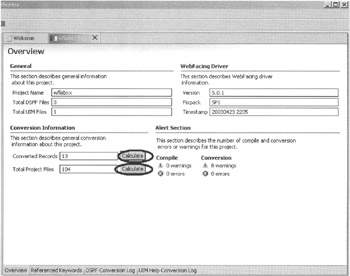
Figure 4.6: The Overview page
The information on this page is divided into four areas:
-
The General section contains the project names and the number of members converted.
-
The WebFacing Driver section has information on the WebFacing driver level used for the conversion. This might be useful in case you talk to IBM service and they request this information.
-
Conversion Information has two Calculate push buttons that you can use in case you are interested in some statistical data about your WebFacing conversion.
-
Alert Section is the most important section, since it tells you how successful the conversion has been. In case any errors are shown, use the detail pages to check the impact of these errors. Check the warnings as well; they might clue you in to why the behavior of a WebFaced application differs from the original.
The Referenced Keywords Page
The Referenced Keywords page (Figure 4.7) shows two lists: on the left side a list of the converted members, and on the right side the keyword contained in a selected member and the WebFacing support for this keyword.
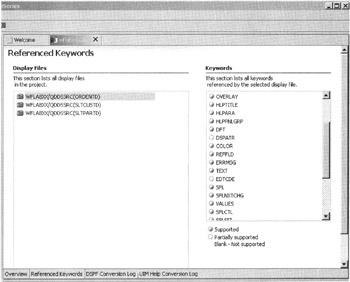
Figure 4.7: The Referenced Keywords Page
Selecting a member in the left list will show all keywords used in this member and their WebFacing support status. If you need more detail on these keywords, check the WebFacing help. The WebFacing help under the Reference topic has a DDS Support tables section that provides more detailed information for many keywords.
The DSPF Conversion Log Page
The DSPF Conversion Log page (Figure 4.8) lists all the display file members converted in the left-side list and shows the individual record format names in a given selected member.
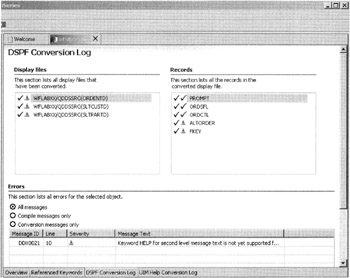
Figure 4.8: The DSPF Conversion Log page
Selecting a member on the left side will display the record formats inside the member and the conversion results for each individual record format in the right-side list. It will also display any file-level keyword problems in the message list at the bottom. If you select a specific record format in the right-side list, detailed messages for this record format are displayed in the message list.
The UIM Help Conversion Log Page
The UIM Help Conversion Log page (Figure 4.9) is very similar to the DSPF Conversion Log page; similar information is displayed here for UIM help members instead of DDS display file members.
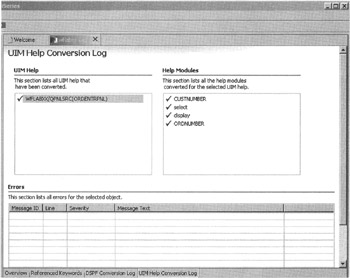
Figure 4.9: The Uim Help Conversion Log Page
Navigation through the page is the same as for the DSPF Conversion Log page.
You have now converted the DDS display file and panel group source. Click each tab to see more details about the conversion
EAN: 2147483647
Pages: 153