Scenario
In this scenario, you use a 5250 emulation screen to start the sample Order Entry application. In the application, the first screen prompts you for a customer number. You select a customer from a list of valid customers and then fill an order for this selected customer. To fill an order, you select a part from a special list and add it to the order by specifying the quantity. After you specify all parts and their quantities for this order, you complete the order by pressing function key 6 (F6). The application then prompts you for a new customer number to initiate the next order. At the beginning of this scenario, you work with the help panels provided by the application.
Starting the 5250 Application
To start the Order Entry application you need a 5250 emulator on your workstation. Start a 5250 emulation screen.
Signing on to the iSeries System and Calling the Order Entry Application
On the 5250 emulation screen,
-
Enter the user ID and password that you set up in the previous chapter. Once you have logged in, the emulator starts a job that has the WFLABXX library in its library list.
On the command line of the 5250 screen,
-
Invoke the Order Entry application by typing CALL ORDENTR.
The application starts, displaying the first panel as shown in Figure 2.1. This first screen prompts for a customer number. You can type the customer number directly or you can press function key 4 to display a window that shows a selection list of existing customers.
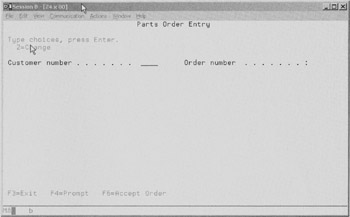
Figure 2.1: Order Entry application first panel
Before you begin the order entry process, explore the Help. This application uses User Interface Manager (UIM) help. Keep in mind that you will use the WebFacing Tool to convert these UIM help panels along with the Display File source. To understand the results of the UIM help conversion, I suggest you navigate through the Help in the 5250 environment so that you will have a basis of comparison when you view the Help in the browser.
Using Online Help
-
Move the cursor to the Customer number entry field.
-
Press function key 1 (F1).
Panel group help is displayed, as shown in Figure 2.2.
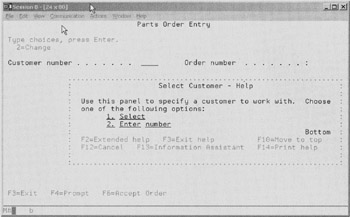
Figure 2.2: UIM help panel for customer number
-
To view additional help, move the cursor underneath the 1. in the Help area and press the Enter key.
Figure 2.3 shows a sample of the panel that appears.
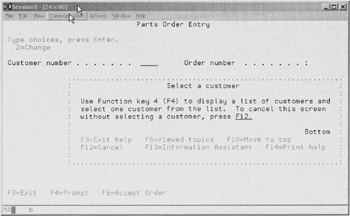
Figure 2.3: Help for requesting a customer list
-
Press function key 12 to return to the Customer number field help.
-
To view additional help for the second choice, move the cursor underneath the 2. in the Help area and press the Enter key.
Now you see detailed help for keying in the customer number, as shown in Figure 2.4.
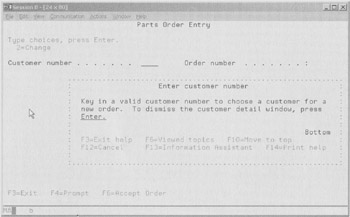
Figure 2.4: Detailed help for specifying a valid customer number
-
Press function key 12 to exit the Help for the Customer number field.
On the main help panel in the Select Customer - Help area,
-
Press function key 2 to view the extended Help.
Figure 2.5 shows the extended Help for the Customer number field.
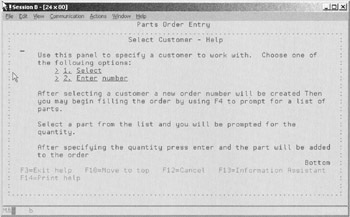
Figure 2.5: Extended Help panel for customer number
-
Press function key 12 to exit the extended Customer number field Help.
-
Press function key 12 again to exit the Customer number field Help.
On the application customer number input panel,
-
Move the cursor near the Order number field.
-
Press function key 1.
Context-sensitive help for this area is displayed, as shown in Figure 2.6.
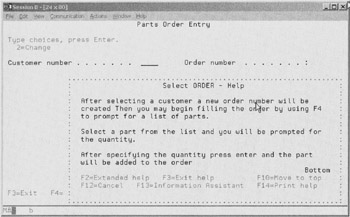
Figure 2.6: Help for Order number
-
Press function key 12 to exit the Order number field Help.
Selecting a Customer
Now that you can see how the Help panels function in this application, you are ready to specify a customer for this order. You can specify a valid customer number, or you can select from a list of valid customers. I want you to use the selection list because that choice makes use of the WINDOW DDS keyword, so that you can see how the WebFacing Tool converts a DDS window.
-
Press function key 4 to display the customer selection list.
A list of customers displays, as shown in Figure 2.7.
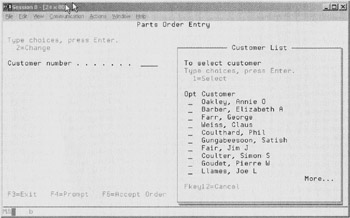
Figure 2.7: Customer list panel
-
Select a customer by typing 1 in the Options field.
-
Press the Enter key to proceed.
You will return to the initial panel, but now it is filled with detailed data for the selected customer, as shown in Figure 2.8. Notice that the application assigns an order number as well. You can now order a quantity of parts.

Figure 2.8: Order entry panel with detailed customer data
Filling the Order
Selecting a part is similar to selecting a customer. You can type the part number directly or select the part from a selection list. I want you use the parts selection list as you used the customer selection list in the last exercise.
On the order entry panel,
-
Press function key 4 to view a list of available parts.
A parts list displays, as shown in Figure 2.9.
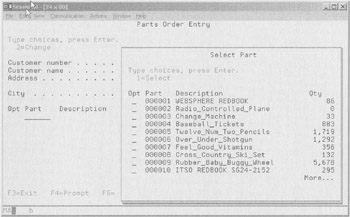
Figure 2.9: Part selection list
-
Select a part that has a large quantity by typing 1 in the Options field.
Back on the order screen, the part appears in the order on the top line of the parts list, as shown in Figure 2.10.
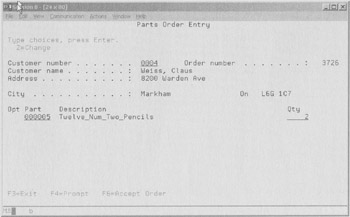
Figure 2.10: Specify parts quantity
To order a certain quantity of this part,
-
Change the Quantity field to a value, for example, 2, as shown in Figure 2.10.
-
Press the Enter key to add the part and quantity to the order.
The detailed order line for this part, with a specified quantity, is now part of this order, as shown in Figure 2.11.
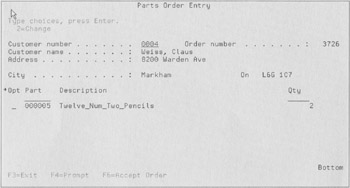
Figure 2.11: One item added to order
To practice adding more parts to your order, repeat the following three steps as many times as you would like:
-
Press function key 4 on the order panel to go to the parts list.
-
Select a part from the parts list.
-
Specify the part's quantity.
When you feel the order is complete, go to the next task.
Completing the Order
On the order entry panel,
-
Press function key 6 to accept the order.
Once you accept the order, it is added to the database. You return to the starting screen of the application and can begin a new order.
Upon completing this exercise, you have worked with all panels in this application:
-
The start order entry panel
-
Several help panels
-
The customer list window
-
The full order entry panel
-
The parts list window
You can add more orders if you want to become more familiar with the application, but it is not necessary.
If you feel that you understand how the user interface of this application works,
-
Press function key 3 to exit the application.
You are now ready to place a brand new Web-based user interface onto this application.
EAN: 2147483647
Pages: 153