Windows System Restore
What good is a computer that won't boot? System Restore is among Windows' most valuable utilities. Microsoft enables it by default, but some manufacturers disable it to conserve disk space. Here's how you can determine whether System Restore is enabled and adjust its size .
-
Right-click on My Computer.
-
Select Properties.
-
Click the System Restore tab.
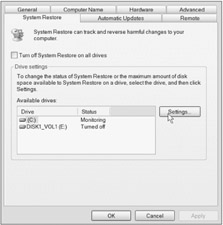
Figure 12.4: System Restore utility size settings
On hard drives larger that 4 GB, the default size of System Restore is approximately 12 percent of the logical drive on which Windows is installed. Microsoft hasn't changed this default since XP was launched, but hard drives have grown exponentially. Two gigabytes for System Restore is generally enough. Each restore point is approximately 50 MB. Forty restore points is plenty for average use. If you change your computer configuration quite often, reserve more disk space accordingly .
Get in the Habit of Creating Restore Points
Prior to installing any new applications or making any major changes to your system settings, create a restore point. Windows supposedly creates restore points every 24 hours, but I find it reassuring to create my own restore points manually. You should create a restore point now, before you make any of the changes I'm about to suggest. There are several ways to access System Restore:
-
Start menu
-
Click Help and Support, Performance and Maintenance, Using System Restore to Undo Changes.
-
Click All Programs, Accessories, System Tools, System Restore.
-
-
Windows XP Control Panel (Category View). Click Performance and Maintenance and then select System Restore located in the left pane of the Control Panel under "See Also."
To create a restore point
-
Open System Restore.
-
Click Create a Restore Point.
-
Click Next.
-
Type an identifiable name (such as Before Invasion of Privacy Security Tweak) in the Restore Point Description field.
-
Click Create.
-
System Restore automatically adds the date and time to the name of your restore point.
-
Click Close.
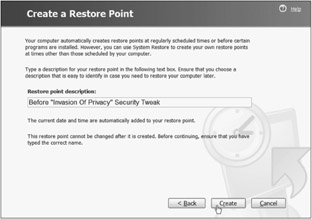
Figure 12.5: Create a Restore Point screen
Disabling Error Reporting
I find Microsoft's Error Reporting feature invasive and insulting. And as you can see from this bulletin posted on the U.S. Department of Energy CIAC ( Computer Incident Advisory Capability ) Web site, Error Reporting is also insecure .
DOE CIAC Warning
Office XP, Internet Explorer, and Windows XP use a feature called Error Reporting to send crash and debug information back to Microsoft to help them detect and fix bugs in their software. Unfortunately, Error Reporting can send portions of the document or Web site you are viewing along with this debugging information. The debugging information includes a memory dump which may contain all or part of the document being viewed or edited. This debug message potentially could contain sensitive, private information.
The last thing I want to see when a Windows program crashes is a dialog box from Microsoft rubbing it in my face. Sending Microsoft an Error Report takes time, drains my system, tries my patience, and transmits data I could regret transmitting. Disabling Error Reporting is now a simple affair, but prior to the latest XP/Office Service Packs, it required a registry hack, which really ticked me off! There is no reason to feel guilty either. According to Microsoft, more than 90 percent of these Error Reports pertain to fewer than 2 percent of all software bugs.
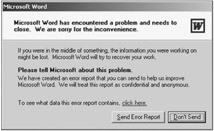
Figure 12.6: Microsoft Error Reporting dialog box
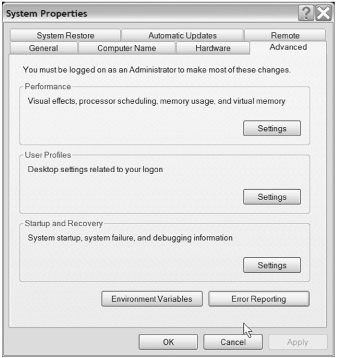
Figure 12.7: Error Reporting button in System Properties
To disable error reporting
-
Right-click My Computer.
-
Select Properties.
-
Click the Advanced tab in System Properties.
-
Click the Error Reporting button.
-
The Error Reporting dialog box will appear. Select Disable Error Reporting.
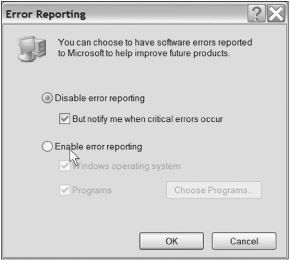
Figure 12.8: Check Disable Error Reporting in the Error Reporting dialog box
Disabling File and Printer Sharing
Unless you want to give a malicious hacker or corporation complete read/write access to the contents of your hard drive, disable file and printer sharing except when absolutely necessary. File and printer sharing leave your computer open to attack.
To disable Windows file sharing
-
Double-click My Computer.
-
Right-click each drive under Hard Disk Drives.
-
Select Properties.
-
Click the Sharing tab.
-
Ascertain that file sharing is disabled.
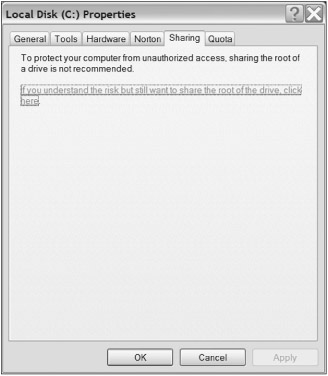
Figure 12.9: File Sharing tab under Disk Properties
Microsoft makes you jump through another hoop to disable file and printing sharing over the Internet. This redundancy is not only confusing, it's the worst kind of security breach ”a blind spot! It's about time Microsoft got into the habit of placing redundant tasks like this on the same tab, don't you think?
To disable Internet file and printer sharing:
-
Open the Control Panel.
-
Click Network and Internet Connections.
-
Right-click each network connection.
-
Select Properties.
-
Uncheck File and Printer Sharing for Microsoft Networks on the Connection Properties page
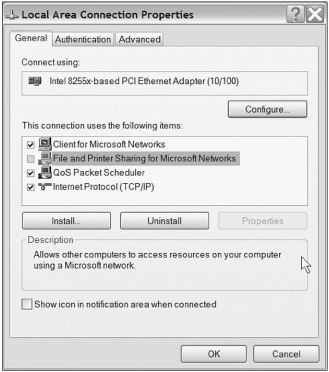
Figure 12.10: Uncheck Disable Internet File and Printer Sharing for Microsoft Networks in the Connection Properties box
EAN: 2147483647
Pages: 135