Section 3.5. Transform XML into a Spreadsheet
|
3.5. Transform XML into a SpreadsheetYou can also use XSLT or other tools to transform XML files created outside of Excel into XML spreadsheets. In this way, you can create native Excel documents from your own applications. Note: XML is a two-way street. Getting XML into Excel is as important as knowing how to get it out. 3.5.1. How to do itFor instance, the following abbreviated XML represents a customer order created outside of Excel: <?xml version="1.0"?> <!-- SimpleOrder.xml --> <Orders> <Order> <ID>1002</ID> <BillTo> <Address> <Name>Joe Magnus</Name> <Street1>1234 Made Up Place</Street1> <City>Somewhere</City> <State>FL</State> <Zip>33955</Zip> </Address> </BillTo> <ShipTo> <Address>...</Address> </ShipTo> <Line> <Number>20</Number> <Description>Mahogany Tiller</Description> <Quantity>1</Quantity> <UnitPrice>95.00</UnitPrice> <Taxable>Yes</Taxable> <Total>95.00</Total> </Line> <Line>...</Line> <Total> <SubTotal>540.00</SubTotal> <Tax>3.24</Tax> <Due>543.24</Due> </Total> </Order> </Orders> To convert this XML into an XML spreadsheet, create XSLT that creates the following nodes and processing instruction:
Some of the preceding steps involve extensive XSLT, so it is convenient to break the steps into separate templates that are called or applied by a root template: <!--OrderToExcel.xslt transform an Order XML file into an Excel XML Spreadsheet--> < xsl:template match="/Orders"> <xsl:processing-instruction name="mso-application">prog </xsl:processing-instruction> <xsl:element name="Workbook" namespace="urn:schemas-microsoft-com:office:spreadsheet" > <xsl:call-template name="AddStyles" /> <xsl:for-each select="Order"> <!-- Create a worksheet for each order --> <xsl:element name="Worksheet"> <!-- Name the worksheet --> <xsl:attribute name="ss:Name"> <xsl:value-of select="BillTo/Address/Name" /> <xsl:value-of select="ID" /> </xsl:attribute> <xsl:element name="Table"> <xsl:call-template name="AddColumns" /> <!-- Add bill to headings --> <xsl:apply-templates select="BillTo" /> <!-- Add send to headings --> <xsl:apply-templates select="ShipTo" /> <!-- Add column headings --> <xsl:call-template name="AddColumnHeads" /> <xsl:for-each select="Line"> <xsl:apply-templates select="." /> </xsl:for-each> <xsl:call-template name="AddTotals" /> </xsl:element> </xsl:element> </xsl:for-each> </xsl:element> </xsl:template> The preceding template uses xsl:call-template to call named templates when the content output does not depend on a specific node. A good example of this is the AddStyles template, which creates the cell formats used in the worksheet: <xsl:template name="AddStyles"> <Styles xmlns:ss="urn:schemas-microsoft-com:office:spreadsheet"> <Style ss:> <Alignment ss:Horizontal="Center" ss:Vertical="Bottom"/> <Borders> <Border ss:Position="Bottom" ss:LineStyle="Continuous" ss:Weight="1"/> </Borders> <Font ss:Bold="1"/> </Style> <Style ss:> <Alignment ss:Horizontal="Right" ss:Vertical="Bottom"/> <Font ss:Bold="1"/> </Style> <Style ss:> <NumberFormat ss:Format="Currency"/> </Style> </Styles> </xsl:template> The AddStyles template just inserts the Excel Style elements since they are static and it is fairly easy to cut and paste the Style elements created by Excel into this template. This is also true for the Columns element created by AddColumns template (not shown). The main work is performed by the following template, which is applied to each Line in the order needed to create the rows in the worksheet: <xsl:template match="Line"> <xsl:element name="Row"> <xsl:element name="Cell"> <xsl:element name="Data"> <xsl:attribute name="ss:Type">Number</xsl:attribute> <xsl:value-of select="Number" /> </xsl:element> </xsl:element> <xsl:element name="Cell"> <xsl:element name="Data"> <xsl:attribute name="ss:Type">String</xsl:attribute> <xsl:value-of select="Description" /> </xsl:element> </xsl:element> <xsl:element name="Cell"> <xsl:element name="Data"> <xsl:attribute name="ss:Type">Number</xsl:attribute> <xsl:value-of select="Quantity" /> </xsl:element> </xsl:element> <xsl:element name="Cell"> <xsl:attribute name="ss:StyleID">Currency</xsl:attribute> <xsl:element name="Data"> <xsl:attribute name="ss:Type">Number</xsl:attribute> <xsl:value-of select="UnitPrice" /> </xsl:element> </xsl:element> <xsl:element name="Cell"> <xsl:attribute name="ss:StyleID">Currency</xsl:attribute> <xsl:attribute name="ss:Formula">=RC[-2]*RC[-1] </xsl:attribute> <xsl:element name="Data"> <xsl:attribute name="ss:Type">Number</xsl:attribute> <xsl:value-of select="Total" /> </xsl:element> </xsl:element> </xsl:element> </xsl:template> 3.5.2. How it worksThe preceding template transforms a Line node from an order into a Row node in a worksheet. Two important things to note are shown in bold :
Other templates convert the BillTo and ShipTo nodes into rows, add column heads, and totals. Rather than reproduce those templates here, please refer to the OrderToExcel.xslt sample file. You can use that file as a starting point for converting your own XML files into XML spreadsheets. Once processed, the transformed orders can be opened in Excel (Figure 3-4). Figure 3-4. XML order information transformed into an XML spreadsheet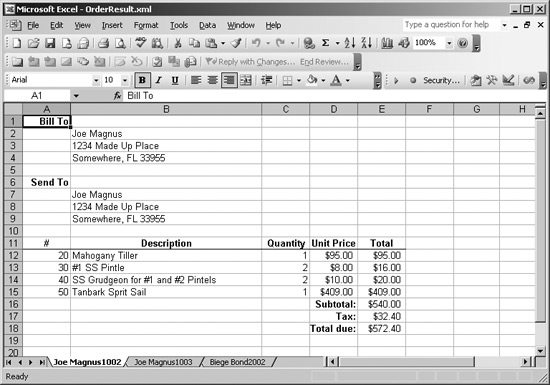 One of the beauties of creating your own transformations is that repeating items, such as multiple Order nodes, can be mapped to items other than rows. In this sample case, each order becomes a separate worksheet, which then receives a unique name (see the worksheet tabs in Figure 3-4). 3.5.3. What about...
|
|
EAN: 2147483647
Pages: 133