Creating a View Layout
| < Day Day Up > |
| When you're producing production form templates, you want to create a professional-looking design and layout for forms that are to be distributed widely. This chapter explores layout and styling issues in InfoPath form templates, providing you with the skills to create the visual context for the forms controls described in Chapter 4, "InfoPath Form Controls," and Chapter 5, "Expression Boxes." Like many other aspects of using InfoPath, the end product is a result of gaining control over individual aspects of the relevant processin this case, mastery of creating layout tables that meet your precise needs and applying style the way you want it. Deciding on a LayoutI cannot help you directly with choosing the layout of your form templatesthose decisions will depend on your circumstances. Only you know what data you want to collect, what importance you attach to it, whether there is a specific order in which you want to collect it, and whether you wantas far as is possible in InfoPathto create a form template with views similar to an existing paper-based form or set of forms. Use Cases for Form TemplatesUse cases are, seen broadly, descriptions of what a user wants to be able to achieve by using an InfoPath form template. To design a form template that is of maximum use to the user, a form designer needs to understand the business information the user needs to enter, as well as how the user works. For example, it makes sense to group information on an InfoPath view in a way that corresponds to the availability of that information to the user , to avoid inefficient jumping around the page when the form is being filled in.
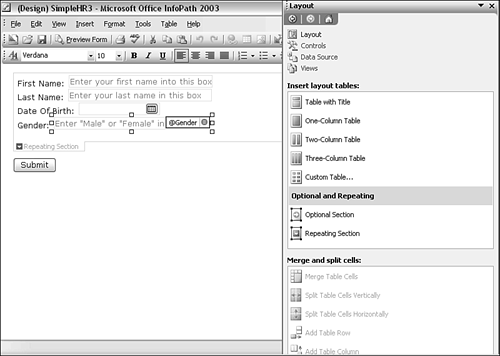
Even for moderately complex InfoPath forms, use cases often don't require the paraphernalia of the Unified Modeling Language (UML). They can be text descriptions only, when appropriate. A succinct description of what information the user needs is, of course, essential. This should be recorded somewhere so that a developer who updates or modifies the form template can quickly grasp why the previous version adopted a particular approach. If your use case for InfoPath is the rapid creation of a form to query an Access or SQL Server database and to submit data to that same database, you can quickly create a form template, as you saw in Chapter 1, "Getting Started with InfoPath." Given the simplicity of the wizard-based approach, it is all too easy to omit documenting the use case for the form template. For such a simple scenario, you can often change a form template more quickly to accommodate changing data needs by creating a new form using the wizard. However, a basic use case retained for future use helps the developer creating the new form template ensure that all relevant considerations are taken into account. Listening to users is not time wasted after all, the business uses to which users want to put the form make the form template worth creating in the first place! Reproducing Existing Paper FormsWhen you're creating a form template, one of the fundamental decisions to make is whether you want to reproduce existing paper forms exactly, or whether to design something new that takes advantage of InfoPath's functionality. It seems to me that an InfoPath form implicitly requires you to put aside some aspects of the mindset that worked well for paper-based forms. For example, a paper form has a fixed number of lines for, say, expense items. In InfoPath, you are likely to use the repeating table control to collect that information. So, if you use a repeating table control that displays a single line initially to replace a fixed number of lines for expense items (say, eight), you immediately change the visual appearance of a form. If management insists that the InfoPath form must "exactly" reproduce the paper form, you must put to one side a significant advantage of InfoPathdynamic view design incorporating repeating table or repeating section controls. Similar considerations relevant to layout apply to optional sections. An InfoPath view with an optional section expanded cannot be visually the same, nor take up the same space, as the same view that doesn't use the optional section. Printing InfoPath FormsThe issue of exactly reproducing existing forms also raises the question of how closely you can reproduce an existing form onscreen and then in print. Two significant issues are worth mentioning here: First, InfoPath form templates produce HTML documents for display onscreen using the Internet Explorer rendering engine. HTML has poor characteristics for precise printing. Therefore, you cannot expectand you must educate your managers not to expectInfoPath to produce a precise printing layout. (Of course, one of InfoPath's great advantages is being able to submit XML to a range of data sources, so it often doesn't make much sense to print out InfoPath forms.) Second, even if an average InfoPath view for a particular form template bears a reasonable resemblance to an existing paper form when you print it, on one occasion the InfoPath form might have a repeating table with two rows, and on another that repeating table might have ten rows. Obviously, the forms will differ when they're printed. If the existing paper form has six rows, neither InfoPath form can look exactly like the paper form. When optional sections are added to the mix, then precise reproduction on paper becomes unrealistic . If precise layout on paper is crucially important for your use case, InfoPath might not be the most appropriate XML forms tool to use. Table-Based LayoutLayout of a view in InfoPath is based on table structures. A range of table structures is available from the Layout task pane (see Figure 6.1). Figure 6.1. The Layout task pane. You can drag the table structures available in the Layout task pane onto the form area in a desired order, or you can place the cursor where you want to insert the table structure and then click the structure in the Layout task pane. If the predefined table structures don't meet your visual requirements, you can split or combine table cells , add or delete columns or rows, or change the visual appearance of the layout. Each of the techniques to manage layout tables will be described in the following sections. Using the Table with Title OptionThe first option offered in the Layout task pane is Table with Title. This is used most commonly to create a customized top area for a view. One of the fundamental characteristics to be aware of about a Table with Title structure is that color schemes, described in the "Applying a Color Scheme" section later in this chapter, apply to that type of table structure. The Table with Title layout table is the only layout table whose appearance is controlled using InfoPath color schemes.
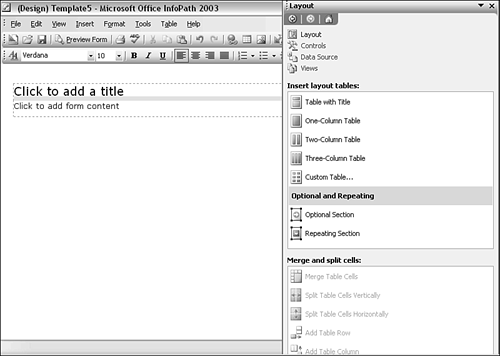
To add a table with title, click Table with Title in the Insert Layout Tables section of the Layout task pane. The initial appearance is shown in Figure 6.2. Figure 6.2. The initial appearance after adding a Table with Title layout table. If you don't want to include graphics (for example, a corporate logo) in the title area, then changing text in the Table with Title structure is straightforward. Simply click on either of the pieces of placeholder text and start typing. Adding Graphics to a Table with TitleIf you want, you can add graphics to the upper row of a Table with Title structure. To place a graphic on the left and the title text on the right, inserting the graphic first will bring the best results. To insert a graphic, select the Insert menu, and then select Picture, From File. You can then insert the graphic from your filesystem. If you require precise placement of title text relative to a logo, splitting the single table cell intended for title text is useful. Splitting table cells is described later in this chapter in the section "Merging and Splitting Tables." First let's briefly look at the characteristics of other table structures that are available for use from the Layout task pane. Other Table StructuresFour additional layout table structures are available:
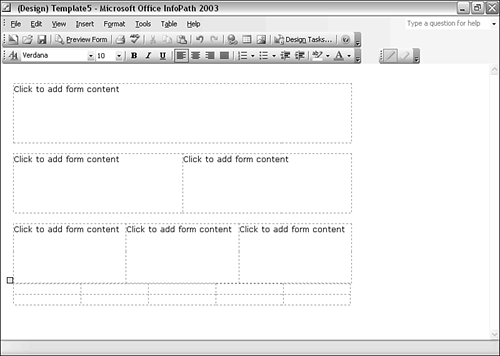
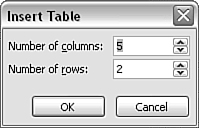
Figure 6.3 shows a simple view with a one-column table, a two-column table, a three-column table, and a custom table. Figure 6.3. The structures available in the Insert Layout Tables section of the Layout task pane. Unlike the Table with Title structure, applying one of InfoPath's color schemes doesn't change the appearance of any of these structures. One-Column TableThe one-column table provides a layout table with a single column and a single row. The default width is 542 pixels, and the default height is 1 inch. (The reason for mixing units in such a way is unclear.) A gap is inserted above the structure by default. If you want the one-column table placed flush to the layout table above it, place the cursor in the space between the two layout tables and press either the Backspace key or Delete. Two-Column TableThe two-column table provides a layout table with two columns. The default height and width are the same as for the one-column table. Like the one-column table, by default a gap is inserted above the two-column table. Three-Column TableThe three-column table differs from the two-column table only in having an extra column. Custom TableThe final option in the Insert Layout Tables section of the Layout task pane is Custom Table. When you select this structure, an Insert Table window pops up, displaying the default option of five columns and two rows (see Figure 6.4). Figure 6.4. The Insert Table window to define rows and columns in a custom table. You can adjust the number of rows and columns in the custom table up or down according to need, either by typing text into the text boxes in the Insert Table window or by adjusting the spin buttons up or down.
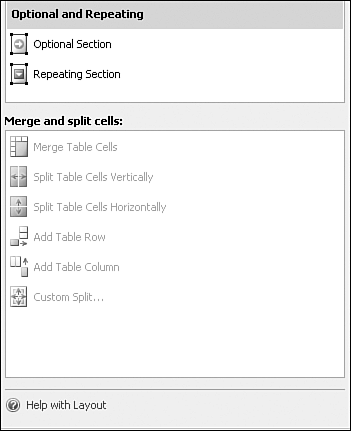
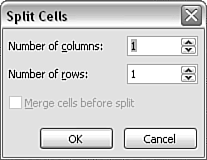
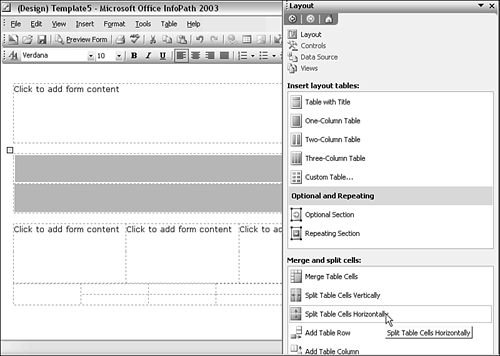
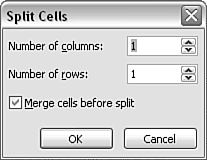
Merging and Splitting TablesThe default table structures described in the preceding sections are suitable for many uses as is. However, almost inevitably you will find situations in which you want to create more or fewer cells in a row, combine a couple of cells, and so on. This section describes how to merge and split cells. In general, it is easiest to merge or split table cells before you add content to a layout table, although it is possible to merge or split with content in place. Merging Table CellsYou can merge cells in a single column or in a single row, or in multiple columns and rows, provided that the result forms a rectangle. In InfoPath, you cannot combine cells to create a nonrectangular shape, presumably because of limitations in the syntax of the underlying HTML tables created by InfoPath's XSLT stylesheets. To merge two cells in the same row, click in one and drag the mouse to the other, then right-click and select Merge Cells from the context menu. A similar technique can be used to merge cells in the same column. An alternative approach is to click in the first cell to be merged, hold down the Ctrl key, and then click in the second cell. Right-click, and select Merge Cells from the context menu as just described. Cells can also be merged using the Merge Table Cells option in the Merge and Split Cells section of the Layout task pane (see Figure 6.5). Figure 6.5. The Merge and Split Cells section of the Layout task pane. The first option in the Merge and Split Cells section is Merge Table Cells. If no cells are selected, the Merge Table Cells icon is grayed out. When two or more cells are selected that would produce a rectangular area, the Merge Table Cells icon is highlighted in blue. (In the first release of InfoPath 2003, there appears to be a bug in the Merge Table Cells option, which means some legal cell merges are not shown. ) Splitting Table CellsTo split table cells, you can use either the context menu or the Merge and Split Cells section of the Layout task pane. To split a single cell, click in it and then right-click. Clicking the Split Cells option in the context menu causes the Split Cells window to open (see Figure 6.6). Figure 6.6. Using the Split Cells window to split cells. When only a single cell of a layout table is selected, the Merge Cells Before Split option is grayed out. The Split Cells window allows an arbitrary number of rows or columns to be created from a single layout table cell. The alternative way to achieve the same result is to click on the cell that you want to split, and then click on the Custom Split option in the Merge and Split Cells section of the Layout task pane. This also causes the Split Cells window to be displayed. It's also possible to split groups of existing cells, but only if the existing cells correspond to certain patterns of geometry. If you attempt to perform a cell split on a group of cells that can't be split, the Split Cells option in the context menu is grayed out. The Custom Split option in the Merge and Split Cells section of the Layout task pane is also grayed out. When Cell Splitting Behaves OddlySometimes cell splitting will behave oddly if you select the Split Table Cells Horizontally or Split Table Cells Vertically option in the Merge and Split Cells section of the Layout task pane. For example, suppose you select both cells in a two-column layout table and then select the Split Table Cells Horizontally option. You end up with the appearance shown in Figure 6.7, with only two cells split horizontally, which possibly is not the result you expected. Figure 6.7. Unexpected result from cell splitting. To understand what InfoPath is doing behind the scenes, create a Two-Column Table structure and then select the Custom Split option in the Merge and Split Cells section (or select Split Cells in the context menu). The Split Cells window opens (see Figure 6.8). Figure 6.8. The Split Cells window showing the default Merge Cells Before Split option checked. Notice how the Merge Cells Before Split option is checked by default. This default setting causes the unexpected behavior described previously. In the example described earlier, the two columns are first combined (because of the Merge Cells Before Split default) and then split horizontally, producing two cells rather than the four you would probably expect in that situation. So, if you want to apply a split to a group of cells, you might find it more helpful to select Custom Split and adjust the settings you need from the Split Cells window. Resizing Table CellsWhen you merge or split cells in layout tables, the resulting cells are automatically resized inside the boundaries of the existing cell(s). However, it is also possible to resize cells without merging or splitting. Cell dimensions can be increased or decreased vertically or horizontally. If you hold the mouse pointer over the thin gray dividing line between cells in a layout table, the pointer changes to a small vertical line with an arrow on each side. This is similar to the graphic displayed in, for example, Microsoft Excel, to resize columns. However, the InfoPath graphic is smaller in some situations. Cells can be resized this way only in whole columns or whole rows. If you drag the mouse pointer to the right, all columns to the left of the cursor will increase in width, and all columns to the right of the cursor will decrease in width. Creating Offset ColumnsSome form template developers might want to create offset columns and find themselves frustrated by InfoPath. If you don't want to create offset columns, you can skip this section. The problem is that if you resize a column in one row in a layout table, the division between columns changes in all rows of that table with the same column boundary. Therefore, to create offset columns, you need to make two different splits in two rows and then perform a merge in one row. InfoPath then sees the column boundaries as distinct entities. For example, you can create offset columns in a two-row table as follows :
Aligning Tables and Their ContentThis section covers the techniques needed to align tables and their content. Aligning Layout Tables on a ViewTo align a layout table on a view, right-click anywhere in the layout table and select Table Properties from the context menu. The Table Properties window opens (see Figure 6.9). On the Table tab, select Left, Center, or Right depending on your preference. The alignment makes use of the whole form area, so if you select Right, you will likely find that the table at least partly disappears below the task pane, which can be inconvenient. InfoPath seems to lack the automatic provision of horizontal scrolling that Word 2003 provides in similar circumstances. Figure 6.9. The Table Properties window. Aligning Objects in CellsTo align text vertically in a layout table cell, right-click on the cell and select the Table Properties menu option. On the Table Properties window, click the Cell tab and then select Top, Center, or Bottom as appropriate. InfoPath doesn't provide a comparable mechanism to horizontally align text. If you want to align text horizontally in a table, with the appropriate splitting of cells you can place text to the left, center, or right of the table. Alternatively, you can use the alignment buttons on the formatting toolbar. Adjusting Cell PaddingFor example, to adjust the padding around text in a layout table cell, right-click in the cell and select Table Properties from the context menu. On the Table Properties window, select the Cell tab; in the Cell Padding section, adjust the Top, Bottom, Left, and Right padding settings to the desired values. Layout for PrintInfoPath 2003 uses HTML/XHTML to produce the views associated with an InfoPath form template. As mentioned earlier in the chapter, this means that precision printing to a defined page layout is not possible. In addition, the dynamic nature of InfoPath form templateswhich include views with repeating tables, repeating sections, and/or optional sectionsmeans that the page layout of a form with lots of data in a repeating section will differ from a form with minimal data. Similarly, the printed layout of a view that has an expanded optional section will differ from the same view when the optional section is unexpanded. |

| < Day Day Up > |
EAN: 2147483647
Pages: 206