TcpListener and TcpClient
Classes from the System.Net.Sockets namespace provide much more control for network programming. Classes from these namespaces enable you to write your own server and define a custom protocol to transfer information from the client to the server and from the server to the client.
The TcpListener class can be used with the server. You can define a port number that the server should listen to with the constructor of the class. With the Start() method the listening begins. However, to communicate with a client the server must invoke the method AcceptTcpClient(). This method blocks until a client connects. The return value of this method is a TcpClient object that contains information about the connection to the client. Using this TcpClient object the server can receive data that is sent from the client, and send data back to the client.
The client itself makes use of the TcpClient class. The client can initiate the connection to the server with the Connect() method , and afterward it can send and receive data by using a stream associated with the TcpClient object.
In the following two Try It Outs, you create a simple server and a client application with the TcpListener and TcpClient classes. The server sends a list of picture files to the client, so the client can choose a file from this list to request that file from the server. With this application the client can make two requests: the LIST request returns the file list, while the PICTURE:filename request returns the picture in a byte stream.
Try It Out – Create a TCP server
Let's start by creating the server application.
-
Create a new console application project in the directory C:\BegVCSharp\Chapter29 with Visual Studio. Give the application the name PictureServer.
-
Open the Properties in the Solution Explorer. Double-click the item Settings.settings to open the Properties Editor. Add a property named PictureDirectory of type string and a property named Port of type int, as shown in Figure 29-12. Set the value of the PictureDirectory to a directory of your system where you have pictures, for example c:\pictures. Set the value of the Port property to 8888 to define the server's port number.

Figure 29-12 -
Add the helper class PictureHelper to the console application using Add Class in the Solution Explorer. The static methods offered by this class return a list of all files (GetFileList() method), return the file list in a byte array (GetFileListBytes() method), and return a byte array of a picture file (GetPictureBytes() method). This class uses file I/O to get filenames and to read a file.
Note You can read more about file I/O in Chapter 22.
using System; using System.IO; using System.Text; namespace PictureServer { public static class PictureHelper { public static string[] GetFileList() { string[] files = Directory.GetFiles( Properties.Settings.Default.PictureDirectory); // Remove the directory path from the filename. for (int i = 0; i < files.Length; i++) { files[i] = Path.GetFileName(files[i]); } return files; } public static byte[] GetPictureBytes(string filename) { FileInfo fileInfo = new FileInfo(filename); byte[] buffer = new byte[fileInfo.Length]; using (FileStream stream = fileInfo.OpenRead()) { stream.Read(buffer, 0, buffer.Length); } return buffer; } public static byte[] GetFileListBytes() { // LIST request - return list string[] files = PictureHelper.GetFileList(); StringBuilder responseMessage = new StringBuilder(); foreach (string s in files) { responseMessage.Append(s); responseMessage.Append(":"); } byte[] responseBuffer = Encoding.ASCII.GetBytes( responseMessage.ToString()); return responseBuffer; } } }
-
Import the namespaces System.Net and System.Net.Sockets in the file Program.cs.
-
In the Main() method of the server application, add the code shown here:
class Program { static void Main(string[] args) { TcpListener listener = new TcpListener(IPAddress.Any, Properties.Settings.Default.Port); listener.Start(); while (true) { const int bufferSize = 256; TcpClient client = listener.AcceptTcpClient(); NetworkStream clientStream = client.GetStream(); byte[] buffer = new byte[bufferSize]; int readBytes = 0; readBytes = clientStream.Read(buffer, 0, bufferSize); string request = Encoding.ASCII.GetString(buffer).Substring( 0, readBytes); if (request.StartsWith("LIST")) { // LIST request - return list byte[] responseBuffer = PictureHelper.GetFileListBytes(); clientStream.Write(responseBuffer, 0, responseBuffer.Length); } else if (request.StartsWith("FILE")) { // FILE request - return file // get the filename string[] requestMessage = request. string filename = requestMessage[1]; byte[] data = File.ReadAllBytes(Path.Combine( Properties.Settings.Default.PictureDirectory, filename)); // Send the picture to the client. clientStream.Write(data, 0, data.Length); } clientStream.Close(); } } }
How It Works
To create a server application that waits for connecting clients using the TCP protocol, you can use the TcpListener class. To create a TcpListener object, you must define a port number for the server. Here, the port number is read from the configuration file with Properties.Settings.Default.Port. Then the Start() method is invoked to start listening for incoming requests.
TcpListener listener = new TcpListener(IPAddress.Any, Properties.Settings.Default.Port); listener.Start();
After starting the listener, the server waits in the AcceptTcpClient() method until a client connects. The connection to the client is defined in the TcpClient object returned by AcceptTcpClient().
TcpClient client = listener.AcceptTcpClient();
After the connection is initiated, the client sends a request to the server. The request is read in the stream. client.GetStream() returns a NetworkStream object. The data from this network stream is read into the byte array buffer and then converted to a string that is stored in the variable request.
NetworkStream clientStream = client.GetStream(); byte[] buffer = new byte[bufferSize]; int readBytes = 0; readBytes = clientStream.Read(buffer, 0, bufferSize); string request = Encoding.ASCII.GetString(buffer).Substring( 0, readBytes);
Depending on the request string, either a list of picture files or the bytes of a picture are returned to the client. The request string is checked with the String method StartsWith.
if (request.StartsWith("LIST")) The server sends data back to the client by writing the return data to the network stream:
byte[] responseBuffer = PictureHelper.GetFileListBytes(); clientStream.Write(responseBuffer, 0, responseBuffer.Length);
Try It Out – Create a TCP Client
The client application is a Windows forms application that shows the picture files available on the server. When the user selects a picture file, the picture is shown in the client application.
-
Create a new Windows Forms project in the directory C:\BegVCSharp\Chapter29, with the name PictureClient.
-
Rename the file Form1.cs to PictureClientForm.cs.
-
Add the server name and port number of the server to the application's property settings as you did with the server application. The server name has the property name Server, and the port number has the property name ServerPort. Set the value of the server to the name of your server and the port number to the port number of the server. In the example, server port number 8888 has been used.
-
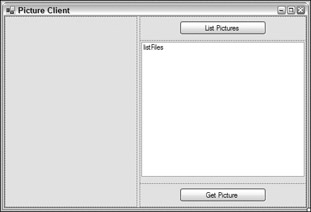
Add controls to the main dialog as shown in Figure 29-13.

Figure 29-13The main controls of this dialog are shown in the following table.
Control Type
Name
Text Property
PictureBox
pictureBox
Button
buttonListPictures
List Pictures
ListBox
listFiles
Button
buttonGetPicture
Get Picture
-
Import the namespaces System.Net, System.Net.Sockets, and System.IO in the file PictureClientForm.cs.
-
Add a Click event handler to the button buttonListPictures to include this code:
private void OnGetFiles(object sender, EventArgs e) { const int bufferSize = 4096; // Connect to the server. TcpClient client = new TcpClient(); IPHostEntry host = Dns.GetHostEntry( Properties.Settings.Default.Server); client.Connect(host.AddressList[0], Properties.Settings.Default.ServerPort); // Send a request to the server. NetworkStream clientStream = client.GetStream(); string request = "LIST"; byte[] requestBuffer = Encoding.ASCII.GetBytes(request); clientStream.Write(requestBuffer, 0, requestBuffer.Length); // Read the response from the server. byte[] responseBuffer = new byte[bufferSize]; MemoryStream memStream = new MemoryStream(); int bytesRead = 0; do { bytesRead = clientStream.Read(responseBuffer, 0, bufferSize); memStream.Write(responseBuffer, 0, bytesRead); } while (bytesRead > 0); clientStream.Close(); client.Close(); byte[] buffer = memStream.GetBuffer(); string response = Encoding.ASCII.GetString(buffer); string[] fileNames = response. this.listFiles.DataSource = fileNames; } -
Add a Click event handler to the buttonGetPicture button, and add this code:
private void OnGetPicture(object sender, EventArgs e) { const int bufferSize = 4096; TcpClient client = new TcpClient(); IPHostEntry host = Dns.GetHostEntry( Properties.Settings.Default.Server); client.Connect(host.AddressList[0], Properties.Settings.Default.ServerPort); NetworkStream clientStream = client.GetStream(); string request = "FILE:" + this.listFiles.SelectedItem.ToString(); byte[] requestBuffer = Encoding.ASCII.GetBytes(request); clientStream.Write(requestBuffer, 0, requestBuffer.Length); byte[] responseBuffer = new byte[bufferSize]; MemoryStream memStream = new MemoryStream(); int bytesRead = 0; do { bytesRead = clientStream.Read(responseBuffer, 0, bufferSize); memStream.Write(responseBuffer, 0, bytesRead); } while (bytesRead > 0); clientStream.Close(); client.Close(); pictureBox.Image = Image.FromStream(memStream); } -
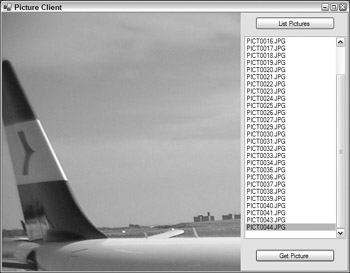
Now, you can start the server application and afterward the client application (see Figure 29-14). When you click the first button (List Pictures), a list of all pictures in the pictures directory (which has been configured on the server) shows up. Selecting a picture and clicking the Get Picture button transfers the picture to the client, and the picture is displayed in the picture box.

Figure 29-14Note If you have the Windows XP firewall enabled, you are asked to unblock the program. For the server to listen on a specific port, you have to allow this. With the firewall settings you can also configure an exception for specific port numbers used during development.
How It Works
The TcpClient class is used with the client to connect to the server. After creating the TcpClient object, the Connect() method initiates a connection to the server. the Connect() method requires an IP address and a port number. The IP address is read from the IPHostEntry variable host. The IPHostEntry that contains all IP addresses of the server is returned from the Dns class GetHostEntry() method. The server's name is read from the application configuration file with Properties.Settings.Default.Server.
TcpClient client = new TcpClient(); IPHostEntry host = Dns.GetHostEntry( Properties.Settings.Default.Server); client.Connect(host.AddressList[0], Properties.Settings.Default.ServerPort);
Using a NetworkStream, data can now be sent to the server. the NetworkStream object can be accessed using the GetStream() method of the TcpClient object. Data to be written can now be sent to the server with the NetworkStream method. Because the Write() method requires a byte array, the string "LIST" is converted to a byte array with the Encoding class. Encoding.ASCII returns an ASCII Encoding object. With this object the GetBytes() method is used to convert the string to a byte array.
NetworkStream clientStream = client.GetStream(); string request = "LIST"; byte[] requestBuffer = Encoding.ASCII.GetBytes(request); clientStream.Write(requestBuffer, 0, requestBuffer.Length);
The data that is returned from the server is read with the clientStream object's Read() method. Because it's not sure how much data is received from the server, a do while loop is used to read data as long as there is some. The data read is appended to a MemoryStream, which automatically resizes.
byte[] responseBuffer = new byte[bufferSize]; MemoryStream memStream = new MemoryStream(); int bytesRead = 0; do { bytesRead = clientStream.Read(responseBuffer, 0, bufferSize); memStream.Write(responseBuffer, 0, bytesRead); } while (bytesRead > 0); The picture is read in a similar way as the file data. The memory stream that contains the picture data is converted to an Image with the method Image.FromStream. (You can read more about images in Chapter 30.) The image is then assigned to the Image property of the PictureBox, so it is displayed in the form:
pictureBox.Image = Image.FromStream(memStream);
EAN: N/A
Pages: 278