| The ASP.NET Framework includes three controls you can use to submit a form to the server: the Button, LinkButton, and ImageButton controls. These controls have the same function, but each control has a distinct appearance. In this section, you learn how to use each of these three types of buttons in a page. Next, you learn how to associate client-side scripts with server-side Button controls. You also learn how to use a button control to post a form to a page other than the current page. Finally, you learn how to handle a button control's Command event. Using the Button Control The Button control renders a push button that you can use to submit a form to the server. For example, the page in Listing 2.14 contains a Button control. When you click the Button control, the time displayed by a Label control is updated (see Figure 2.10). Listing 2.14. ShowButton.aspx| [View full width] <%@ Page Language="VB" %> <!DOCTYPE html PUBLIC "-//W3C//DTD XHTML 1.0 Transitional//EN" "http://www.w3.org/TR  /xhtml1/DTD/xhtml1-transitional.dtd"> <script runat="server"> Sub btnSubmit_Click(ByVal sender As Object, ByVal e As EventArgs) lblTime.Text = DateTime.Now.ToString("T") End Sub </script> <html xmlns="http://www.w3.org/1999/xhtml" > <head runat="server"> <title>Show Button</title> </head> <body> <form runat="server"> <div> <asp:Button Text="Submit" OnClick="btnSubmit_Click" Runat="server" /> <br /><br /> <asp:Label Runat="server" /> </div> </form> </body> </html> /xhtml1/DTD/xhtml1-transitional.dtd"> <script runat="server"> Sub btnSubmit_Click(ByVal sender As Object, ByVal e As EventArgs) lblTime.Text = DateTime.Now.ToString("T") End Sub </script> <html xmlns="http://www.w3.org/1999/xhtml" > <head runat="server"> <title>Show Button</title> </head> <body> <form runat="server"> <div> <asp:Button Text="Submit" OnClick="btnSubmit_Click" Runat="server" /> <br /><br /> <asp:Label Runat="server" /> </div> </form> </body> </html>
|
Figure 2.10. Displaying a Button control. 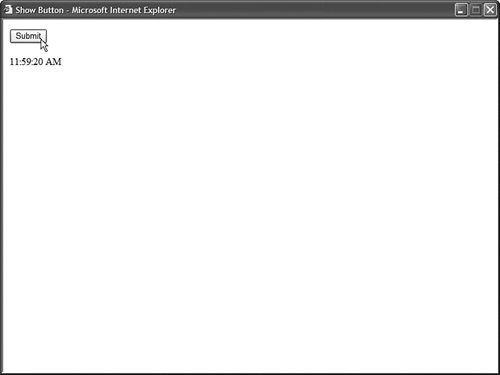
The Button control supports the following properties (this is not a complete list): AccessKey Enables you to specify a key that navigates to the Button control. CommandArgument Enables you to specify a command argument that is passed to the Command event. CommandName Enables you to specify a command name that is passed to the Command event. Enabled Enables you to disable the Button control. OnClientClick Enables you to specify a client-side script that executes when the button is clicked. PostBackUrl Enables you to post a form to a particular page. TabIndex Enables you to specify the tab order of the Button control. Text Enables you to label the Button control. UseSubmitBehavior Enables you to use JavaScript to post a form.
The Button control also supports the following method: The Button control also supports the following two events: Using the LinkButton Control The LinkButton control, like the Button control, enables you to post a form to the server. Unlike a Button control, however, the LinkButton control renders a link instead of a push button. The page in Listing 2.15 contains a simple form. The form includes a LinkButton control that enables you to submit the form to the server and display the contents of the form fields (see Figure 2.11). Listing 2.15. ShowLinkButton.aspx| [View full width] <%@ Page Language="VB" %> <!DOCTYPE html PUBLIC "-//W3C//DTD XHTML 1.0 Transitional//EN" "http://www.w3.org/TR /xhtml1/DTD/xhtml1-transitional.dtd"> <script runat="server"> Sub lnkSubmit_Click(ByVal sender As Object, ByVal e As EventArgs) lblResults.Text = "First Name: " & txtFirstName.Text lblResults.Text &= "<br />Last Name: " & txtLastName.Text End Sub </script> <html xmlns="http://www.w3.org/1999/xhtml" > <head runat="server"> <title>Show LinkButton</title> </head> <body> <form runat="server"> <div> <asp:Label Text="First Name:" AssociatedControl Runat="server" /> <br /> <asp:TextBox Runat="server" /> <br /><br /> <asp:Label Text="Last Name:" AssociatedControl Runat="server" /> <br /> <asp:TextBox Runat="server" /> <br /><br /> <asp:LinkButton Text="Submit" OnClick="lnkSubmit_Click" Runat="server" /> <br /><br /> <asp:Label Runat="server" /> </div> </form> </body> </html>
|
Figure 2.11. Displaying a LinkButton control. 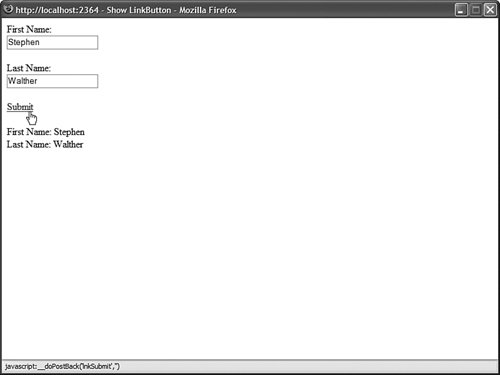
Behind the scenes, the LinkButton control uses JavaScript to post the form back to the server. The hyperlink rendered by the LinkButton control looks like this: <a href="javascript:__doPostBack('lnkSubmit','')">Submit</a>
Clicking the LinkButton invokes the JavaScript __doPostBack() method, which posts the form to the server. When the form is posted, the values of all the other form fields in the page are also posted to the server. The LinkButton control supports the following properties (this is not a complete list): AccessKey Enables you to specify a key that navigates to the Button control. CommandArgument Enables you to specify a command argument that is passed to the Command event. CommandName Enables you to specify a command name that is passed to the Command event. Enabled Enables you to disable the LinkButton control. OnClientClick Enables you to specify a client-side script that executes when the LinkButton is clicked. PostBackUrl Enables you to post a form to a particular page. TabIndex Enables you to specify the tab order of the LinkButton control. Text Enables you to label the LinkButton control.
The LinkButton control also supports the following method: The LinkButton control also supports the following two events: Using the ImageButton Control The ImageButton control, like the Button and LinkButton controls, enables you to post a form to the server. However, the ImageButton control always displays an image. The page in Listing 2.16 contains an ImageButton control that posts a simple form back to the server (see Figure 2.12). Figure 2.12. Displaying an ImageButton control. 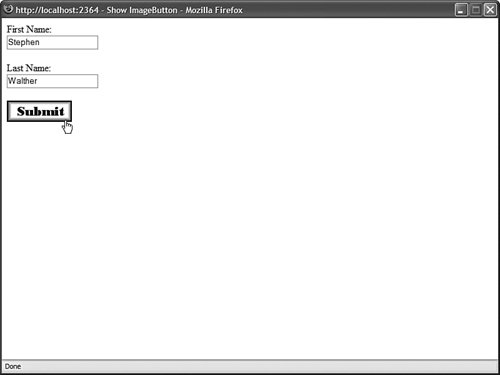
Listing 2.16. ShowImageButton.aspx| [View full width] <%@ Page Language="VB" %> <!DOCTYPE html PUBLIC "-//W3C//DTD XHTML 1.0 Transitional//EN" "http://www.w3.org/TR /xhtml1/DTD/xhtml1-transitional.dtd"> <script runat="server"> Sub btnSubmit_Click(ByVal sender As Object, ByVal e As ImageClickEventArgs) lblResults.Text = "First Name: " & txtFirstName.Text lblResults.Text &= "<br />Last Name: " & txtLastName.Text End Sub </script> <html xmlns="http://www.w3.org/1999/xhtml" > <head runat="server"> <title>Show ImageButton</title> </head> <body> <form runat="server"> <div> <asp:Label Text="First Name:" AssociatedControl Runat="server" /> <br /> <asp:TextBox Runat="server" /> <br /><br /> <asp:Label Text="Last Name:" AssociatedControl Runat="server" /> <br /> <asp:TextBox Runat="server" /> <br /><br /> <asp:ImageButton ImageUrl="Submit.gif" AlternateText="Submit Form" Runat="server" OnClick="btnSubmit_Click" /> <br /><br /> <asp:Label Runat="server" /> </div> </form> </body> </html>
|
The ImageButton in Listing 2.16 includes both an ImageUrl and AlternateText property. The ImageUrl contains the path to the image that the ImageButton displays. The AlternateText property is used to provide alternate text for the image used by screen readers and text-only browsers. Web Standards Note Always include alternate text for any image. The accessibility guidelines require it. Furthermore, remember that some people turn off images in their browsers for a faster surfing experience.
Notice that the event handler for an Image control's Click event is different than that for the other button controls. The second parameter passed to the event handler is an instance of the ImageClickEventArgs class. This class has the following properties: You can use the ImageButton control to create a simple image map. For example, the page in Listing 2.17 contains an ImageButton that displays an image of a target. If you click the center of the target, then a success message is displayed (see Figure 2.13). Listing 2.17. ImageButtonTarget.aspx| [View full width] <%@ Page Language="VB" %> <!DOCTYPE html PUBLIC "-//W3C//DTD XHTML 1.0 Transitional//EN" "http://www.w3.org/TR /xhtml1/DTD/xhtml1-transitional.dtd"> <script runat="server"> Sub btnTarget_Click(ByVal sender As Object, ByVal e As ImageClickEventArgs) If (e.X > 90 And e.X < 110) And (e.Y > 90 And e.Y < 110) Then lblResult.Text = "You hit the target!" Else lblResult.Text = "You missed!" End If End Sub </script> <html xmlns="http://www.w3.org/1999/xhtml" > <head runat="server"> <title>ImageButton Target</title> </head> <body> <form runat="server"> <div> <asp:ImageButton ImageUrl="Target.gif" Runat="server" OnClick="btnTarget_Click" /> <br /><br /> <asp:Label Runat="server" /> </div> </form> </body> </html>
|
Figure 2.13. Retrieving X and Y coordinates from an ImageButton. 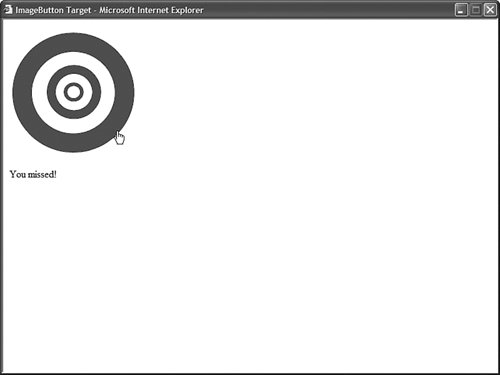
Web Standards Note The ImageButton can be used to create a server-side image map. Server-side image maps are not accessible to persons with disabilities. A better method for creating an ImageMap is to use the ImageMap control, which enables you to create a client-side image map. The ImageMap control is discussed in the next section of this chapter.
The ImageButton control supports the following properties (this is not a complete list): AccessKey Enables you to specify a key that navigates to the ImageButton control. AlternateText Enables you to provide alternate text for the image (required for accessibility). DescriptionUrl Enables you to provide a link to a page that contains a detailed description of the image (required to make a complex image accessible). CommandArgument Enables you to specify a command argument that is passed to the Command event. CommandName Enables you to specify a command name that is passed to the Command event. Enabled Enables you to disable the ImageButton control. GenerateEmptyAlternateText Enables you to set the AlternateText property to an empty string. ImageAlign Enables you to align the image relative to other HTML elements in the page. Possible values are AbsBottom, AbsMiddle, Baseline, Bottom, Left, Middle, NotSet, Right, TextTop, and Top. ImageUrl Enables you to specify the URL to the image. OnClientClick Enables you to specify a client-side script that executes when the ImageButton is clicked. PostBackUrl Enables you to post a form to a particular page. TabIndex Enables you to specify the tab order of the ImageButton control.
The ImageButton control also supports the following method: The ImageButton control also supports the following two events: Using Client Scripts with Button Controls All three Button controls support an OnClientClick property. You can use this property to execute any client-side code that you need when a button is clicked. The page in Listing 2.18 illustrates how you can use the OnClientClick property to display a confirmation dialog box (see Figure 2.14). Figure 2.14. Displaying a client-side confirmation dialog box. 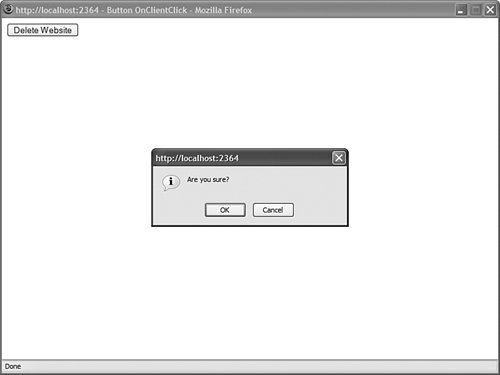
Listing 2.18. ButtonOnClientClick.aspx| [View full width] <%@ Page Language="VB" %> <!DOCTYPE html PUBLIC "-//W3C//DTD XHTML 1.0 Transitional//EN" "http://www.w3.org/TR /xhtml1/DTD/xhtml1-transitional.dtd"> <script runat="server"> Sub btnDelete_Click(sender AS Object, e As EventArgs) lblResult.Text = "All pages deleted!" End Sub </script> <html xmlns="http://www.w3.org/1999/xhtml" > <head runat="server"> <title>Button OnClientClick</title> </head> <body> <form runat="server"> <div> <asp:Button Text="Delete Website" OnClick="btnDelete_Click" OnClientClick="return confirm('Are you sure?');" Runat="server" /> <br /><br /> <asp:Label Runat="server" /> </div> </form> </body> </html>
|
In Listing 2.18, the Button control includes an OnClientClick property, which executes a JavaScript script when you click the button on the client. The script displays a confirmation dialog box. If the confirmation box returns False, then the button click is canceled and the form containing the button is not posted to the server. Because the button controls, like most ASP.NET controls, support expando attributes, you can handle other client-side events simply by adding an arbitrary attribute to the control. If the ASP.NET Framework does not recognize an attribute declared on a button control, the framework simply passes the attribute to the browser. For example, the page in Listing 2.19 contains a button control that includes onmouseover and onmouseout attributes. When you hover your mouse over the button, the text displayed in the button is changed. Listing 2.19. ButtonExpando.aspx| [View full width] <%@ Page Language="VB" %> <!DOCTYPE html PUBLIC "-//W3C//DTD XHTML 1.0 Transitional//EN" "http://www.w3.org/TR /xhtml1/DTD/xhtml1-transitional.dtd"> <html xmlns="http://www.w3.org/1999/xhtml" > <head runat="server"> <title>Button Expando</title> </head> <body> <form runat="server"> <div> <asp:Button Text="Submit" onmouseover="this.value='Click Here!'" onmouseout="this.value='Submit'" Runat="server" /> </div> </form> </body> </html>
|
Note You'll get green squiggly warnings under expando attributes in Visual Web Developerbut these warnings can be safely ignored.
Performing Cross-Page Posts By default, if you click a button control, the page containing the control is posted back to itself and the same page is reloaded. However, you can use the PostBackUrl property to post form data to another page. For example, the page in Listing 2.20 includes a search form. The Button control in the page posts the form to another page named ButtonSearchResults.aspx. The ButtonSearchResults.aspx page is contained in Listing 2.21. Listing 2.20. ButtonSearch.aspx| [View full width] <%@ Page Language="VB" %> <!DOCTYPE html PUBLIC "-//W3C//DTD XHTML 1.0 Transitional//EN" "http://www.w3.org/TR /xhtml1/DTD/xhtml1-transitional.dtd"> <html xmlns="http://www.w3.org/1999/xhtml" > <head runat="server"> <title>Button Search</title> </head> <body> <form runat="server"> <div> <asp:Label Text="Search:" Runat="server" /> <asp:TextBox Runat="server" /> <asp:Button Text="Go!" PostBackUrl="ButtonSearchResults.aspx" Runat="server" /> </div> </form> </body> </html>
|
Listing 2.21. ButtonSearchResults.aspx| [View full width] <%@ Page Language="VB" %> <!DOCTYPE html PUBLIC "-//W3C//DTD XHTML 1.0 Transitional//EN" "http://www.w3.org/TR /xhtml1/DTD/xhtml1-transitional.dtd"> <script runat="server"> Sub Page_Load() If Not IsNothing(PreviousPage) Then Dim txtSearch As TextBox = CType(PreviousPage.FindControl("txtSearch"), TextBox) lblSearch.Text = String.Format("Search For: {0}", txtSearch.Text) End If End Sub </script> <html xmlns="http://www.w3.org/1999/xhtml" > <head runat="server"> <title>Button Search Results</title> </head> <body> <form runat="server"> <div> <asp:Label Runat="server" /> </div> </form> </body> </html>
|
In the Page_Load event handler in Listing 2.21, the PreviousPage property is used to get a reference to the previous page (the ButtonSearch.aspx page in Listing 2.20). Next, the FindControl() method is used to retrieve the txtSearch TextBox control from the previous page. Finally, the value entered into the TextBox is displayed in a label on the page. As an alternative to using the FindControl() method to retrieve a particular control from the previous page, you can expose the control through a page property. The page in Listing 2.22 exposes the txtSearch TextBox through a property named SearchString. The page posts the form data to a page named ButtonSearchResultsTyped.aspx, contained in Listing 2.23. Listing 2.22. ButtonSearchTyped.aspx| [View full width] <%@ Page Language="VB" %> <!DOCTYPE html PUBLIC "-//W3C//DTD XHTML 1.0 Transitional//EN" "http://www.w3.org/TR /xhtml1/DTD/xhtml1-transitional.dtd"> <script runat="server"> Public ReadOnly Property SearchString() As String Get Return txtSearch.Text End Get End Property </script> <html xmlns="http://www.w3.org/1999/xhtml" > <head runat="server"> <title>Button Search Typed</title> </head> <body> <form runat="server"> <div> <asp:Label Text="Search:" Runat="server" /> <asp:TextBox Runat="server" /> <asp:Button Text="Go!" PostBackUrl="ButtonSearchResultsTyped.aspx" Runat="server" /> </div> </form> </body> </html>
|
Listing 2.23. ButtonSearchResultsTyped.aspx| [View full width] <%@ Page Language="VB" %> <%@ PreviousPageType VirtualPath="~/ButtonSearchTyped.aspx" %> <!DOCTYPE html PUBLIC "-//W3C//DTD XHTML 1.0 Transitional//EN" "http://www.w3.org/TR /xhtml1/DTD/xhtml1-transitional.dtd"> <script runat="server"> Sub Page_Load() If Not IsNothing(Page.PreviousPage) Then lblSearch.Text = String.Format("Search For: {0}", PreviousPage.SearchString) End If End Sub </script> <html xmlns="http://www.w3.org/1999/xhtml" > <head runat="server"> <title>Button Search Results Typed</title> </head> <body> <form runat="server"> <div> <asp:Label Runat="server" /> </div> </form> </body> </html>
|
Notice that the page in Listing 2.23 includes a <%@ PreviousPageType %> directive. This directive casts the value returned by the PreviousPage property as an instance of the ButtonSearchTyped class. Without this directive, the PreviousPage property would return the previous page as an instance of the generic Page class. You can use either method when performing cross-page posts. The first method provides you with an untyped method of retrieving values from the previous page, and the second method provides you with a typed method. Specifying a Default Button You can specify a default button for a form by using the DefaultButton property of the server-side Form control. If you specify a default button, then pressing the keyboard Enter key invokes the button. For example, the page in Listing 2.24 contains a simple search form. The <form> tag sets the btnSearch Button control as the default button on the page. Listing 2.24. ButtonDefaultButton.aspx| [View full width] <%@ Page Language="VB" %> <!DOCTYPE html PUBLIC "-//W3C//DTD XHTML 1.0 Transitional//EN" "http://www.w3.org/TR /xhtml1/DTD/xhtml1-transitional.dtd"> <script runat="server"> Sub btnSearch_Click(ByVal sender As Object, ByVal e As EventArgs) lblResult.Text = "Search for: " & txtSearch.Text End Sub </script> <html xmlns="http://www.w3.org/1999/xhtml" > <head runat="server"> <title>Button Default Button</title> </head> <body> <form defaultbutton="btnSearch" runat="server"> <div> <asp:Label Text="Search:" AssociatedControl Runat="server" /> <asp:TextBox Runat="server" /> <asp:Button Text="Search" OnClick="btnSearch_Click" Runat="server" /> <asp:Button Text="Cancel" Runat="server" /> <hr /> <asp:Label Runat="server" /> </div> </form> </body> </html>
|
If you open the page in Listing 2.24, type a search phrase, and hit the keyboard Enter key, the form is submitted to the server. Pressing the Enter key causes the btnSearch_Click event handler to execute because the btnSearch button is the default button on the page. Note You can also specify a DefaultButton with a Panel control. The Panel control is discussed later in this chapter.
Handling the Command Event All three Button controls support both the Click event and the Command event. The difference between these events is that you can pass a command name and command argument to a Command event handler but not to a Click event handler. For example, the page in Listing 2.25 contains two Button controls and a BulletedList control. When you click the first button, the items displayed by the BulletedList control are sorted in ascending order, and when you click the second button, the items displayed by the BulletedList control are sorted in descending order (see Figure 2.15). Figure 2.15. Handling the Command even\t. 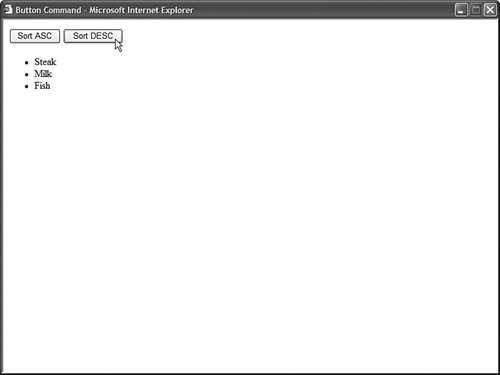
Listing 2.25. ButtonCommand.aspx| [View full width] <%@ Page Language="VB" %> <%@ Import Namespace="System.Collections.Generic" %> <!DOCTYPE html PUBLIC "-//W3C//DTD XHTML 1.0 Transitional//EN" "http://www.w3.org/TR /xhtml1/DTD/xhtml1-transitional.dtd"> <script runat="server"> Private groceries As New List(Of String)() Sub Page_Load() groceries.Add("Milk") groceries.Add("Steak") groceries.Add("Fish") End Sub Sub Sort_Command(ByVal sender As Object, ByVal e As CommandEventArgs) If e.CommandName = "Sort" Then Select Case e.CommandArgument.ToString() Case "ASC" groceries.Sort(AddressOf SortASC) Case "DESC" groceries.Sort(AddressOf SortDESC) End Select End If End Sub Sub Page_PreRender() bltGroceries.DataSource = groceries bltGroceries.DataBind() End Sub Function SortASC(ByVal x As String, ByVal y As String) As Integer Return String.Compare(x, y) End Function Function SortDESC(ByVal x As String, ByVal y As String) As Integer Return String.Compare(x, y) * -1 End Function </script> <html xmlns="http://www.w3.org/1999/xhtml" > <head runat="server"> <title>Button Command</title> </head> <body> <form runat="server"> <div> <asp:Button Text="Sort ASC" CommandName="Sort" CommandArgument="ASC" OnCommand="Sort_Command" Runat="server" /> <asp:Button Text="Sort DESC" CommandName="Sort" CommandArgument="DESC" OnCommand="Sort_Command" Runat="server" /> <br /><br /> <asp:BulletedList Runat="server" /> </div> </form> </body> </html>
|
Both Button controls include CommandName and CommandArgument properties. Furthermore, both Button controls are wired to the same Sort_Command() event handler. This event handler checks the CommandName and CommandArgument properties when determining how the elements in the BulletedList should be sorted. |