| You use a Catalog Zone to list one or more catalogs of Web Parts that you can add to the page. The contents of a Catalog Zone appear only when a page is in Catalog Display Mode. There are three standard types of Catalog Part controls included in the Web Part Framework: Declarative Catalog Parts, Page Catalog Parts, and Import Catalog Parts. Using a Declarative Catalog Part A Declarative Catalog Part contains a static list of controls that you can add to a page. You can supply the list of controls in two ways: The controls can be listed in the DeclarativeCatalogPart control's <WebPartsTemplate> tag or you can list the Web Parts in an external file. The page in Listing 27.8 illustrates how you can list the Web Parts displayed in the Declarative Catalog Part inline. Listing 27.8. DeclarativeCatalogPart1.aspx <%@ Page Language="VB" %> <%@ Register TagPrefix="user" TagName="FirstSimplePart" src="/books/3/444/1/html/2/~/FirstSimplePart.ascx" %> <%@ Register TagPrefix="user" TagName="SecondSimplePart" src="/books/3/444/1/html/2/~/SecondSimplePart.ascx" %> <!DOCTYPE html PUBLIC "-//W3C//DTD XHTML 1.1//EN" "http://www.w3.org/TR/xhtml11/DTD/xhtml11.dtd"> <script runat="server"> Sub Menu1_MenuItemClick(ByVal sender As Object, ByVal e As MenuEventArgs) WebPartManager1.DisplayMode = WebPartManager1.DisplayModes(e.Item.Text) End Sub </script> <html xmlns="http://www.w3.org/1999/xhtml" > <head runat="server"> <style type="text/css"> .column { float:left; width:30%; height:200px; margin-right:10px; border:solid 1px black; background-color: white; } .menu { margin:5px 0px; } html { background-color:#eeeeee; } </style> <title>Declarative Catalog Part 1</title> </head> <body> <form runat="server"> <asp:WebPartManager Runat="server" /> <asp:Menu OnMenuItemClick="Menu1_MenuItemClick" Orientation="Horizontal" Css Runat="server"> <Items> <asp:MenuItem Text="Browse" /> <asp:MenuItem Text="Design" /> <asp:MenuItem Text="Catalog" /> </Items> </asp:Menu> <asp:WebPartZone Css Runat="server" /> <asp:WebPartZone Css Runat="server" /> <asp:CatalogZone Css Runat="server"> <ZoneTemplate> <asp:DeclarativeCatalogPart Runat="server"> <WebPartsTemplate> <user:FirstSimplePart Title="First Web Part" Description="Our first simple Web Part" Runat="server" /> <user:SecondSimplePart Title="Second Web Part" Description="Our second simple Web Part" Runat="server" /> </WebPartsTemplate> </asp:DeclarativeCatalogPart> </ZoneTemplate> </asp:CatalogZone> </form> </body> </html>
|
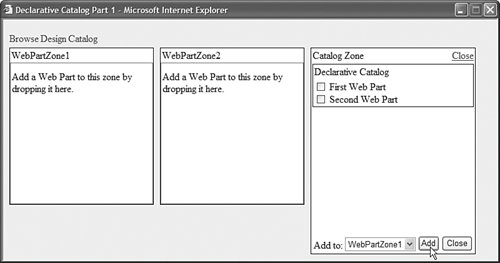
The page in Listing 27.8 contains a CatalogZone control. The CatalogZone control contains a ZoneTemplate, which includes the DeclarativeCatalogPart control. Finally, the DeclarativeCatalogPart control has a WebPartsTemplate that lists two Web Parts: the FirstSimplePart and SecondSimplePart. If you open the page in your browser and click the Catalog menu link, you can see the list of controls rendered by the DeclarativeCatalogPart control. You can add a new part to the page by selecting any of the parts in the list, selecting a Web Part Zone from the drop-down list, and clicking the Add button (see Figure 27.7). Figure 27.7. Using the DeclarativeCatalogPart control. 
Note The DeclarativeCatalogPart does not support paging or sorting. In Chapter 30, "Extending the Web Part Framework," you learn how to create custom CatalogPart controls that support more functionality.
If you want to enable users to personalize multiple pages in an application, then it doesn't make sense to list the Web Parts displayed by a Declarative Catalog Part in each page. You can use the DeclarativeCatalogPart control's WebPartsListUserControlPath property to point to an external file that contains a list of Web Parts. The DeclarativeCatalogPart in Listing 27.9 uses the WebPartsListUserControlPath property. The file that contains the list of Web Parts is contained in Listing 27.10. (Notice that the file is a User Control.) Listing 27.9. DeclarativeCatalogPart2.aspx <%@ Page Language="VB" %> <!DOCTYPE html PUBLIC "-//W3C//DTD XHTML 1.1//EN" "http://www.w3.org/TR/xhtml11/DTD/xhtml11.dtd"> <script runat="server"> Sub Menu1_MenuItemClick(ByVal sender As Object, ByVal e As MenuEventArgs) WebPartManager1.DisplayMode = WebPartManager1.DisplayModes(e.Item.Text) End Sub </script> <html xmlns="http://www.w3.org/1999/xhtml" > <head runat="server"> <style type="text/css"> .column { float:left; width:30%; height:200px; margin-right:10px; border:solid 1px black; background-color: white; } .menu { margin:5px 0px; } html { background-color:#eeeeee; } </style> <title>Declarative Catalog Part 2</title> </head> <body> <form runat="server"> <asp:WebPartManager Runat="server" /> <asp:Menu OnMenuItemClick="Menu1_MenuItemClick" Orientation="Horizontal" Css Runat="server"> <Items> <asp:MenuItem Text="Browse" /> <asp:MenuItem Text="Design" /> <asp:MenuItem Text="Catalog" /> </Items> </asp:Menu> <asp:WebPartZone Css Runat="server" /> <asp:WebPartZone Css Runat="server" /> <asp:CatalogZone Css Runat="server"> <ZoneTemplate> <asp:DeclarativeCatalogPart WebPartsListUserControlPath="~/WebPartList.ascx" Runat="server" /> </ZoneTemplate> </asp:CatalogZone> </form> </body> </html>
|
Listing 27.10. WebPartList.ascx <%@ Control Language="VB" ClassName="WebPartList" %> <%@ Register TagPrefix="user" TagName="FirstSimplePart" src="/books/3/444/1/html/2/~/FirstSimplePart.ascx" %> <%@ Register TagPrefix="user" TagName="SecondSimplePart" src="/books/3/444/1/html/2/~/SecondSimplePart.ascx" %> <user:FirstSimplePart Title="First Web Part" Description="Our first simple Web Part" Runat="server" /> <user:SecondSimplePart Title="Second Web Part" Description="Our second simple Web Part" Runat="server" />
|
Notice that the FirstSimplePart and SecondSimplePart controls are not registered in the page in Listing 27.9. However, you do need to register the controls in the file in Listing 27.10. You can mix the Web Parts retrieved from an external file and the Web Parts declared inline. The Web Parts retrieved from the two sources are combined into one list. Using a Page Catalog Part The PageCatalogPart control displays all the Web Parts in the current page that have been closed. The control enables users to add closed Web Parts back to the original page. Note There is a difference between closing a Web Part and deleting a Web Part. You cannot delete a Web Part that is declared in a page, but you can close it. Furthermore, when you delete a Web Part from a page, all personalization state information is lost. When you close a Web Part, on the other hand, personalization data is not lost.
The page in Listing 27.11 demonstrates how you can use the PageCatalogPart control in a Catalog Zone. Listing 27.11. ShowPageCatalogPart.aspx <%@ Page Language="VB" %> <%@ Register TagPrefix="user" TagName="FirstSimplePart" src="/books/3/444/1/html/2/~/FirstSimplePart.ascx" %> <%@ Register TagPrefix="user" TagName="SecondSimplePart" src="/books/3/444/1/html/2/~/SecondSimplePart.ascx" %>`1 <!DOCTYPE html PUBLIC "-//W3C//DTD XHTML 1.1//EN" "http://www.w3.org/TR/xhtml11/DTD/xhtml11.dtd"> <script runat="server"> Sub Menu1_MenuItemClick(ByVal sender As Object, ByVal e As MenuEventArgs) WebPartManager1.DisplayMode = WebPartManager1.DisplayModes(e.Item.Text) End Sub </script> <html xmlns="http://www.w3.org/1999/xhtml" > <head runat="server"> <style type="text/css"> .column { float:left; width:30%; height:200px; margin-right:10px; border:solid 1px black; background-color: white; } .menu { margin:5px 0px; } html { background-color:#eeeeee; } </style> <title>Show Page Catalog Part</title> </head> <body> <form runat="server"> <asp:WebPartManager Runat="server" /> <asp:Menu OnMenuItemClick="Menu1_MenuItemClick" Orientation="Horizontal" Css Runat="server"> <Items> <asp:MenuItem Text="Browse" /> <asp:MenuItem Text="Design" /> <asp:MenuItem Text="Catalog" /> </Items> </asp:Menu> <asp:WebPartZone Css Runat="server"> <ZoneTemplate> <user:FirstSimplePart Title="First Web Part" Description="Our first simple Web Part" Runat="server" /> <user:SecondSimplePart Title="Second Web Part" Description="Our second simple Web Part" Runat="server" /> </ZoneTemplate> </asp:WebPartZone> <asp:WebPartZone Css Runat="server" /> <asp:CatalogZone Css Runat="server"> <ZoneTemplate> <asp:PageCatalogPart Runat="server" /> </ZoneTemplate> </asp:CatalogZone> </form> </body> </html>
|
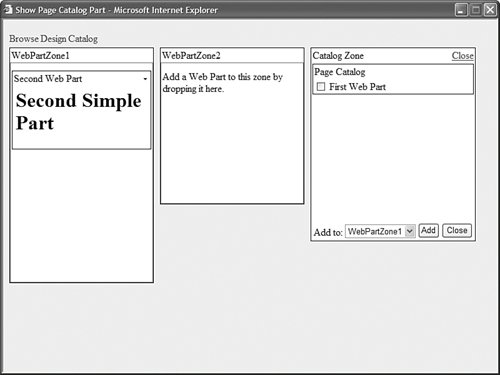
After you open the page in Listing 27.11, you see two Web Parts in the left column Web Part Zone. You can close either Web Part by selecting Close from the Web Part's menu. If you click the Catalog link, you can open the Page Catalog and add any closed Web Parts back to the page (see Figure 27.8). Figure 27.8. Adding closed Web Parts from the Page Catalog. 
Note You can prevent users from closing Web Parts by setting the CloseVerb-Visible property on a WebPartZone control to the value false.
Using the Import Catalog Part If you need to transfer a Web Part control's settings between two different pages, or even between two different applications, you can export the Web Part from one page and import the Web Part on another page. When you export a Web Part, an XML file that represents the Web Part's properties is generated. You can download and save the settings file to your local computer. After you export the settings file, you can import the settings to any Web Part application that includes an Import Catalog Part and knows about the type of Web Part control that you are importing. When you import a Web Part, a new instance of the Web Part control is created that contains the original settings. Note You can programmatically export and import Web Parts by using the WebPartManager control's ExportWebPart() and ImportWebPart() methods.
Before you can export any Web Parts from a page, you must enable exporting for your application. The web configuration file in Listing 27.12 contains the necessary configuration settings. Listing 27.12. Web.Config <?xml version="1.0"?> <configuration> <system.web> <webParts enableExport="true" /> </system.web> </configuration>
|
To make things more interesting, we'll create a new Web Part to illustrate how exporting a Web Part works. The new Web Part represents a user profile. It displays both sensitive and non-sensitive data. The ProfilePart is contained in Listing 27.13. Listing 27.13. ProfilePart.ascx <%@ Control Language="VB" ClassName="ProfilePart" %> <script runat="server"> Private _firstName As String Private _lastName As String Private _socialSecurityNumber As String Private _userProfile As String <Personalizable()> _ <WebBrowsable()> _ Public Property FirstName() As String Get Return _firstName End Get Set(ByVal Value As String) _firstName = value End Set End Property <Personalizable()> _ <WebBrowsable()> _ Public Property LastName() As String Get Return _lastName End Get Set(ByVal Value As String) _lastName = value End Set End Property <Personalizable(PersonalizationScope.User, True)> _ <WebBrowsable()> _ Public Property SocialSecurityNumber() As String Get Return _socialSecurityNumber End Get Set(ByVal Value As String) _socialSecurityNumber = value End Set End Property <Personalizable()> _ <WebBrowsable()> _ Public Property UserProfile() As String Get Return _userProfile End Get Set(ByVal Value As String) _userProfile = value End Set End Property Private Sub Page_PreRender() lblFirstName.Text = _firstName lblLastName.Text = _lastName lblSocialSecurityNumber.Text = _socialSecurityNumber lblUserProfile.Text = _userProfile End Sub </script> First Name: <asp:Label Runat="server" /> <br /> Last Name: <asp:Label Runat="server" /> <br /> Social Security Number: <asp:Label Runat="server" /> <br /> User Profile: <asp:Label Runat="server" />
|
The ProfilePart displays four profile properties: a person's First Name, Last Name, Social Security Number, and User Profile. The value of the Social Security Number property is considered to be sensitive data and the values of the other properties are not. Notice that all four properties in Listing 27.13 are decorated with the Personalizable attribute. Only properties marked with this attribute can be exported. Furthermore, notice that the Personalizable attribute associated with the SocialSecurityNumber property includes two parameters. The second parameter represents whether or not the property contains sensitive data. To prevent the Social Security Number from being exported, this parameter is set to the value true. The page in Listing 27.14 illustrates how you can use the ProfilePart in a page. Listing 27.14. ShowImportCatalogPart.aspx <%@ Page Language="VB" %> <%@ Register TagPrefix="user" TagName="ProfilePart" src="/books/3/444/1/html/2/~/ProfilePart.ascx" %> <%@ Register TagPrefix="user" TagName="FirstSimplePart" src="/books/3/444/1/html/2/~/FirstSimplePart.ascx" %> <%@ Register TagPrefix="user" TagName="SecondSimplePart" src="/books/3/444/1/html/2/~/SecondSimplePart.ascx" %> <!DOCTYPE html PUBLIC "-//W3C//DTD XHTML 1.1//EN" "http://www.w3.org/TR/xhtml11/DTD/xhtml11.dtd"> <script runat="server"> Sub Menu1_MenuItemClick(ByVal sender As Object, ByVal e As MenuEventArgs) WebPartManager1.DisplayMode = WebPartManager1.DisplayModes(e.Item.Text) End Sub </script> <html xmlns="http://www.w3.org/1999/xhtml" > <head runat="server"> <style type="text/css"> .column { float:left; width:30%; height:200px; margin-right:10px; border:solid 1px black; background-color: white; } .menu { margin:5px 0px; } html { background-color:#eeeeee; } </style> <title>Show Import Catalog Part</title> </head> <body> <form runat="server"> <asp:WebPartManager Runat="server" /> <asp:Menu OnMenuItemClick="Menu1_MenuItemClick" Orientation="Horizontal" Css Runat="server"> <Items> <asp:MenuItem Text="Browse" /> <asp:MenuItem Text="Design" /> <asp:MenuItem Text="Catalog" /> <asp:MenuItem Text="Edit" /> </Items> </asp:Menu> <asp:WebPartZone Css Runat="server"> <ZoneTemplate> <user:ProfilePart Title="Profile Part" Description="Displays your profile" ExportMode="NonSensitiveData" Runat="server" /> <user:FirstSimplePart Title="First Web Part" Description="Our first simple Web Part" Runat="server" /> <user:SecondSimplePart Title="Second Web Part" Description="Our second simple Web Part" Runat="server" /> </ZoneTemplate> </asp:WebPartZone> <asp:WebPartZone Css Runat="server" /> <asp:CatalogZone Css Runat="server"> <ZoneTemplate> <asp:ImportCatalogPart Runat="server" /> </ZoneTemplate> </asp:CatalogZone> <asp:EditorZone Css Runat="server"> <ZoneTemplate> <asp:PropertyGridEditorPart Runat="server" /> </ZoneTemplate> </asp:EditorZone> </form> </body> </html>
|
In Listing 27.14, the ProfilePart is declared in the first Web Part Zone. Notice that the ProfilePart includes an ExportMode property. This property can have three possible values: None The default value is to prevent users from exporting a Web Part. All This value enables users to export both sensitive and non-sensitive data. NonSensitiveData This value enables users to export only data that has not been marked as sensitive.
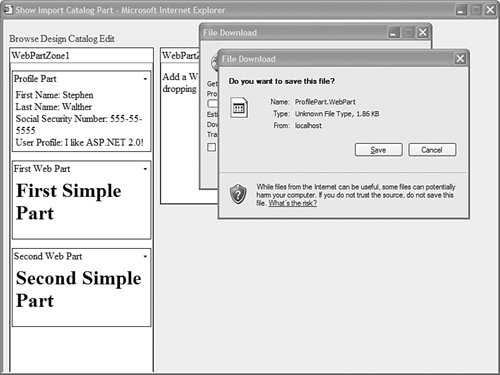
The first thing that you should do after opening the page in Listing 27.14 is to create a user profile. Click the Edit link to switch the page to Edit Display Mode. Select the Edit menu option on the ProfilePart and enter values for the ProfilePart control's properties. Click the OK button when you are finished. Next, you can export the ProfilePart by selecting Export from the ProfilePart control's menu (see Figure 27.9). When you export the ProfilePart, an XML file resembling the file in Listing 27.15 is downloaded to your computer. Figure 27.9. Exporting a Web Part. 
Listing 27.15. ProfilePart.WebPart <?xml version="1.0" encoding="utf-8"?> <webParts> <webPart> <metaData> <type src="/books/3/444/1/html/2/~/ProfilePart.ascx" /> <importErrorMessage>Cannot import this Web Part.</importErrorMessage> </metaData> <data> <properties> <property name="LastName" type="string">Walther</property> <property name="FirstName" type="string">Ruth</property> <property name="UserProfile" type="string">I like ASP.NET 2.0!</property> </properties> <genericWebPartProperties> <property name="AllowClose" type="bool">True</property> <property name="Width" type="unit" /> <property name="AllowMinimize" type="bool">True</property> <property name="AllowConnect" type="bool">True</property> <property name="ChromeType" type="chrometype">Default</property> <property name="TitleIconImageUrl" type="string" /> <property name="Description" type="string">Displays your profile</property> <property name="Hidden" type="bool">False</property> <property name="TitleUrl" type="string" /> <property name="AllowEdit" type="bool">True</property> <property name="Height" type="unit" /> <property name="HelpUrl" type="string" /> <property name="Title" type="string">Profile Part</property> <property name="CatalogIconImageUrl" type="string" /> <property name="Direction" type="direction">NotSet</property> <property name="ChromeState" type="chromestate">Normal</property> <property name="AllowZoneChange" type="bool">True</property> <property name="AllowHide" type="bool">True</property> <property name="HelpMode" type="helpmode">Navigate</property> <property name="ExportMode" type="exportmode">NonSensitiveData</property> </genericWebPartProperties> </data> </webPart> </webParts>
|
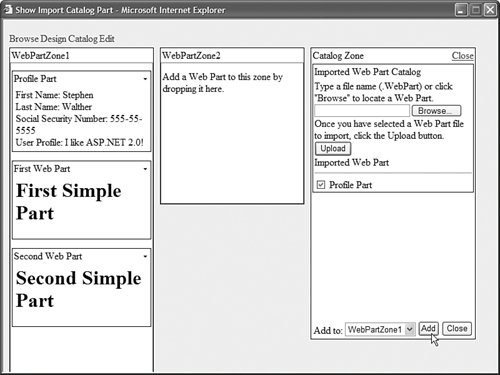
Notice that the file in Listing 27.15 does not include the Social Security Number property. However, it does include the First Name, Last Name, and User Profile properties. After you download the XML file, you can import the Web Part represented by the XML file into another Web Part page or another Web Part application. Click the Catalog link to switch to Catalog Display Mode. The Import Catalog Part enables you to upload a Web Part settings file. After you upload the settings file, the Web Part represented by the file is listed by the Import Catalog Part. You can add the ProfilePart to any Web Part Zone (see Figure 27.10). Figure 27.10. Importing a Web Part. 
| 


