Creating MasterDetail Forms
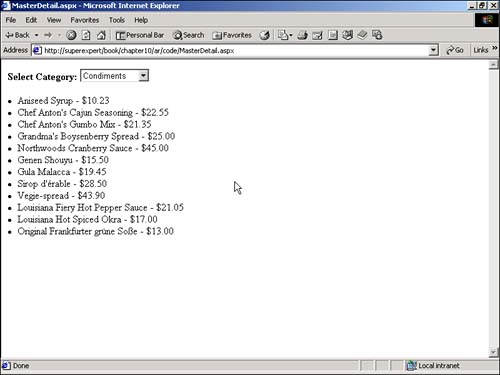
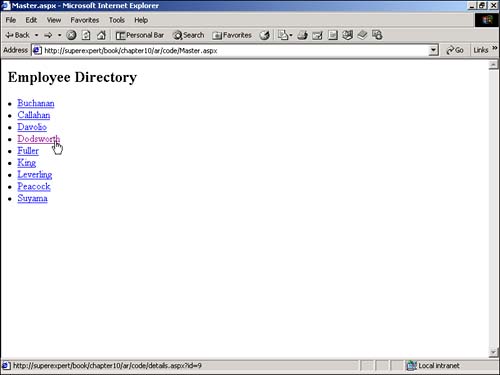
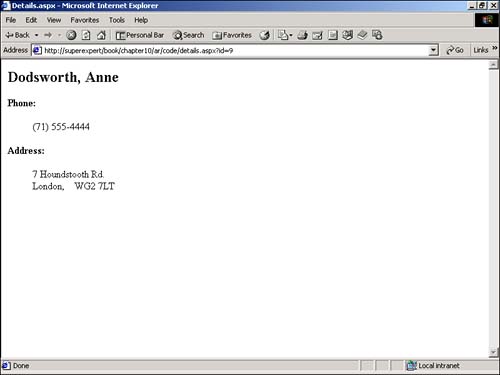
Creating Master/Detail FormsThe following sections describe an advanced application of data binding. Two methods of creating master/detail forms are discussed. You learn how to create both single-page and multipage master/detail forms. What's a master/detail form? Imagine that you have two database tables named Products and Categories. Each product in the Products table is associated with a category in the Categories table. Now, suppose that you want the users of your Web site to be able to view different lists of products by selecting different categories. In this case, you need to build a master/detail form. Or, imagine that you have a database table named Authors. For each author, you have such information as the author's first and last name , phone number, and so on. Suppose that you want to be able to select from a list of author last names and view details on a particular author. This is another situation in which you need to build a master/detail form. Creating Single-Page Master/Detail FormsOne approach to building master/detail forms is to place both the master and detail information on the same page. For example, the page in Listing 10.14 contains a DropDownList control that represents product categories and a Repeater control that represents a list of products. When you select a product category, the corresponding products are displayed (see Figure 10.14). Listing 10.14 MasterDetail.aspx [View full width] <%@ Import Namespace="System.Data.SqlClient" %> <Script Runat="Server"> Sub Page_Load If Not IsPostBack Then Dim conNorthwind As SqlConnection Dim cmdSelect As SqlCommand Dim dtrCategories As SqlDataReader conNorthwind = New SqlConnection( The C# version of this code can be found on the CD-ROM. Figure 10.14. Displaying a single page master/detail form. When you first open the page in Listing 10.14, the Page_Load subroutine is executed, and the DropDownList control is bound to the Categories table in the Northwind database. If you look closely at the Page_Load subroutine, you notice the following line of code: dropCategories.Items.Insert( 0, New ListItem( "none selected", -1 ) ) This line inserts an additional item as the first item in the DropDownList control. When the page is first opened, you want the DropDownList control to display none selected for the current category. When you pick a category with the DropDownList control, the dropCategories_SelectedIndexChanged subroutine is executed. If a category other than none selected has been selected, the products for the selected category are pulled from the Products database table and bound to the Repeater control. Creating Multipage Master/Detail FormsInstead of placing the master and detail information on the same page, you might want to place the information on separate pages. For example, suppose you want to create one page that contains a directory of employees who work at your company and a separate page that lists details for each employee. The page in Listing 10.15 uses a Repeater control to display a list of employees (see Figure 10.15). Listing 10.15 Master.aspx [View full width] <%@ Import Namespace="System.Data.SqlClient" %> <Script Runat="Server"> Sub Page_Load Dim conNorthwind As SqlConnection Dim cmdSelect As SqlCommand Dim dtrEmployees As SqlDataReader conNorthwind = New SqlConnection( "Server=localhost;UID=sa;PWD=secret;Database=Northwind" ) cmdSelect = New SqlCommand( "Select EmployeeID,LastName From Employees", conNorthwind ) conNorthwind.Open() dtrEmployees = cmdSelect.ExecuteReader() rptEmployees.DataSource = dtrEmployees rptEmployees.DataBind() dtrEmployees.Close() conNorthwind.Close() End Sub </Script> <html> <head><title>Master.aspx</title></head> <body> <form Runat="Server"> <h2>Employee Directory</h2> <asp:Repeater ID="rptEmployees" Runat="Server"> <ItemTemplate> <li> <a href='<%# String.Format( "details.aspx?id={0}", Container.DataItem( "EmployeeID" ) ) The C# version of this code can be found on the CD-ROM. Figure 10.15. The master form. The employee's last names are displayed as a list of hyperlinks by the Repeater control. Each employee is a link to the Details.aspx page. The value of the EmployeeID column is passed in the link to the Details.aspx page as a query string variable. The Details.aspx page is contained in Listing 10.16. Listing 10.16 Details.aspx<%@ Import Namespace="System.Data" %> <%@ Import Namespace="System.Data.SqlClient" %> <Script Runat="Server"> Sub Page_Load Dim intEmployeeID As Integer Dim conNorthwind As SqlConnection Dim strSelect As String Dim cmdSelect As SqlCommand Dim dtrEmployee As SqlDataReader ' Retrieve Employee ID intEmployeeID = Int32.Parse( Request.QueryString( "id" ) ) ' Get Employee Detail Information conNorthwind = New SqlConnection( "Server=localhost;UID=sa;PWD=secret;Database=Northwind" ) strSelect = "Select * From Employees Where EmployeeID=@employeeID" cmdSelect = New SqlCommand( strSelect, conNorthwind ) cmdSelect.Parameters.Add( "@employeeID", intEmployeeID ) conNorthwind.Open() dtrEmployee = cmdSelect.ExecuteReader( CommandBehavior.SingleRow ) ' Display in Label Controls If dtrEmployee.Read Then lblEmployee.Text = dtrEmployee( "LastName" ) lblEmployee.Text &= ", " & dtrEmployee( "FirstName" ) lblPhone.Text = dtrEmployee( "HomePhone" ) lblAddress.Text = dtrEmployee( "Address" ) lblCity.Text = dtrEmployee( "City" ) & ", " lblRegion.Text = dtrEmployee( "Region" ).ToString() lblPostalCode.Text = dtrEmployee( "PostalCode" ) End If dtrEmployee.Close() conNorthwind.Close() End Sub </Script> <html> <head><title>Details.aspx</title></head> <body> <form Runat="Server"> <h2> <asp:Label ID="lblEmployee" Runat="Server"/> </h2> <p> <b>Phone:</b> <blockquote> <asp:Label ID="lblPhone" Runat="Server" /> </blockquote> <b>Address:</b> <blockquote> <asp:Label ID="lblAddress" Runat="Server" /> <br> <asp:Label ID="lblCity" Runat="Server" /> <asp:Label ID="lblRegion" Runat="Server" /> <asp:Label ID="lblPostalCode" Runat="Server" /> </blockquote> </form> </body> </html> The C# version of this code can be found on the CD-ROM. The Details.aspx page grabs whatever ID value was passed to it from the Master.aspx page and retrieves the information for the employee in the Employees database with that ID. The information is returned in a DataReader . The values for each of the columns in the DataReader are assigned to Label controls, and the selected employee's phone and address information is then displayed (see Figure 10.16). Figure 10.16. The details form. |
EAN: 2147483647
Pages: 263