Hack62.Tweak Your Sipura ATA
Hack 62. Tweak Your Sipura ATA
If you own a Sipura ATA, you've got a veritable softPBX hiding in that slick plastic enclosure. If only you knew how to set it up! Sipura Technology, now a division of Cisco, makes some very powerful telephony devices. With hundreds of options and many potential combinations, literally thousands of possible configurations are available. While I can't cover them all here (for obvious reasons), I can give you a few examples to get your mind working. 5.5.1. Configure the Sipura by DialingSipura's line of products has a powerful interactive voice-response (IVR) system built in that gives you administrative access to many of the ATA's features. In fact, the IVR will probably be one of your first experiences with Sipura's ATAs. The IVR (like the web interface) has quite a few options. Thankfully, Sipura publishes a user guide that details all of the available options in the IVR menu, as well as in the web configuration screens. In fact, so many options are available that the user guide was 87 pages long at the time of this writing! You can find this document in the Support section of http://www.sipura.com/. After unpacking the Sipura and connecting the cables, you should pick up your phone and dial ****. This will connect you to the Sipura Configuration Menu. You will be asked to enter an option. But what option to enter? Table 5-1 will get you started.
Remember to add a trailing # for each option. So, for example, to have the Sipura read its current IP address, you should enter **** and then 110#. Another thing to remember: when you are entering IP addresses for the device, default gateway, and DNS server, use the * key to represent periods (.). So, you'd enter the IP address 10.1.1.50 as 10*1*1*50#. 5.5.2. Various TweaksAfter you have the Sipura connected to your network and you know its IP address, you can get to its web interface. If you're used to dealing with web interfaces for Network Address Translation (NAT) firewalls and the like, the Sipura web interface, shown in Figure 5-2, is probably unlike anything you've seen. Most people that use the web interfaces of small-office/home-office (SOHO) NAT/firewall/router devices are shocked when they see the web interface on a Sipura. Here, I will attempt to point out the most common and useful, yet often overlooked, web interface parameters. To reach the web interface, simply enter the Sipura's IP address in your web browser. Once you see the gray status screen, click the Admin link in the top right-hand corner. When the page refreshes, click Advanced. You should see several more tabs appear. Now we are ready! While I fully encourage you to review the user guide and browse the configuration pages, I have summarized in Table 5-2 my "Top 10 Sipura options" for your hacking pleasure. Figure 5-2. The Info tab on the Sipura ATA's web interface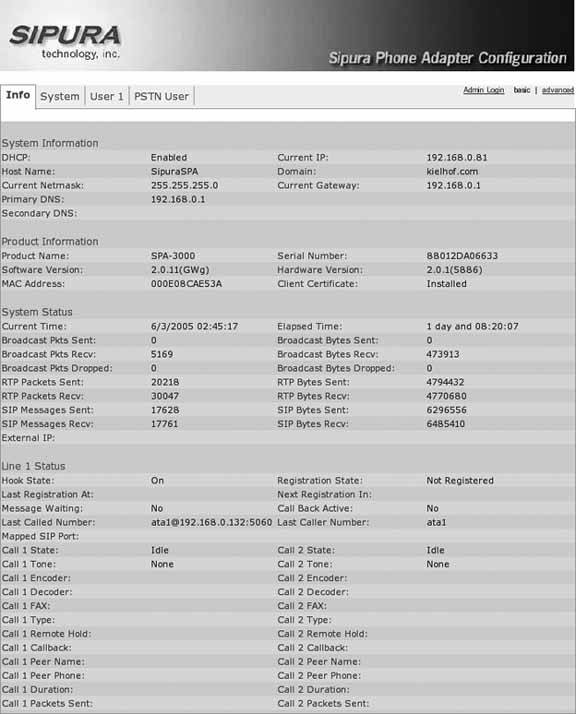
5.5.3. Dial-Plan MagicOf all of the options on the Sipura, the dial plan lets you be the most creative. The dial plan is a string of characters that tell the Sipura how to treat callswhere to send them, any digits to add (or remove), etc. In its most basic use, the dial plan controls when to send calls. VoIP devices are much like cell phones. You have to "send" the number as a whole to the remote server. But how does the ATA know when you are done entering digits? On the Sipura line of ATAs, this is controlled by two more parameters that you should be familiar with. They are called Interdigit Short Timer and Interdigit Long Timer, and you can find them on the Regional tab. Interdigit Short Time specifies the delay (in seconds) for sending numbers that match a string found in the dial plan. Interdigit Long Timer specifies the delay (also in seconds) for sending numbers that do not match the dial plan. Here is an example: Line 1 Dial Plan: (7xxx) Interdigit short time: 3 seconds This means that when I dial 7104, the Sipura will send that number to the remote SIP server 3 seconds after I press 4. If I were to dial 2627638123, the Sipura would send that number to the remote SIP server 10 seconds after I entered 3 because there is no pattern matching that number. Let's take a look at a more complete example: Line 1 Dial Plan: ([2-9]xx[2-9]xxx|[2-9]xx[2-9]xxxxxx|1[2-9]xx[2-9]xxxxxx|011[2-9].|7xx|7xxx) Interdigit short time: 3 seconds Interdigit long time: 10 seconds This example matches NANPA 7-digit, 10-digit, and 11-digit dialing. It also includes NANPA international dialing, as well as matches for three- and four-digit extensions beginning with 7. This way, most standard dialing, as well as extension dialing, will be covered by this dial plan, thus matching the Interdigit Short Timer of 3. I should point out that if you want a number dialed immediately, regardless of whether it matches the dial plan, you can add # to the dial string. Thus, in the previous example, 12345678# will send 12345678 to the remote server immediately, even though it does not match the dial-plan string. It's probably worth pointing out that there is a limit to how long a dial-plan string can be. A dial-plan string has a maximum length of 2,047 characters. On the Sipura SPA-3000, you can have eight dial-plan strings for the Public Switched Telephone Network (PSTN) line. The limitation for those is 511 characters each. 5.5.4. Advanced Dial-Plan ExamplesHere are some more-advanced dial-plan examples: (<111:1002@192.168.0.22:5061) This is a slight modification of the dial-plan string from "Build a Bat Phone" [Hack #63]. This string will call extension 1002 on the Sipura at 192.168.0.22 on port 5061. However, it will do this only if you dial 111. This is a very inexpensive way to set up a PBX with no SIP server at all. You could take several Sipuras with static IP addresses and assign them extensions. You could even include an SPA-3000 for single-line POTS termination/origination. Here is a more complete version of the preceding code: (<111:1002@192.168.0.11:5061>|<112:112@192.168.0.12:5061>|<113: 113@192.168. 0.13:5061>) If you had this same dial plan on every device, you would be able to call between them simply by dialing 111, 112, and 113. This example is another slight modification. Essentially, here we are adding 1847 to any number that the user dials as seven digits: (<:1847>[2-9]xx[2-9]xxx|1[2-9]xx[2-9]xxxxxx|011[2-9].|7xx|7xxx|xx.) The following configuration will work on the SPA-3000 only: ([49]11<:@gw0>|*xx<:@gw0>|[2-9]xxxxxx<:@gw0>|[2-9]xx[2-9]xxxxxx<:@gw0> |1800xxxxxxx<:@gw0>|18[6-8][6-8]xxxxxxx<:@gw0>|7xx|7xxx|1[2-9]xx[2-9]xxxxxx|011[2-9].) The following list explains what this dial plan does for you:
Here is yet one more advanced dial plan: ([49]11<:@gw0>|[2-9]xxxxxx|[2-9]xx[2-9]xxxxxx|1800xxxxxxx|18[6-8][6- 8]xxxxxxx|7xx|7xxx|1[2-9]xx[2-9]xxxxxx|<9:>xx.<:@gw0>) This is very similar to the previous plan, however any calls prefixed with 9 that are longer than three digits will be sent via the POTS line. These are limited examples of what you can do with the Sipura line of ATAs. After more experimentation, you will quickly realize how much fun you can have with a $70 ATA! Kristian Kielhofner |
EAN: 2147483647
Pages: 156