Creating Custom Tools
| Other great objects that you can create on the Extensibility layer are custom tools. Custom tools can be used to do a lot of things, including drawing shapes, adjusting elements on the stage, and even creating new instances of objects. There are certain aspects of JSFL that are used specifically for tools, but we will go over them as we build our tool. The tool being built in the following example is a drawing tool designed for drawing heart shapes just as quickly and easily as drawing squares in Flash.
This code may look like a lot, but it isn't, as you will see as it is broken apart into sections. The first section appears to create a function, but in fact, it creates a function specific to tools, the configureTool() function. Within this function, we set the active tool to a variable for easy reference. We then set the tool's name along with its icon (which we will build later). After that, the menu string is set as well as the ToolTip, which will appear when the tool is hovered over in the toolbar. function configureTool(){ myTool = fl.tools.activeTool; myTool.setToolName("Heart"); myTool.setIcon("Heart.png"); myTool.setMenuString("Heart Tool"); myTool.setToolTip("Heart Tool"); } After that, we create a function that we use later in the code. The drawHeart() function does all the hard work and the math for drawing the actual heart shape. Also, notice that we check to see whether the Shift key is down. This is to make it work like the oval and rectangle tool already in Flash, in that when the Shift key is down, it constrains proportions to make a perfect shape.
After that comes another specific function for the tool object, the activate() function, which is called when the specific tool is activated. function activate(){ myTool = fl.tools.activeTool; } Then the mouseDown() function is created, which will be called after the tool is selected and the user presses the mouse button on the stage. function mouseDown(){ fl.drawingLayer.beginDraw(); } Next, the mouseMove() function is created. This function first checks to make sure that the user is still clicking the mouse button; otherwise, it will draw a single check mark as long as the mouse moves around on the stage. If the mouse is down (meaning that the user is in fact trying to draw something), it gets the most recent position of when the user clicked the mouse, using the penDownLoc property. It then activates the Drawing layer and creates a new path in the Drawing layer. After that, the drawHeart() function is called, which will draw the heart on the stage. Then we set the drawing path and end the drawing frame. function mouseMove(){ if(fl.tools.mouseIsDown){ var difX=fl.tools.penLoc.x-fl.tools.penDownLoc.x; var difY=fl.tools.penLoc.y-fl.tools.penDownLoc.y; fl.drawingLayer.beginFrame(); drawLayer = fl.drawingLayer; thePath = drawLayer.newPath(); drawHeart(fl.tools.penDownLoc.x,fl.tools.penDownLoc.y,difX,difY); drawLayer.drawPath(thePath); fl.drawingLayer.endFrame(); } } The final function is created for when the user releases the mouse. When this occurs, we stop drawing on the Drawing layer and create the shape with the fill color and stroke already set in the authoring environment. function mouseUp(){ fl.drawingLayer.endDraw(); thePath.makeShape(); } Now that you see what the code is doing, the next step is to create the icon for our tool. Still in Flash, or any other drawing program you use such as Fireworks, draw a basic heart, about 16x16, and save it as Heart.png in the same directory as the JSFL file. There is one final step before we have to reboot Flash; we have to add the tool to the toolbar. In the tools directory, open toolConfig.xml and change its content (add the line shown in bold): NOTE Before you start changing this file, or any other file in the Flash 8 directory, be sure to make a backup of it, just in case. <group name="selection"> <tool name="arrow" /> <tool name="bezierSelect" /> <tool name="line" /> <tool name="lasso" /> <tool name="pen" /> <tool name="text" /> <tool name="oval" /> <tool name="rect"> <tool name="polystar" /> <tool name="Heart"/> </tool> <tool name="pencil" /> <tool name="brush" /> <tool name="freeXform" /> <tool name="fillXform" /> <tool name="inkBottle" /> <tool name="bucket" /> <tool name="eyeDropper" /> <tool name="eraser" /> <tool name="hand" /> <tool name="magnifier" /> </group> All we did here is add the Heart tool after the PolyStar tool. Now restart Flash, create a new Flash document, select the Rectangle tool in the toolbar, hold it down, and you will see the heart tool, which makes it easy to draw heart shapes, as shown in Figure 27.13. Figure 27.13. Create custom tools for your own needs and preferences.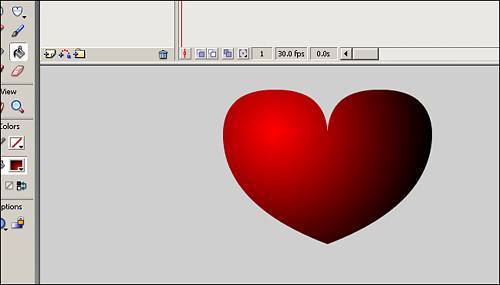 Even after everything we have gone over that can be created with the Extensibility layer, JSFL, and the XML-to-UI API, there is one more: effects. |
EAN: 2147483647
Pages: 319