2.7 WebSphere Portal Content Publishing PTF2
|
| < Day Day Up > |
|
2.7 WebSphere Portal Content Publishing PTF2
Here we discuss the WebSphere Portal Content Publishing post SMP/E installation. At this point you should have successfully completed the installation of Portal Server and Transcoding Publisher and the next steps are to complete post installation of WebSphere Portal Content Publishing runtime (WPCP).
WPCP PTF2 gets installed on top of WPCP PTF1 so that PTF1 is a prerequisite even on a new installation. To do this, perform the following steps:
-
"Step 1: Read about package content" on page 65
-
"Step 2: Edit the wcp.setup.in setup file" on page 65
-
"Step 3: Install JCL procedure fixes" on page 66
-
"Step 4: Create DB2 tables" on page 66
-
"Step 5: Configure WebSphere Portal Content Publishing" on page 67
-
"Step 6: Install PTF2" on page 69
-
"Step 7: Verify the installation" on page 69
| Important: | Be very careful not to confuse PTF1 and PTF2 files during the installation steps. Read carefully through the description of each step, as some of the steps refer to files delivered with PTF2 located in /usr/lpp/PortalServer/PTF/wcp, and other steps refer to files for PTF1 in /usr/lpp/PortalServer/wcp. |
Step 1: Read about package content
The installation file ejpwcpub.tar has already been installed by SMP/E. This file contains the following:
-
jcl directory containing JCL procedures to create and fill the DB2 database tables and run the installation scripts.
-
ear directory containing the files PznRuntime.ear and WCPDemo_Runtime.ear.
-
scripts directory containing REXX and shell scripts to set up WebSphere Portal Content Publishing on WebSphere Application Server for z/OS or OS/390.
-
lib directory containing JAR files for WebSphere Portal Content Publishing.
-
pznConfig directory containing configuration files for WebSphere Portal Content Publishing.
These directories are located at <WCP_PATH> after the installation file is unpacked.
The PTF2 installation file ejpwcpub.DRVNUM.tar has already been installed by SMP/E. This file contains the following:
-
jcl directory containing JCL procedures to replace some JCL files in the base installation and to install PTF2.
-
ear directory containing fixes for the base version of WCPDemo_Runtime.ear.
-
scripts directory containing shell scripts that replace some scripts in the base installation and scripts that install PTF2.
-
lib directory containing replacements for files personalization.jar and prCommon.jar.
-
pznConfig directory contains a replacement for publishAdapters.properties.
These directories are located installed at /usr/lpp/PortalServer/PTF/wcp after the installation file is unpacked.
Step 2: Edit the wcp.setup.in setup file
The setup file is located in WebSphere Portal Content Publishing PTF2 extracted PTF tree directory. By default this directory is /usr/lpp/PortalServer/PTF. In this example, the file to edit will be /usr/lpp/PortalServer/PTF/wcp/wcp.setup.in. You can see the values we used in wcp.setup.in in Table B-1 on page 329.
Step 3: Install JCL procedure fixes
To install fixes for JCL procedures and scripts prior to the base installation, perform the following steps:
-
Import the JCL procedure ejpc2fx into the JCL library to repair files for WebSphere Portal Content Publishing. To do this, execute the following command from UNIX System Services:
-
oget '/usr/lpp/PortalServer/PTF/wcp/jcl/ejpc2fx' '<yourhlq>.JCL(ejpc2fx)' TEXT
-
-
Select the job ejpc2fx.
-
Modify the job card to meet your system requirements.
-
Replace all occurrences of the following strings:
-
Replace #WCP2# with the HFS path of the PTF2 installation of WebSphere Portal Content Publishing. The default for this is /usr/lpp/PortalServer/PTF/wcp.
-
Replace #INPUTFILE1# with the fully-qualified path and name of the input setup file wps.setup.in of WebSphere Portal. The default location for this is usually /usr/lpp/PortalServer/PortalServer/zosinst/scripts/wps.setup.in.
-
Replace #INPUTFILE2# with the HFS path and file name of the input setup file wcp.setup.in of WebSphere Portal Content Publishing within the directory /usr/lpp/PortalServer/PTF/wcp/scripts.
-
Replace #WEBSPHERE# with the HLQ dataset qualifier for the WebSphere Application Server installation, default BBO.
-
-
Run the JCL procedure ejpc2fx.
Step 4: Create DB2 tables
In the TSO environment of the target system, use job WCPDDL to create and load the database table WCPTS. To do this, get the job from the UNIX System Services to your authorized JCL library and then submit the job by performing the following:
-
oget '<WCP_PATH>/jcl/WCPDDL' '<yourhlq>.JCL(WCPDDL)' TEXT
-
Modify the job card, DB2 name, and joblib of the JCL procedure to meet your system requirements.
-
Submit: '<yourhlq>.JCL(WCPDDL)'
-
Verify the successful completion by checking for the successful commit message in the last output line.
| Note | You may receive an error message:
WCPDDL RC=8 from drop data base WCPDB DSNT408I SQLCODE= -204 error WCPDS is an undefined name This error is due to the fact that the table is to be created in this job step, and it does not exist until the job has successfully completed execution, so the message can be ignored. |
Step 5: Configure WebSphere Portal Content Publishing
On the z/OS and OS/390 operating systems, WebSphere Portal Content Publishing is installed and configured as a server on WebSphere Application Server. Three JCL procedures are used to install and configure WebSphere Portal Content Publishing on WebSphere Application Server for z/OS or OS/390. To perform the configuration, follow these steps:
-
Log on to a TSO session with root authority, UID=0.
-
Copy the JCL procedure from UNIX System Services to your authorized JCL library. To do this, execute the following commands from the UNIX System Services command prompt:
-
oget '<WCP_PATH>/jcl/EJPCPPRE' '<yourhlq>.JCL(EJPCPPRE)' TEXT
-
oget '<WCP_PATH>/jcl/EJPCPADM' '<yourhlq>.JCL(EJPCPADM)' TEXT
-
oget '<WCP_PATH>/jcl/EJPCPPOS' '<yourhlq>.JCL(EJPCPPOS)' TEXT
-
-
Select the job EJPCPPRE.
-
Modify the job card to meet your system requirements.
-
Set the variable BBOLIB with the HLQ dataset qualifier for the WebSphere Application Server installation; by default this is BBO.
-
Replace all occurrences of the following strings:
-
Replace #WCP# with the location for the WebSphere Portal Content Publishing installation; the default is <WCP_ROOT>.
-
Replace #INPUTFILE1# with the fully-qualified path and name of the input setup file wps.setup.in of WebSphere Portal. This parameter is optional and defaults to: /usr/lpp/PortalServer/PortalServer/zosinst/scripts/wps.setup.in.
-
Replace #INPUTFILE2# with the fully-qualified path and name of the input setup file wcp.setup.in of WebSphere Portal Content Publishing. This parameter is optional and defaults to WCP_PATH/scripts/wcp.setup.in. Unlike previous steps the #INPUTFILE2# parameter here is mandatory.
-
-
Submit the job and check the return codes for successful completion.
-
From the z/OS or OS/390 console, stop WebSphere Portal using the command:
/P WPS_PROCNAME.WPS_SERVERNAMEA
For example, in our installation we used:
/P WSPORT.WSPORTA
-
Select the job EJPCPADM.
-
Modify the job card to meet your system requirements.
-
Set the variable BBOLIB with the HLQ dataset qualifier for the WebSphere Application Server installation; the default is BBO.
-
Replace all occurrences of the following strings:
-
Replace #WCP# with the location for the WebSphere Portal Content Publishing installation; the default is <WCP_PATH>.
-
Replace #INPUTFILE1# with the fully-qualified path and name of the input setup file wps.setup.in of WebSphere Portal. This parameter is optional and defaults to: /usr/lpp/PortalServer/PortalServer/zosinst/scripts/wps.setup.in.
-
Replace #INPUTFILE2# with the fully-qualified path and name of the input setup file wcp.setup.in of WebSphere Portal Content Publishing. This parameter is optional and defaults to <WCP_PATH>/scripts/wcp.setup.in.
-
Replace #WASADMIN# with the user ID of a WebSphere Application Server administrator, for example, CBADMIN.
-
Replace #WASADMPW# with the password of that user ID.
-
-
Submit the job and check the return codes for successful completion.
-
Next select job EJPCPPOS.
-
Modify the job card to meet your system requirements.
-
Set the variable BBOLIB with the HLQ dataset qualifier for the WebSphere Application Server installation; the default is BBO.
-
Replace all occurrences of the following strings:
-
Replace #WCP# with the location for the WebSphere Portal Content Publishing installation; the default is <WCP_PATH>.
-
Replace #INPUTFILE1# with the fully-qualified path and name of the input setup file wps.setup.in of WebSphere Portal. This parameter is optional and defaults to: /usr/lpp/PortalServer/PortalServer/zosinst/scripts/wps.setup.in.
-
Replace #INPUTFILE2# with the fully-qualified path and name of the input setup file wcp.setup.in of WebSphere Portal Content Publishing. This parameter is optional and defaults to <WCP_PATH>/scripts/wcp.setup.in.
-
-
Submit the job and check the return codes for successful completion.
Step 6: Install PTF2
To install the PTF2 files for WebSphere Portal Content Publishing, perform the following:
-
Import the JCL procedure ejpc2in into the JCL library to install the PTF2 files. To do this, execute the following command from UNIX System Services:
-
oget '/usr/lpp/PortalServer/PTF/wcp/jcl/ejpc2in' '<yourhlq>.JCL(ejpc2in)' TEXT
-
-
Select the job ejpc2in.
-
Modify the job card to meet your system requirements.
-
Replace all occurrences of the following strings:
-
Replace #WCP2# with the HFS path of the WebSphere Portal Content Publishing installation; the default for this is usually /usr/lpp/PortalServer/PTF/wcp.
-
Replace #INPUTFILE1# with the HFS path and file name of the input setup file of WebSphere Portal; the default for this is usually /usr/lpp/PortalServer/PortalServer/zosinst/scripts/wps.setup.in.
-
Replace #INPUTFILE2# with the HFS path and file name of the input setup file of WebSphere Portal Content Publishing; the default for this is usually WCP_PATH/scripts/wcp.setup.in.
-
Replace #WEBSPHERE# with the HLQ dataset qualifier for the WebSphere Application Server installation; the default is BBO.
-
-
Run the JCL procedure ejpc2in to launch wcp2install.sh.
Step 7: Verify the installation
The base WPCP installation is now complete after the successful configuration of WebSphere Portal Content Publishing on WebSphere Application Server for z/OS or OS/390, and the installation of PTF2. Next, you need to verify the installation.
Start WebSphere Portal Server and wait until naming registration completes by looking in SDSF LOG for message BBOU0695I as shown in Figure 2-16 on page 70.
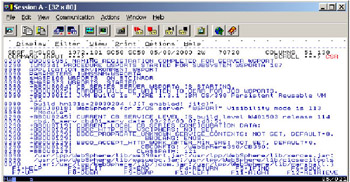
Figure 2-16: WebSphere Portal Content Publishing naming registration completed
Open the WebSphere Portal Content Publishing administrative console for Personalization by using a browser to connect to this URL:
http://WPS_HOST:WPS_PORT/wps/PersAdmin/adminframe.jsp
You should receive a login challenge as shown in Figure 2-17.
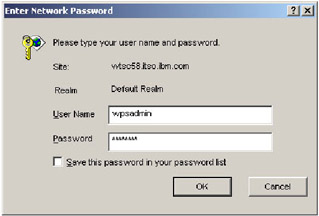
Figure 2-17: Personalization challenge/response based authentication
This is a prompt to login as a user authorized to the role:
PznRuntimeAdministrationRole
The roles of a J2EE application installed on the Portal Server are located in directory /usr/lpp/PortalServer/PortalServer/libapp/config, and the main configuration file is authtablelist.xml. This file points to a specific J2EE security file depending on the J2EE application auth_table.xml for Portal Server, and authtable_wcp.xml for all other applications.
If you examine authtable_wcp.xml as shown in Figure 2-18, you will notice that PznRuntimeAdministrationRole role is given to the WPSADMINS group and to uid=wpsadmin,cn=users,dc=test,dc=com. This may not be what you want at this stage for your environment, because you would probably want to change the hardcoded user to another, as was defined in Example 2-10 on page 46:
uid=wpsadmin,cn=users,dc=<YOURDOMAIN>,dc=<YOURDOMAINSUFFIX>
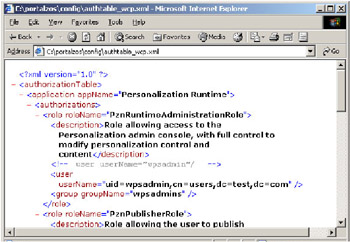
Figure 2-18: authtable_wcp.xml file
At this stage in the installation the wpsadmin user with password wpsadmin belongs to the WPSADMINS LDAP group and can be used to complete the login to WPCP, after which you should receive the page shown in Figure 2-19 on page 72.
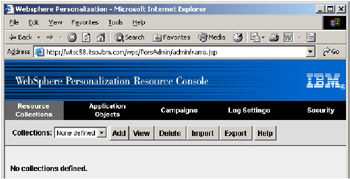
Figure 2-19: WebSphere Personalization "logged in" screen
| Note | Congratulations! You have successfully completed the configuration and installation of WebSphere Portal Server run-time environment on z/OS and OS/390. For configuration and installation of the WebSphere Portal Server Development environment, see Chapter 3, "Development environment installation". |
|
| < Day Day Up > |
|