Migrating an Access Database to a Windows SharePoint Services Site
You’ll learn in Part 7 of this book that you can use an SQL server as a data source for an Access project file. You can also use a Windows SharePoint Services site as a data source for your Access 2007 database. You can either publish or move your Access 2007 database when migrating to a SharePoint site. When you publish your database, you are simply copying your database to the Windows SharePoint server so that others can open and use it. Any changes you make to the data in the local copy are not reflected in the copy on the SharePoint site. If you change queries, forms, reports, macros, or modules, you must republish your database to make the copy on the server current.
When you move your database, Access makes a backup copy of your database, uploads all the tables into Windows SharePoint Services lists, and replaces all the tables with a link to the appropriate list so that any data editing you perform in the local copy is reflected in the copy on the SharePoint site. You can set form and report properties so that Access creates a view of the SharePoint list that points to the form or report in the moved database. If you change queries, forms, reports, macros, or modules in your local copy, you must republish your database to make the copy on the server current.
Similar to the process of upsizing an Access database to SQL Server, Access 2007 includes a Move To SharePoint Site Wizard that walks you through the process of moving your tables and data to Windows SharePoint Services lists. By moving your database, you can share the data with many users and take advantage of the Windows SharePoint Services security, version control, and Recycle Bin. Users can update and view the data either through links to the lists in an Access 2007 database or by using their browser.
When you move an Access 2007 database to a SharePoint site, Access places an entire copy of the database in a document library on the site. Users can open the database from the SharePoint site and download a copy to their local computer to work with the data. By having a copy of your database objects on a SharePoint site, users can always have the latest copy of the queries, forms, reports, macros, and modules.
| Note | Before we began the next steps in this chapter, we deleted all the existing lists we previously created on our SharePoint site. |
Publishing Your Database to a Windows SharePoint Services Site
Publishing a database to a SharePoint site is somewhat similar to copying a database to a file server where users can obtain a copy of the data, work with it, and send changes back to the server. When you open a published database on the SharePoint site, Access downloads a cached copy of the file for you to use. Any changes you make to the data or objects are not reflected in the database on the SharePoint site unless you republish the changes.
Close the current Contacts database if you haven’t already done so; we’ll use another new Contacts database template that comes with Access for an example of publishing a database. Open Access if you closed it, and click the Contacts database template icon in the middle of the Getting Started screen. Browse to a location in the right task pane to save this file and name it Contacts. Beneath the file path, you can see an option to create and link your database to a SharePoint site, as shown in Figure 22–49. If you select this check box and then click Download, Access downloads the database template to your computer and then prompts you for the address of your SharePoint site. After you provide the appropriate address, Access creates a new list for each table in the sample database on the SharePoint site and then creates a link to each list in the database. You also have the option to move a copy of the entire database up to the SharePoint site. (We discuss moving a database in the following sections.)
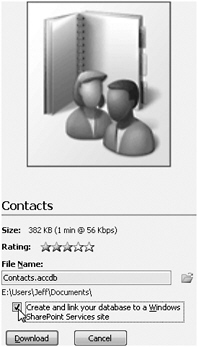
Figure 22–49: The right task pane on the Getting Started screen includes an option to create links to a SharePoint site when you create the database.
To continue our publishing example, clear the Create And Link Your Database To A SharePoint site check box, and then click the Download button to download the database to your local computer. After Access opens the database, close the open Contact List form so that only the Navigation Pane is visible. Click the Navigation Pane menu, click Object Type under Navigate To Category, and then click All Access Objects to display a list of all objects.
This Contacts database includes only one table-Contacts-with no records. To publish the database, click the Microsoft Office Button, point to the Publish option, and then click Document Management Server, as shown in Figure 22–50.
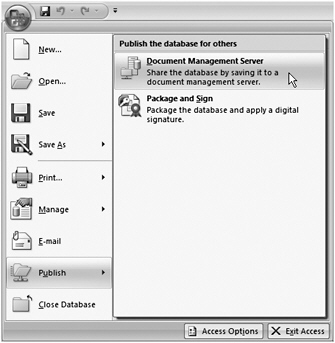
Figure 22–50: Click Document Management Server to begin publishing your database.
| Note | You can publish an Access database to a SharePoint site only if the database is in the Access 2007 .accdb file format. |
Access opens the Publish To Web Server dialog box, as shown in Figure 22–51. You need to specify the address to the workspace on the SharePoint site in the File Name box. (If you’re working in a corporate environment, you might need to ask your network administrator for this information.) We entered the address to the InsideOut workspace on our SharePoint site. Click Publish. You should see a standard Windows logon dialog box to verify your credentials on the SharePoint site. Enter your user name and password and click OK to continue.
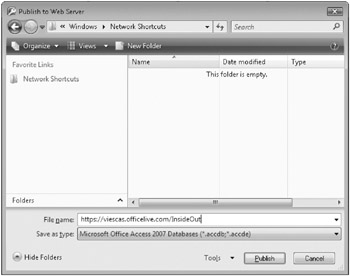
Figure 22–51: Enter the address to your SharePoint site in the Publish To Web Server dialog box.
Access then shows the contents of the InsideOut workspace on our SharePoint site and enters the name of the file, Contacts, in the File Name text box. In our case, we selected the Shared Documents library under Document Libraries, as shown in Figure 22–52. Click the Publish button to begin publishing your database to the SharePoint site.
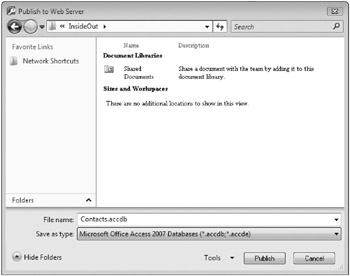
Figure 22–52: Select the Shared Documents library to publish the Contacts database.
During the publishing process, Access sets a property in the database to note that it has been published. After the process is complete, Access opens the Contacts database again and displays the Contact List form, as shown in Figure 22–53. You’ll notice that there is no link to the Contacts table in this database, and no Online With SharePoint message appears on the status bar. Note, however, that Access knows that you have published this database, and it provides you with a handy button on the Message Bar that enables you to republish any changes.
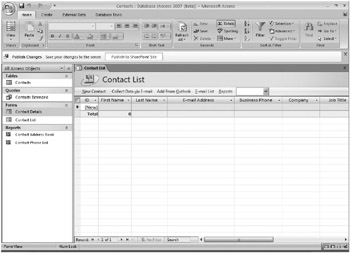
Figure 22–53: The published database does not have active links to any list on the SharePoint site.
Moving Your Database to a Windows SharePoint Services Site
![]() To show you the process of moving an Access 2007 database to a Windows SharePoint Services site, we’ll use the Issues Sample database on the companion CD. (You previously used this sample in Chapter 2, “Exploring the New Look of Access 2007.”) This database already has data in the two tables-Contacts and Issues-so you can see how Access moves data to a SharePoint site. Begin by opening the Issues Sample database (IssuesSample.accdb), and then close the Issue List form so that only the Navigation Pane is visible. Next, on the External Data tab, click the Move To SharePoint button in the SharePoint Lists group, as shown in Figure 22–54.
To show you the process of moving an Access 2007 database to a Windows SharePoint Services site, we’ll use the Issues Sample database on the companion CD. (You previously used this sample in Chapter 2, “Exploring the New Look of Access 2007.”) This database already has data in the two tables-Contacts and Issues-so you can see how Access moves data to a SharePoint site. Begin by opening the Issues Sample database (IssuesSample.accdb), and then close the Issue List form so that only the Navigation Pane is visible. Next, on the External Data tab, click the Move To SharePoint button in the SharePoint Lists group, as shown in Figure 22–54.
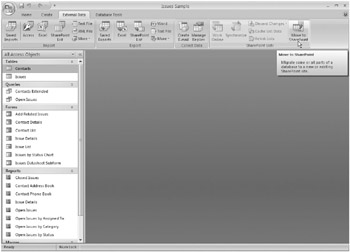
Figure 22–54: The Move To SharePoint button facilitates the process of moving your database to a SharePoint site.
| Note | You can move an Access database to a SharePoint site only if the database is in the Access 2007 .accdb file format. |
Access opens the Move To SharePoint Site Wizard, as shown in Figure 22–55. Enter the address for your SharePoint site in the What SharePoint Site Do You Want To Use? text box. If you select the Save A Copy Of My Database To The SharePoint Site And Create Shortcuts To My Access Forms And Reports check box, Access uploads an entire copy of your database into a document library on that SharePoint site. If you clear this check box, Access creates only new lists for the tables, moves the data to those lists, and creates linked local tables in the Access database.
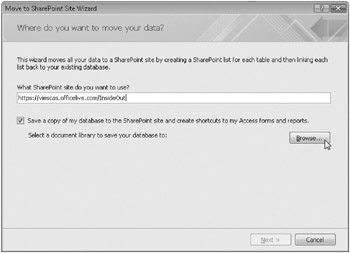
Figure 22–55: On the first page of the wizard, enter the address of your SharePoint site and decide whether you want to upload a copy of the database.
Click the Browse button to browse for a document library location in which to save your database. If you’re not currently logged on to your SharePoint site, you’ll see a standard Windows logon dialog box, as shown in Figure 22–56. Enter your user name and password and then click OK to proceed.
| Note | The Office Live Web site we used to demonstrate migrating a database authenticates users using a Windows Live ID-an e-mail address. |
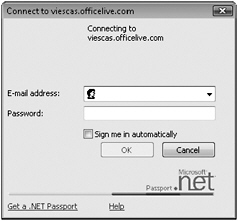
Figure 22–56: You might need to log on to your SharePoint site before proceeding.
After you log on to your SharePoint site, Access displays a Location dialog box showing the various document libraries, sites, and workspaces on the site, as shown in Figure 22–57. For our example, we chose to upload a copy of the database into the Shared Documents library in the InsideOut workspace, as shown in Figure 22–58.
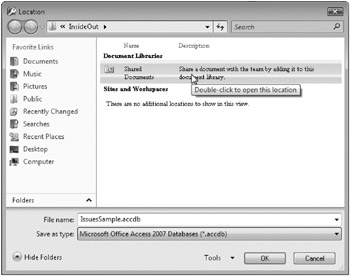
Figure 22–57: Select the document library where you want to save the database.
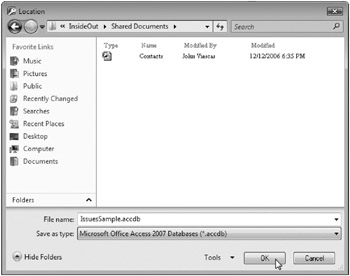
Figure 22–58: After selecting the document library in the workspace, click OK to save the database in that location.
After you navigate to the correct folder in which to upload your database, click OK to continue. The Move To SharePoint Site Wizard now displays the folder where Access will save the database, as shown in Figure 22–59. Verify that the information is correct, and click Next to begin the process of moving your database.
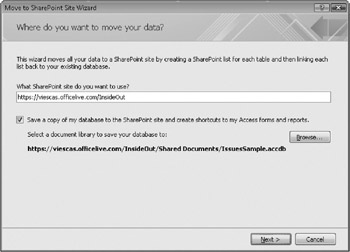
Figure 22–59: The wizard displays the location on the SharePoint site where the migrated database will be saved.
Access displays several progress screens as it creates new lists for the two tables, copies the data to the new lists, and moves a copy of the entire database to the InsideOut folder on our SharePoint site.
| Note | If the data in a table that you’re moving to Windows SharePoint Services closely matches one of the built-in Windows SharePoint Services templates, Access uses that. Otherwise, Access instructs Windows SharePoint Services to build a custom list. |
After Access completes the migration process, the final page of the wizard confirms that the move was successful. You can select the Show Details check box to find out the actions taken and any error that occurred during the migration process. As you can see in Figure 22–60, Access successfully created two new lists on the SharePoint siteContacts and Issues. Access always creates a backup of your database before beginning the migration process, and you can see the name and location of the database on this page of the wizard. You can also see the full address path to the location of your database on the SharePoint site. Finally, Access informs you that it created a log table of issues it encountered when moving the tables to the SharePoint site. Click Finish to close the wizard.
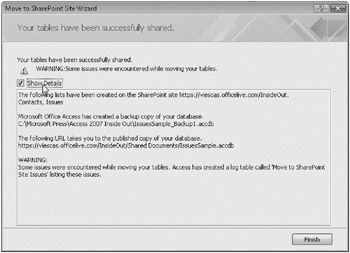
Figure 22–60: Select the Show Details check box to see any issues Access encountered during the migration process.
After you close the wizard, Access opens your new database and displays the startup form, Issue List, as shown in Figure 22–61. You can see in the Navigation Pane that Access created links to the new Contacts and Issues lists on the SharePoint site as well as the User Information List. The status bar notifies you that you are currently online with the SharePoint site. You’ll also notice that the Message Bar displays a Publish Changes message, and Access created a new local table called Move To SharePoint Site Issues.
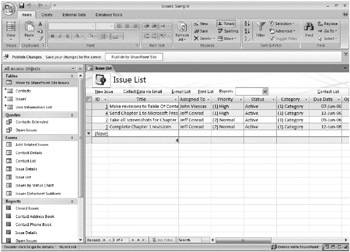
Figure 22–61: The database on your computer is now linked to the SharePoint site.
Close the Issue List form and then open the Move To SharePoint Site Issues table to see what problems Access encountered when moving your database. In Figure 22–62, we collapsed the Navigation Pane and expanded the column widths of the first two fields so that you can read them. Windows SharePoint Services Version 3 does not support referential integrity so Access created a log entry in this table for the three relationships that had referential integrity defined. Windows SharePoint Services Version 3 also does not support validation rules, so the Opened Date and Due Date fields will not have their validation rules enforced in the Windows SharePoint Services lists.
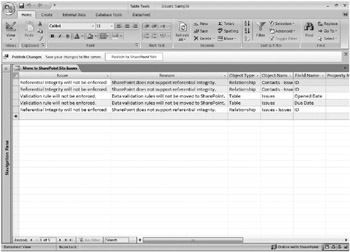
Figure 22–62: Access creates a log table for any problems it encounters when moving your tables to Windows SharePoint Services lists.
When you migrate an Access 2007 database to a SharePoint site, you need to be aware that Windows SharePoint Services does not support certain data types. You also need to be aware of the following issues when migrating an Access 2007 database to Windows SharePoint Services:
-
Windows SharePoint Services does not support dates prior to 1900. You will not be able to move any data that contains dates prior to 1900. If you have a date/time field with some dates earlier than 1900, Access exports the column but Windows SharePoint Services leaves blanks in those records for that column.
-
Windows SharePoint Services converts any new line characters in text fields to either a memo field or a Multiple Lines of Text field.
-
Windows SharePoint Services does not support referential integrity, so any relationships that have this enforced are ignored when you move the table to a list.
-
Windows SharePoint Services does not support cascading updates and cascading deletes, so these will not be applied to the Windows SharePoint Services lists. You will need to write VBA code to delete and update related records. You’ll learn how to do this in Chapter 20.
-
Windows SharePoint Services ignores any relationship where the primary key is not an integer or the relationship does not relate to the ID column.
-
Windows SharePoint Services does not support default values for fields that are dynamic-such as Date(), which changes each day-and ignores these when moving your tables to lists. Windows SharePoint Services accepts only static default values such as numbers, text, and standard dates, which do not change.
-
Windows SharePoint Services supports automatic numbering of fields only in a list for the ID column.
-
Windows SharePoint Services does support any multi-field indexes in lists, and ignores these indexes when you move your data to a list.
-
Windows SharePoint Services supports unique indexes only for the ID column, and ignores any other indexes when you move your data to a list.
-
Windows SharePoint Services does not support data validation rules, and ignores these when you move your data to a list.
-
Windows SharePoint Services converts any ReplicationID fields to Single Line of Text data types.
-
Windows SharePoint Services converts any decimal fields to Number data types.
| Inside Out-Services List Finding the Primary Key Data in a Windows SharePoint | When you export a table to a new SharePoint list, you might not see the primary key data in the default view. If your primary key is an AutoNumber or Number data type, Windows SharePoint Services moves this data into a hidden _ID column in the new list. Windows SharePoint Services defaults to not displaying any hidden _ID columns in the default view. You’ll need to modify the view in order to display this hidden column. |
In Figure 22–63, you can see the Issues Sample database uploaded to the Shared Documents library in the InsideOut folder. You can also see that Access created new Contacts and Issues lists on the SharePoint site. Now that you have migrated the data to lists, other users who have the appropriate permissions can view, edit, and delete records through either the views on the SharePoint site or by opening the Access database in the Shared Documents library. If some of your users do not have Access 2007 installed, they can still view, edit, and delete records by using their browser.
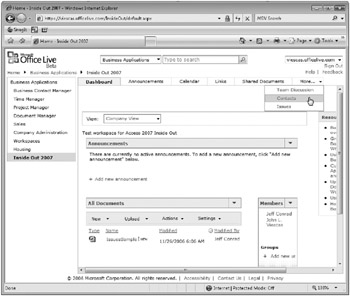
Figure 22–63: The Issues Sample database has now been migrated to the SharePoint site.
Republish a Database to a Windows SharePoint Services Site
Regardless of whether you publish or move a database to a Windows SharePoint Services site, you might occasionally need to republish your database. In Figure 22–53 on page 1211, you might have noticed a Publish To SharePoint Site button on the Message Bar after publishing a copy of the database to Windows SharePoint Services. Any changes you make to the data or database objects in the local copy of the Contacts database will not appear on the SharePoint site unless you republish these changes.
In Figure 22–61 in the previous section, you can see the same Publish To SharePoint Site button, but in a database that you moved to Windows SharePoint Services. When you move a database, Access 2007 modifies the local copy, replacing the tables with links to the SharePoint lists. Any changes you make to data using the local copy will appear in the shared lists on the SharePoint site. However, any changes you make to queries, forms, reports, macros, or modules must be republished to appear in the shared copy on the server.
In this case, we’ll work with the worst-case example, the published Contacts database. We’ll add some records and make a change to one of the database objects to show you how this process works. If you followed along and created a Contacts database and published it, reopen the database now. Add a couple of records to the Contacts table using the Contact List form, as shown in Figure 22–64.
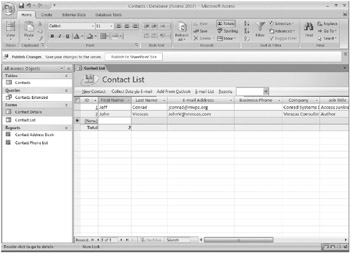
Figure 22–64: Add some records to the Contacts table for this example.
After you enter the records, switch to Design view on the Contact List form by rightclicking the form’s tab and clicking Design View on the shortcut menu. Change the caption of the label in the Form Header section to Conrad Systems Development Contact List, as shown in Figure 22–65. Close the form and save the changes you made.
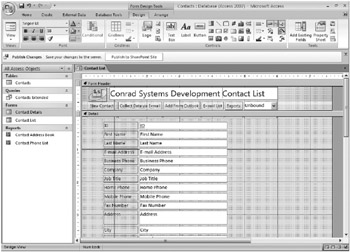
Figure 22–65: Change the label caption in the Form Header section.
To republish these changes to the SharePoint site, click the Publish To SharePoint Site button on the Message Bar. (If you accidentally closed the Message Bar, you can reopen it by clicking the Database Tools tab, and then selecting the Message Bar check box in the Show/Hide group.) If you are prompted for your logon information by the SharePoint site, enter your user name and password and click OK to continue. Access remembers the specific folder in which you saved the database, as shown in Figure 22–66. If the correct folder is not showing, locate the proper document library and then click Publish.
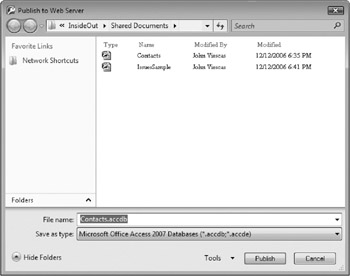
Figure 22–66: Navigate to the folder on the SharePoint site to republish the database changes.
Access prompts you that a Contacts database file already exists in the same location and asks if you want to overwrite the existing file. Click Yes to confirm the overwrite and Access republishes the revised database to the SharePoint site. After the republishing procedure is complete, Access reopens the database and shows the Contact List form.
| Note | Use this same procedure for a database that you have moved to a SharePoint site, but you need to republish your database only when you have made a change to a query, form, report, macro, or module in your local copy of the database. |
Opening the Database from Windows SharePoint Services
Users with appropriate permissions can open a database directly from a Windows SharePoint Services document library using their browser. In this example, we’ll open the Contacts database we republished in the previous section. If your local copy of the Contacts database is still open, close it now.
In Figure 22–67 you can see that we navigated to the Shared Documents library in the InsideOut folder on our test SharePoint site. You can double-click directly on the name of the Contacts database to open it in Access 2007. Alternatively, if you click the arrow next to the name of the Contacts database (you must point to this database to see the arrow), Windows SharePoint Services displays a list of options; click the Edit In Microsoft Office Access option to view this database using Access 2007. However, if you choose this option, Access downloads a copy to a temporary folder on your computer and opens it as read-only. This option works when all you want to do is edit data in a database that has been moved to a SharePoint site. But if the database has simply been published, you won’t be able to do anything except browse the data. (We’ll show you how to modify the data in a read-only database in just a moment.)
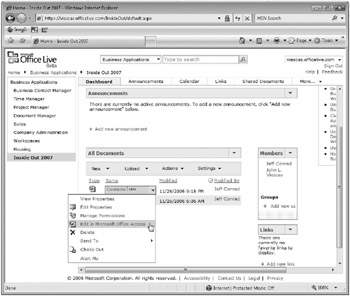
Figure 22–67: When you open a published Access 2007 database using Edit In Microsoft Office Access, your browser downloads and opens a read-only copy of the database.
In this case, you’re opening a published database, so double-click the database name to open it. Windows Internet Explorer displays a File Download dialog box with a warning message that some files can be harmful to your computer, as shown in Figure 22–68.
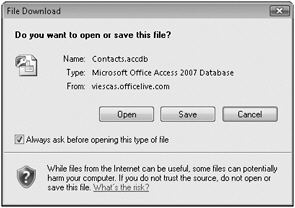
Figure 22–68: Internet Explorer asks if you want to open the database or save a copy for editing.
If you click Open, Internet Explorer downloads a copy of the database to a temporary folder on your local hard drive and then calls Access to open the file. If you choose this option, Access opens the database in read-only mode. (You cannot make any design changes to the objects or change any of the data in the tables if the database is readonly.) If the database had links to Windows SharePoint Services lists, you could change the data in any linked tables. If you only want to view data in the database, the Open option should work just fine for you. If you click Save, the Windows Save As dialog box opens, as shown in Figure 22–69. You can select a folder on your hard drive and save a copy of the database. In this case, Access does not open the database in read-only mode, so you can make changes to the data and objects. If you click Cancel, Windows SharePoint Services stops the download process.
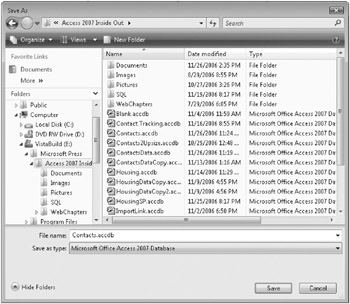
Figure 22–69: Select a folder to save a local copy of the database.
Troubleshooting
Why can’t I make any changes to my published database?
If you select the Edit In Microsoft Office Access option for a published Access 2007 database, your database opens in read-only mode. You can only view data in this situation. If you moved the database instead of publishing it, you’ll be able to edit the data and database objects.
Either change the name of the database or save it in a different location than the Access 2007 Inside Out folder so as not to overwrite the existing Conrad Systems Contacts database-Contacts.accdb. Click the Save button in the File Download dialog box, navigate to a folder in which to save the database, and then click the Save button in the Save As dialog box to download a copy of the database from the SharePoint site. If necessary, click Close to close the Download Complete dialog box. Access opens the database and displays the Contact List form with our two records in the Contacts table, as shown in Figure 22–70. You can now view, edit, and delete records and make design-level changes to the database objects. Remember that in order to have the information reflected in the database on the SharePoint site, you will need to republish the database by clicking the Publish To SharePoint Site button on the Message Bar. Close this database after you are finished.
| Note | If you save a copy of the database to an untrusted location, Access 2007 disables any harmful content in the database, including all Visual Basic code and certain macro actions. To avoid this, you should download the database to a trusted location. |
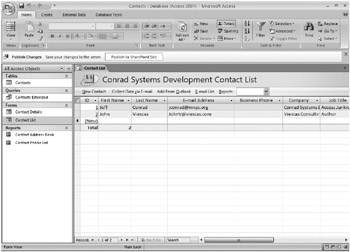
Figure 22–70: Use the Save option to download a local copy of the database for editing.
Working Offline
Occasionally, you might need to work with data stored in lists on a SharePoint site when you are disconnected. If your Windows SharePoint Services lists are stored on an internal server not accessible from the Internet, this could pose a problem if you need to view, edit, or delete records while away from your local intranet. Access 2007 and Windows SharePoint Services Version 3 allow you to work offline with data from the lists and then later synchronize your offline changes with the server after you reconnect.
Earlier in this chapter, you saw us move the Issues Sample database, which linked to lists on our test SharePoint site. You’ll now see how we can take the data offline, make some changes, and later resolve any conflicts that might occur with data still on the server. In Access, open the Issues Sample database you migrated earlier in this chapter. (You might need to log on to the SharePoint site when reopening this database.) In Figure 22–71, you can see the links to the Contacts and Issues lists as well as to the User Information List table. The status bar indicates that we are online with our SharePoint site, and the Message Bar displays the Publish Changes message. Remember from earlier in this chapter that we can make changes to the data in the tables because we have links to the list in this database.
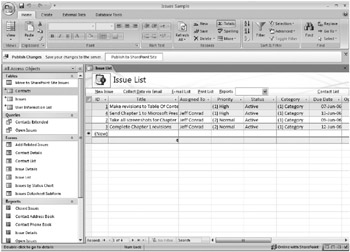
Figure 22–71: Reopen the Issues Sample database and verify that you are working online with the SharePoint site.
Disconnect from the SharePoint site by closing the Issue List form and then on the External Data tab of the Ribbon, in the SharePoint Lists group, clicking the Work Offline button, as shown in Figure 22–72. Access downloads a copy of all the data currently on the server and temporarily disconnects the active links to the Windows SharePoint Services lists. You might see Access display some progress screens for each list depending on how much data it needs to download.
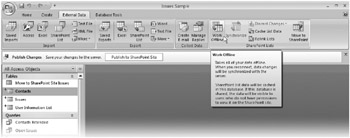
Figure 22–72: Click the Work Offline button to disconnect from the SharePoint site.
![]() Access changes the icon for the linked lists to give you a visual cue that your links are now disconnected from the SharePoint site. Access also changes the status bar message to Offline With SharePoint to indicate that you are now working offline, as shown in Figure 22–73. Now that you have a local copy of all the data, you can analyze the data with queries, view and edit data through forms, and run reports while disconnected from the server. You’ll also probably see a performance increase because you are now working only with data stored locally in the database.
Access changes the icon for the linked lists to give you a visual cue that your links are now disconnected from the SharePoint site. Access also changes the status bar message to Offline With SharePoint to indicate that you are now working offline, as shown in Figure 22–73. Now that you have a local copy of all the data, you can analyze the data with queries, view and edit data through forms, and run reports while disconnected from the server. You’ll also probably see a performance increase because you are now working only with data stored locally in the database.
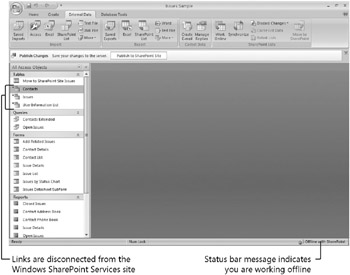
Figure 22–73: Your database is now disconnected from the Windows SharePoint Services lists, but you can still edit the data.
Open the Issue List form, and let’s make some changes to a couple of the records. Change the status of the issue records with IDs of 1 and 4 from Active to Resolved, as shown in Figure 22–74. Also, add a new record to the Issues table using the Issue List form. In Figure 22–74, you can see that we added a record concerning Chapter 22. You might notice that Access has used a negative number for the ID value instead of a positive value. Access uses negative numbers for ID values when you are working offline.
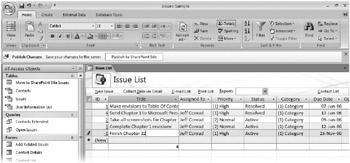
Figure 22–74: You can edit and add records while working offline.
After you make the changes to the records, close the Issue List form and then open the Issues table in Datasheet view. In Figure 22–75, you can see that Access flags all records edited or added while offline with a pencil icon in the record selector. When you reconnect to the network, Access looks for this flag to synchronize changes with the server. If you want to discard all changes you made to the records while offline, you can click the arrow to the right of the Discard Changes button in the SharePoint Lists group on the External Data tab and then click either Discard All Changes or Discard All Changes And Refresh. The latter option not only ignores all changes you made while you had the database offline but also refreshes the data from the SharePoint site.
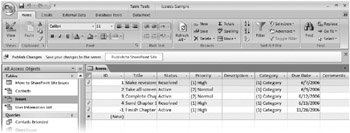
Figure 22–75: Access displays a pencil icon next to records that you changed while offline.
Synchronizing Changes After Working Offline
While you are disconnected from the server, it is possible that someone else might edit the same records you changed. As a result, you now have a conflict between your local copy of the data and the server data. Let’s assume that while you were away from the office, someone else changed the status of the same two records from Active to Closed, but you changed them from Active to Resolved. In Figure 22–76, you can see within the browser window on the SharePoint site that the records with IDs of 1 and 4, were edited. (Someone else could also make changes through links from another database as well.)
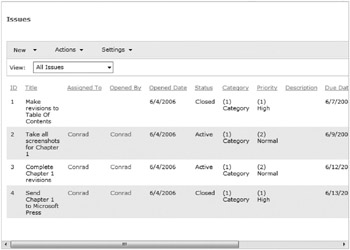
Figure 22–76: The data on the SharePoint site changed while you were offline.
To reconnect to the SharePoint site and synchronize the data, click the Work Online button in the SharePoint Lists group on the External Data tab, as shown in Figure 22–77. If you click the Synchronize button, Access attempts to resolve any data conflicts, updates any data that has been changed between the local copy and the server copy, but keeps the links disconnected from the server.
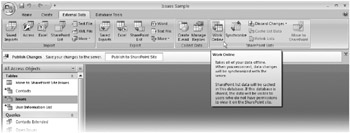
Figure 22–77: Click the Work Online button to reestablish links to the Windows SharePoint Services lists.
Access now attempts to reconnect the links to the lists on the SharePoint site, but it finds some data conflicts in the Issues table. If any conflicts exist between data in the local copy of the database and the data in the Windows SharePoint Services lists, Access displays the Resolve Conflicts dialog box, as shown in Figure 22–78. In this case, Access correctly spots that two records have data conflicts. The Resolve Conflicts dialog box has Previous and Next buttons in the upper-right corner. You can use these buttons to move back and forth between the records that have data conflicts. (These buttons appear dimmed if only one conflict is found in a table.) Access displays the number of conflicts it finds near the top of the dialog box. In our case Access shows a message of “Details – 1 of 2,” meaning two records have data conflicts.
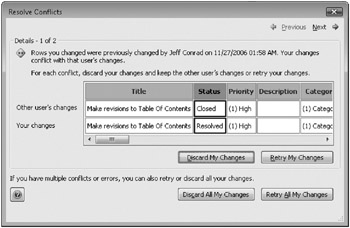
Figure 22–78: Access displays the Resolve Conflicts dialog box whenever data conflicts occur.
The Resolve Conflicts dialog box shows who changed the data on the server and the date and time it was changed. In the middle of the dialog box Access displays all the fields in the list, and highlights what the other user changed in the record on the SharePoint site as well as the changes you made to the same record. In our example, you can see that the Status field was changed to Closed on the server and we changed it to Resolved in our local copy of the data.
If you want to keep the changes that the other user made, click the Discard My Changes button. If you want to keep the changes you made to the record, click the Retry My Changes button. For each record conflict, you need to decide whether you want to keep your changes or discard them. If you want to discard all your data changes, click the Discard All My Changes button at the bottom of the dialog box. If you want to keep all your record changes, click the Retry All My Changes button. If you have additional data conflicts in other tables, you’ll need to resolve those conflicts as well. (If two people from two locations try to resolve conflicts at the same time, the last user’s changes are saved.) As you might recall, we added one new record to the Issues table. Access had no problems adding this record to the Windows SharePoint Services Issues list because there were no data conflicts. We want to keep the changes we made, so click the Retry All My Changes button. After the data conflicts are resolved, Access relinks your tables to the Windows SharePoint Services lists and changes the status bar message to indicate that you are back online. In Figure 22–79 you can see Access has completed the relinking process and opened the Issue List form.
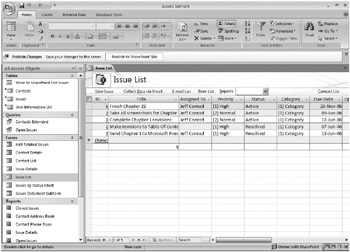
Figure 22–79: Access relinks the tables when you go back online.
Our record changes were accepted and uploaded to the SharePoint site and now show up in both our local copy of the database, in any database linked to the lists on the server, and in the lists on the server. In Figure 22–80 you can see all the updated data in the Issues list on the SharePoint site.
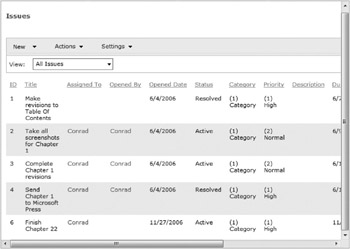
Figure 22–80: The Issues list on the SharePoint site now includes all the changes we made while working offline.
You should now have a good grasp of working within the user interface of a Windows SharePoint Services Version 3 site. You have also learned how to leverage the collaborative benefits of Windows SharePoint Services with Access 2007.
EAN: 2147483647
Pages: 234