Printing Reports
So far in this chapter you have learned the basics of viewing a report in Print Preview and in Report view. Here are a few more tips and details about setting up reports for printing.
Print Setup
Before you print a report, you might first want to check its appearance and then change the printer setup. Open the ContactsDataCopy database, right-click the rptContacts report (which you looked at earlier) in the Navigation Pane, and click Print Preview on the shortcut menu to see the report. After Access shows you the report, click the arrow under the Zoom button in the Zoom group on the Print Preview contextual tab, and then size the window to see the full-page view by clicking Fit To Window. Click the Two Pages button in the same group to see two pages side by side, as shown in Figure 14–16.
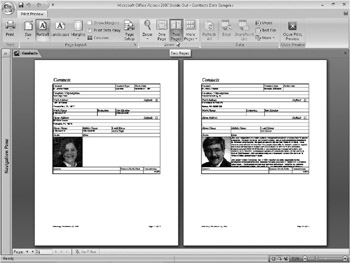
Figure 14–16: Click the Two Pages button on the Ribbon to display a two-page view of the rptContacts report in Print Preview.
This report is narrow enough to print two contacts side by side in landscape orientation on 14-inch-long paper. To print it that way, you need to modify some parameters in the Page Setup dialog box.
Open the Page Setup dialog box by clicking the Page Setup button in the Page Layout group. Access displays a dialog box similar to the one shown in Figure 14–17.
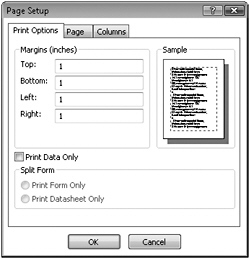
Figure 14–17: You can adjust the margins in the Page Setup dialog box.
To print the rptContacts report with two logical pages per physical page, you first need to adjust the margins. You haven’t changed the page orientation yet, so the settings that are currently the top and bottom will become the left and right margins, respectively, after you rotate the page. (And left and right margins become top and bottom, respectively.) The pages need to print very close to the edges of the paper, so set the top margin (this becomes the left margin in landscape orientation) to 0.25 inch, set the bottom margin to about 0.5 inch, and set the left and right margins to 0.5 inch. Effectively, the left margin will be the smallest after you change the orientation. Click the Page tab to display the next set of available properties, as shown in Figure 14–18.
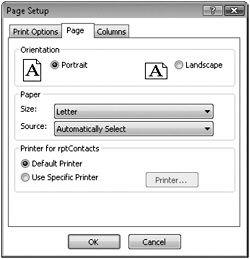
Figure 14–18: You can set page orientation options on the Page tab of the Page Setup dialog box.
On the Page tab, you can select the orientation of the printed page-Portrait to print vertically down the length of the page, or Landscape to print horizontally across the width of the page. Because we’re trying to print two pages across a single sheet of paper, select the Landscape option. The report is also about 6 1/2 inches wide, so you’ll need wider paper to fit two logical pages to a printed page. Select Legal (8 1/2-by-14-inch) paper from the Size list under Paper.
In general, it’s best to leave the printer set to the default printer that you specified in your Windows settings. If you move your application to a computer that’s attached to a different type of printer, you won’t have to change the settings. You can print any report you design in Access on any printer supported by Windows with good results.
However, if you’ve designed your report to print on a specific printer, you can save those settings by using the Page Setup dialog box. To do this, select the Use Specific Printer option on the Page tab and then click the Printer button to open a dialog box in which you can select any printer installed on your system. (The Printer button is available only if you have more than one printer installed on your computer.) Click the Properties button to adjust settings for that printer in its Properties dialog box, shown in Figure 14–19. The Properties dialog box you see might look different, depending on the capabilities of the printer you selected and how Windows supports that printer.
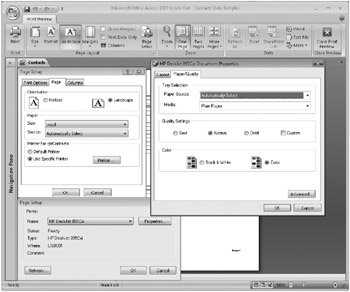
Figure 14–19: You can define properties for a specific printer to be used with your report.
After you finish selecting options on the Page tab, click the Columns tab, as shown in Figure 14–20, to set up a multiple-column report. In this case, you want to print two “columns” of information. After you set the Number Of Columns property to a value greater than 1, (in this case, 2), you can set spacing between rows and spacing between columns. By default, Access selects the Same As Detail check box and displays the design Width and Height measurements of your report. You can also clear the Same As Detail check box and set a custom width and height that are larger or smaller than the underlying report design size. Note that if you specify a smaller size, Access crops the report. When you have detail data that fits in more than one column or row, you can also tell Access whether you want the detail printed down and then across the page or vice versa.
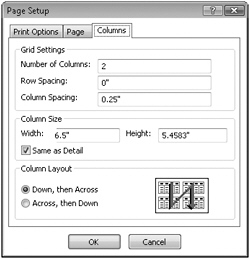
Figure 14–20: You can set report column properties on the Columns tab of the Page Setup dialog box.
| Note | If you created the report or have permission to modify the design of the report, you can change the page layout settings and save them with the report. The next time you print or view the report, Access will use the last page layout settings you specified. |
After you enter the appropriate settings in the Page Setup dialog box, click OK, and your report in Print Preview should look like the one shown in Figure 14–21. You can find this modified version of the Contacts report saved in the sample database as rptXmplContacts2Page.
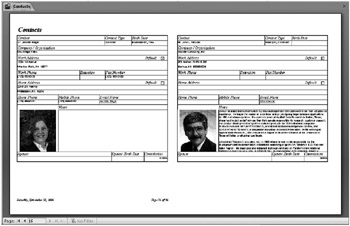
Figure 14–21: Print Preview now displays the rptContacts report in landscape orientation and in two columns.
The most common use for setting multiple columns is to print mailing labels. You can find four example reports in the sample database that do this: rptCompanyLabels5160 and rptContactLabels5160 that print company and contact labels two across in Avery 5160 format; and rptCompanyLabels5163 and rptContactLabels5163 that print company and contact labels three across in Avery 5163 format.
That covers the fundamentals of reports and how to view them and set them up for printing. The next two chapters will show you how to design and build reports for your application.
EAN: 2147483647
Pages: 234