Basing a Form on a Multiple-Table Query
When you bring together data from multiple tables using select queries, the result of that query is called a recordset. A recordset contains all the information you need, but it’s in the unadorned Datasheet view format. Forms enable you to present this data in a more attractive and meaningful way. And in the same way that you can update data with queries, you can also update data using a form that is based on a query.
Creating a Many-to-One Form
It’s easy to design a form that allows you to view and update the data from a single table. Although you can include selected fields from related tables using a list box or a combo box, what if you want to see more information from the related tables? The best way to do this is to design a query based on two (or more) related tables and use that query as the basis of your form.
When you create a query with two or more tables, you’re usually working with one-to-many relationships among the tables. As you learned earlier, Microsoft Office Access 2007 lets you update any data in the table that is on the many side of the relationship and any nonkey fields on the one side of the relationship. This means that when you base a form on a query, you can update all the fields in the form that come from the many table and most of the fields from the one side. Because the primary purpose of the form is to search and update records on the many side of the relationship while reviewing information on the one side, this is called a many-to-one form.
In Chapter 8, “Building Complex Queries,” you learned how to build a multiple-table query that displays information from several tables in the HousingDataCopy.accdb sample database. Later, you explored the fundamentals of form construction by creating simple forms to display company and product data in the ContactsDataCopy.accdb sample database.
In Chapter 12, “Customizing a Form,” you built and enhanced a simple form to display employee information from the housing database. (See Figure 12–42 on page 650.)
You could have used a combo box to display a department name instead of a number in your employees form. But what if you want to see the additional details about the department when you view an employee record? To do this, you need to base your employees form on a query that joins multiple tables.
Designing a Many-to-One Query
To build the query you need, follow these steps:
-
Open the HousingDataCopy.accdb sample database, and on the Create tab, in the Other group, click the Query Design button to open a new Query window in the Design view.
-
Add the tblDepartments table and two copies of the tblEmployees table using the Show Table dialog box. (You need the second copy to fetch the department manager name.) Close the Show Table dialog box after you add the tables to the Query window.
-
Remove the extra relationship line between EmployeeNumber in the first copy of tblEmployees and ManagerNumber in the tblDepartments table.
-
Right-click the second copy of tblEmployees (the title bar of the field list displays tblEmployees_1) and click Properties on the shortcut menu, or click the Property Sheet button in the Show/Hide group on the Design tab. In the Property Sheet window, give the field list an alias name of Managers to make the purpose of this field list clear, and then close the Property Sheet window.
-
Click the EmployeeNumber field in the Managers field list, and drag and drop it on ManagerNumber in the tblDepartments field list. This link establishes who the department manager is.
-
Drag the special “all fields” indicator (*) from the tblEmployees field list to the design grid.
-
Create an expression, Manager: Managers.LastName & "," & Managers.FirstName, in the next empty column in the design grid to display the department manager name.
-
From the tblDepartments table, drag DeptLocation, DeptAddress, DeptCity, DeptStateOrProvince, DeptPostalCode, and DeptCountry to the query design grid. Do not include the DepartmentID field from tblDepartments; you want to be able to update the DepartmentID field, but only in the tblEmployees table. If you include the DepartmentID field from the tblDepartments table, it might confuse you later as you design the form. You’ll use a combo box on DepartmentID on the form to display the department name. Save your query as qryEmployeesDepartmentManager, and close the query.
You can find a query already built for this purpose (named qryXmplEmployeesDepartmentManager) in the sample database, as shown in Figure 13–1.
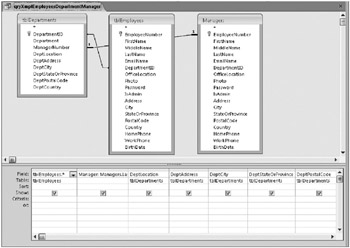
Figure 13–1: The qryXmplEmployeesDepartmentManager query serves as the record source for your form.
Designing a Many-to-One Form
Now that you have the query you need, find the query definition in the Navigation Pane, and create a new form based on the query. You can use the Form Wizard to quickly build a starting point for your form. Select the query in the Navigation Pane, click the Create tab, and in the Forms group, click the More Forms button. Click Form Wizard to get started.
You want to include all the fields from the query in this form, so click the double right arrow to move all the fields from the Available Fields list to the Selected Fields list. Click Next to go to the second page of the wizard. Select a columnar layout on the next page, and select the style you want on the page that follows. We started with the Trek style for all forms in the Housing Reservations sample database, as shown in Figure 13–2.
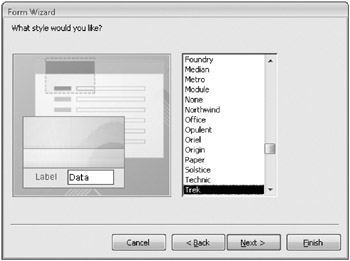
Figure 13–2: Select a form style on the third page of the Form Wizard.
Give your form a title of Employees on the last page, and click Finish. When the wizard finishes, you should see a form similar to that shown in Figure 13–3.
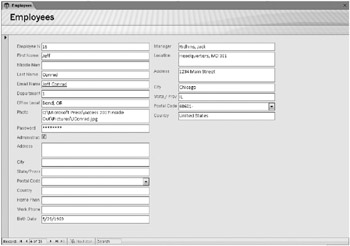
Figure 13–3: The Employees form is a many-to-one form to display data from multiple tables.
| Note | In the initial release of Office Access 2007, the Form Wizard fails to apply the defined background image for the style you select when you create a Columnar, Datasheet, or Justified form. Microsoft is aware of this issue and is looking into it. Figure 13–3 shows the form after we reapplied the Trek style using the AutoFormat command. |
This form could use some polishing, but the wizard has placed the fields you chose on the form for you. To be able to see the department name, instead of Department ID, switch to Design view, and perform the following steps:
-
Right-click the DepartmentID text box, click Change To, and then click Combo. This converts the text box to a combo box.
-
Open the property sheet, and set Row Source to tblDepartments, Column Count to 2. (the first two fields of tblDepartments are DepartmentID and Department), and column widths to 0";1.5" to hide the DepartmentID field and display the department name.
Switch back to Form view, and the result should look like Figure 13–4. You can find this form saved as frmXmplEmployee6 in the sample database.
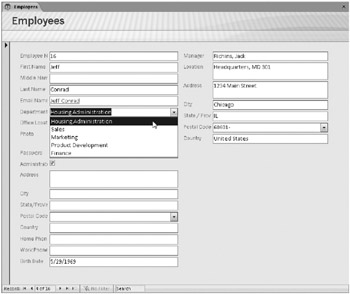
Figure 13–4: The DepartmentID control displays the related department name after you changed it to a combo box.
Try changing the department in any record to something else, and watch what happens. You should see the corresponding manager name and department location information pop into view, as shown in Figure 13–5. Because you haven’t set the Locked property for any of the fields, you can also update the location information for the displayed department. However, if you do this, the new location information appears for all employees assigned to that department.
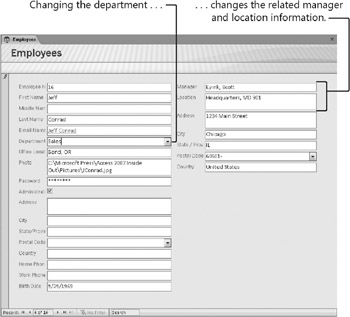
Figure 13–5: If you change the Department field for the employee, new related information is displayed automatically on this many-to-one form.
| Inside Out-Understanding Windows-Themed Controls | Access 2007 provides an option to help your forms look more consistent with Windows Vista and Windows XP. To enable this feature, click the Microsoft Office Button, click Access Options, and in the Current Database category, select the Use Windows-Themed Controls On Forms check box (displayed under Application Options). You can set this option for each individual database. When you do this, Access uses the Windows Vista or Windows XP theme for your command buttons. It also applies the Windows theme for label, text box, option group, option button, check box, combo box, list box, image, unbound object frame, bound object frame, subform, and rectangle controls. All these controls appear flat when all the following conditions are true:
You can selectively restore the default look for controls by creating a template form in your database. (See the previous chapter for details about creating a template form.) However, the Form Wizard does not honor these settings unless you add your template form as a custom style and instruct the wizard to use that style. The only other solution is to selectively change one of the previously mentioned settings (for example, set Back Color to #010000 instead of #000000) for controls that you do not want themed. |
EAN: 2147483647
Pages: 234