| When Visual Studio 2005 is first installed, you'll want to further tune the configuration to meet your specific preferences. Depending on the version of Visual Studio you're accustomed to, you might want to move the individual explorer windows or make other changes that make your job easier. Let's start by using the Tools | Options menu to further refine our custom configuration. 1. | Click on the Tools | Options menu to expose the dialog shown in Figure 4.9.
Figure 4.9. The Visual Basic Tools | Options dialog. 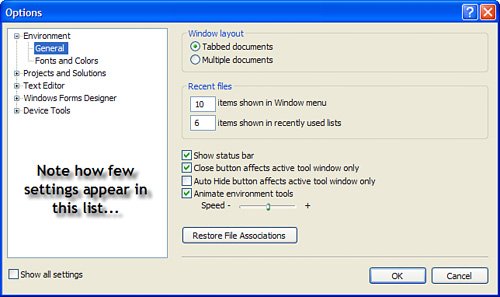
| 2. | Note that not nearly all of the options are exposed in this listthat's because I chose "Visual Basic Developer" as the Developer Activity. To see the remaining options, click the "Show all settings" checkbox.
| | | 3. | In Standard and better editions, scroll down in the Options list and click on "Projects and Solutions (General)." I recommend that Visual Basic developers check "Show advanced build options". This permits you to modify your debug toolbar to include the build type (debug or production), as shown in Figure 4.10.
Figure 4.10. Enable "Show advanced build configurations". 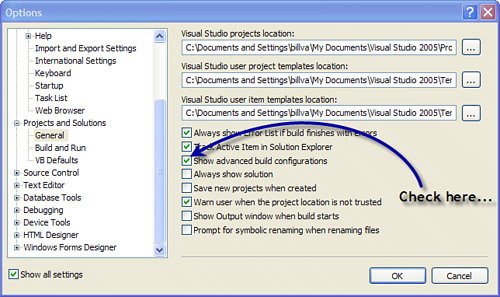
| 4. | Next, click on the "VB Defaults" item in the Options list. Set "Option Strict:" to "On", as shown in Figure 4.11. This option ensures your Visual Basic applications must be hard-coded to force narrowing type conversions instead of letting Visual Basic perform these conversions behind the scenes. Once set, late binding is not allowed. This means you'll have to make sure that the datatype of the variable you're moving matches the destination type.
Figure 4.11. Set the Option Strict option to "On". 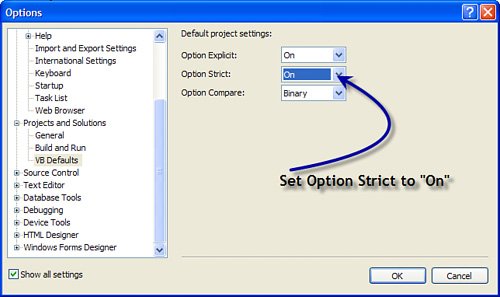
| | | 5. | In Standard and better editions, select the "Keyboard" option and review the settings already applied. Remember, I chose "Visual Basic" application activity, which sets the keyboard shortcuts to match those used by Visual Basic 6.0well, sort of. Visual Basic 6.0 developers expect that F8 is used to "step into" an application. The default "Visual Basic 6.0" settings have this set to F11. If you want the Visual Basic debug keyboard shortcuts to work using F8, you'll need to change the Debug.StepInto shortcut, as shown in Figure 4.12.
Figure 4.12. Reset the Debug.StepInto keyboard shortcut to F8. 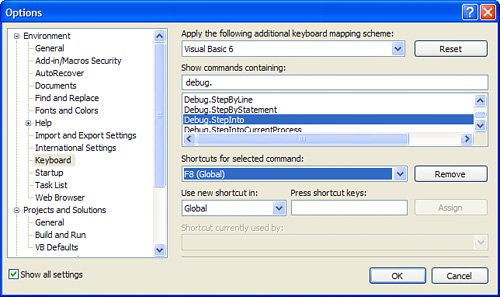
| | | 6. | Select the "Text Editor" and drill into "All Languages". In this dialog, I enable line numbers for the source code shown in the code editor, as shown in Figure 4.13.
Figure 4.13. Enable line numbers for the source code editor. 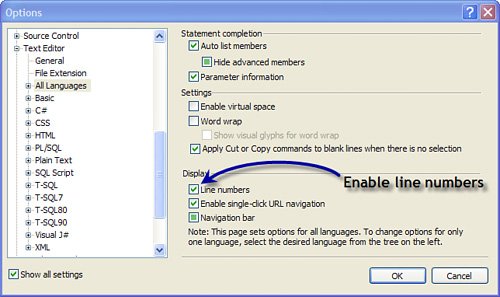
|
No, you don't necessarily need to make all of these changes in your configuration, but if you do, your code will compile and appear in the editor in the same way as our examples. Now that I've made these changes, it's time to save them. Saving and Loading Custom Configurations Whenever you apply custom settings, it's a good idea to save these configuration changes so they can be restored on demand. These custom configuration settings files can also be shared and loaded by other developers on your team so that everyone is using the same (custom) configuration. To save your settings: | | 1. | Click the Tools | Import and Export Settings... menu. This opens the dialog shown in Figure 4.14.
Figure 4.14. Saving your custom configuration with the Import and Export Settings Wizard. 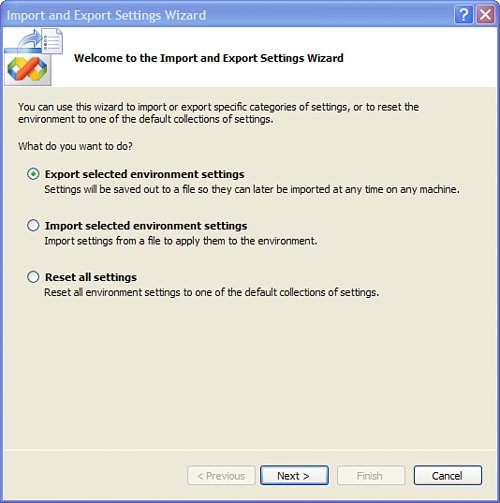
| | | 2. | Click "Next >" and select the options to export in the subsequent dialog (shown in Figure 4.15). You can select or de-select as many of the settings as needed.
Figure 4.15. Choose the settings to persist to your custom configuration file. 
| | | 3. | Click "Next >" to open the final file designation dialog. Name your settings file and provide a path where the settings are to be saved (as shown in Figure 4.16).
Figure 4.16. Name and provide a path to your custom file. 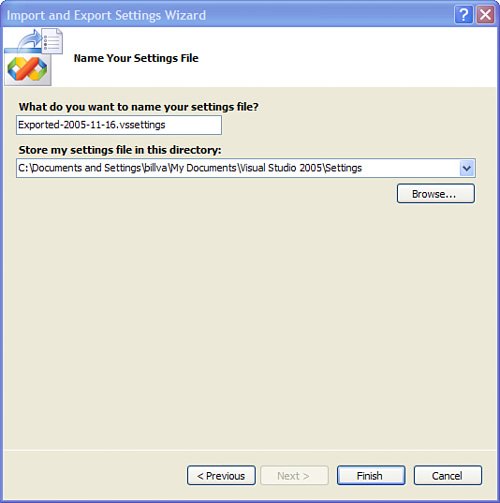
| 4. | Click "Finish" to save the custom file.
|
As you work with Visual Studio 2005, you'll often revisit these option settings. I encourage you to save your custom configurations, so when you need to revert to a "safe" configuration, you can easily do so. If you upgrade your Visual Studio edition, you can use these same configuration files to reset your favorite settings. Creating Custom Project Templates In Standard and better editions, before you start creating projects, it makes sense to work up a custom template. In the Express edition, you'll have to make do with the built-in templates. Custom templates let you start a new project from your own template that's already filled in with the comments, "To-dos", references, and settings your company's applications use. Let's walk through the process of creating a custom template and exporting it so Visual Studio can list it as one of the available templates when you start a new project. | | 1. | Click on File | New Project. This launches the New Project dialog, shown in Figure 4.17.
Figure 4.17. Choose a starting template. 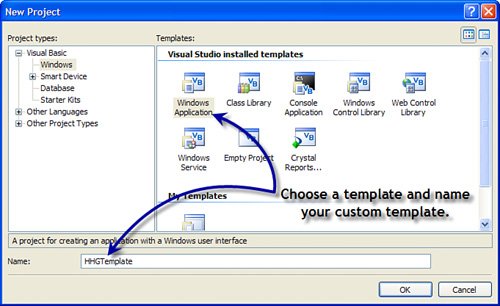
| 2. | Depending on the type of application template you want to build, open the appropriate Windows or other project type. I'm going to show how to create a custom Windows project template, so I chose "Windows Application". Name the project to the default name your custom projects will use. I'll use "HHGTemplate".
| | | 3. | Click "OK". This creates a new project using the settings and configuration built into the standard template.
| | | 4. | Customize the project to incorporate any standard configuration options. For example:
- I added copyright comments to the Form1.vb file.
- I added a Private Sub New and code to the Form1_Load to configure a SqlConnection object.
- I also added a BuildAndExecuteCommand sub to perform a simple query. This code is used as a base for many of our examples.
This code is shown in Figure 4.18.
Figure 4.18. Custom code added to the custom HHGTemplate Form1.vb. 
| | | 5. | No, I'm not done yet. Note that the SqlConnection class constructor references the Application settings (stored in the app.config file). The (Visual Basicspecific) My.Settings.BiblioConnectionString references a specific application setting. I need to ensure that this setting is applied to the app.config file. Yes, if you're creating an ASP.NET template, you'll want to change the Web.Config file. Right-click on the project (HHGTemplate) and choose Properties. This opens the Settings.settings file dialog, as shown in Figure 4.19.
Figure 4.19. Configuring the application settings. 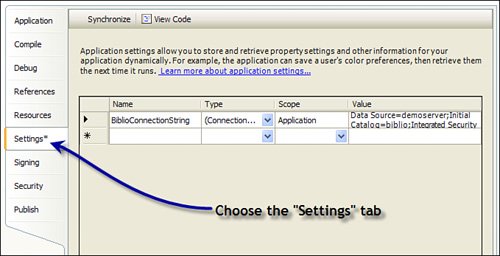
In this case, I need to add a custom setting that's used as a ConnectionString. Start by naming the setting and choosing a appropriate type from the drop-down list of types. In this case, I chose "(Connection string)".
| 6. | Next, set the Scope to "Application" and set the Value to your database connection string. This can be typed by hand, or, if the Value cell is selected, the dialog exposes an ellipsis (...) that can be selected to open a Connection Properties configuration dialog (as shown in Figure 4.20).
Figure 4.20. Opening the Connection Properties dialog. 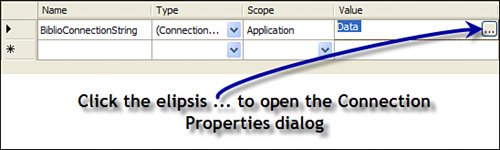
| 7. | The Connection Properties dialog collects all of the needed elements of the ConnectionString. In this case, I'm setting up a ConnectionString to address the DemoServer (an alias[5] for a specific server on our local network), use Windows (SSPI) authentication, and set the initial catalog to the "Biblio" database. To make sure the ConnectionString is valid, click the "Test Connection" button. Nope, it might not work unless you've done some configuration first. Remember, SQL Server is initially installed to be invisible from the network. While you might be able to easily connect to a local SQL Server instance, getting connected to an instance on the local area network (regardless of your rights) won't be easy. I discuss how it's done in Chapter 9, "Getting Started".
[5] See Chapter 2, where I show how to set up an alias to a specific SQL Server instance.
| | | 8. | Click "OK" when you have configured your Connection properties. This copies this preconfigured ConnectionString into the Settings dialog. Now is the time to add settings to your Settings.Settings (app.config or web.config) file. Note that these values are compiled and also stored in the Settings.Designer.vb file as strongly typed properties. Figure 4.22 shows how the "BiblioConnectionString" setting is compiled into a strongly typed property.
Figure 4.21. Configuring a ConnectionString. 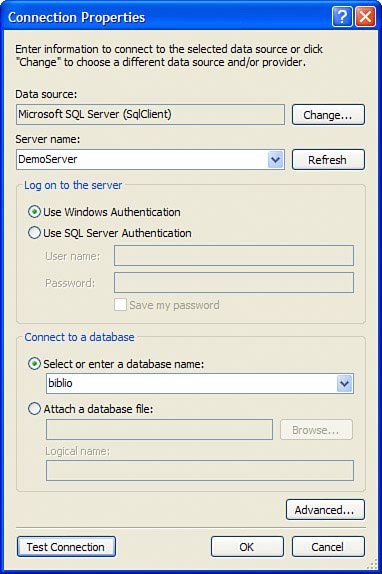
Figure 4.22. The strongly typed BiblioConnectionString "setting" property. 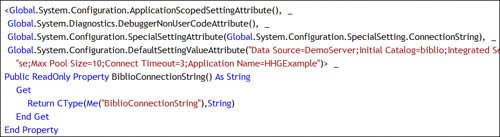
| | | 9. | It would be a good idea to visit each of the project property tabs while you have the dialog open. Interesting settings include:
In the Application tab:
Setting the application icon. Automatically add code to ensure that only one instance of the application is started. (Make single instance application.) Determine when application is shut down. Enable a splash screen. Add code to specific "startup" events
In the "Compile" tab:
Set "Advanced" compiler settings. Here, you can enable or disable integer overflow checks and optimizations. Note that compiler optimizations are disabled when you create a "debug" build and enabled when you create a "production" build. Set Option Strict: On. I've already discussed the importance of this setting.
In the "Signing" tab:
This is also a good time to add class files or modules and any custom controls your application template needs to include.
| 10. | You're ready to export your template, so click the Save All button or choose File | Save All.
| | | 11. | Next, click File | Export Template. I'm creating a "Project" template, so all of the files in the template are included in the new Template project. Note that when you start a new project using this template, a copy of each of these files (in their current state) is loaded into your new project. Figure 4.23 shows where to enter your template name.
Figure 4.23. Enter the name of your template in the Export Template Wizard. 
| | | 12. | Click Next and fill in the Template icon, name, and description, as shown in Figure 4.24. Click Finish to install the template into Visual Studio 2005's list of valid templates.
Figure 4.24. Describing the project template 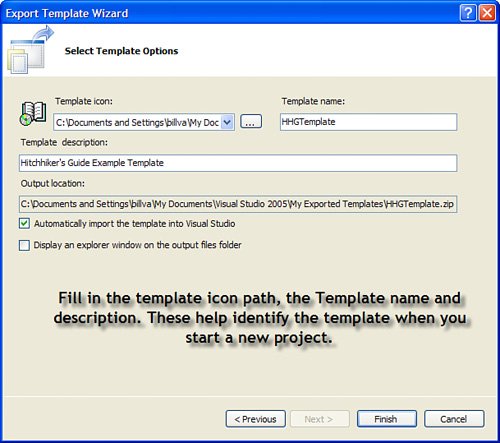
| | | 13. | Test your new template by creating a new project (File | New Project). Note that your custom template is listed under the languagein this case, "Visual Basic", as shown in Figure 4.25. Note that the default application name is based on the template name you choose in the project template dialog (see Figure 4.24).
Figure 4.25. Your custom template appears as a new project type under your development language. 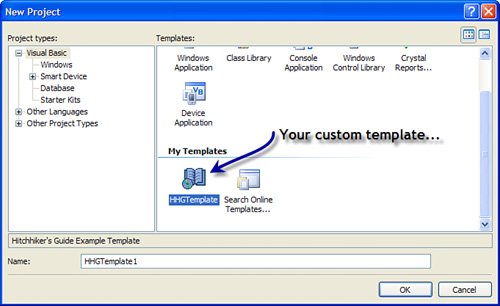
| 14. | To remove the template, navigate to your C:\Documents and Settings\billva\My Documents\Visual Studio 2005\Templates\ProjectTemplates and remove the .ZIP file located in this directory that corresponds to your custom project template.
|
Configuring Online or Local Help I expect that you're going to need to use online (MSDN) or local help topics to explain issues that I don't cover here. The first time you press F1 or click on an item in the Help menu, Visual Studio prompts you to choose where you want to search for the help topics you need. You have three choices, as outlined in Figure 4.26. Note that while local help is faster, it's not nearly as complete as the online version. Note that this is a Standard or better feature. Figure 4.26. Choose where help is sourced. 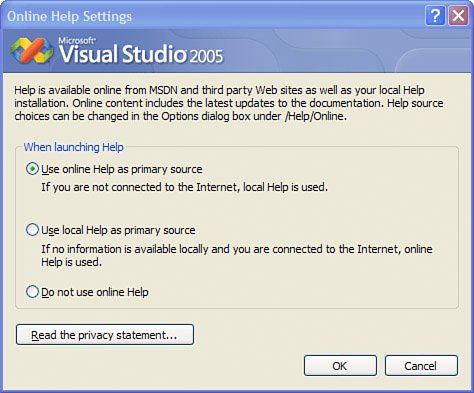
|