Section 9.2. Modifying Drawings
9.2. Modifying DrawingsJust as you erase and redraw the sketches you make on paper, you can erase and redraw the drawings you add to your PowerPoint slides. This section shows you how to modify individual lines and shapes . The next section shows you how to layer, align, and group multiple lines and shapes. 9.2.1. Selecting Lines and ShapesBefore you can modify a shape or line, you first need to do one of the following:
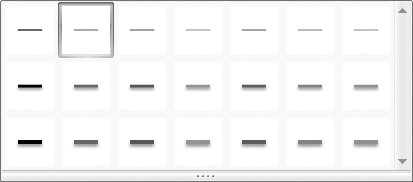
9.2.2. Applying Shape StylesPowerPoint comes with a handful of Shape Style options that let you add professionally designed, theme-coordinated colors and effects (including glows and reflections) to your lines and shapes. The great thing about Shape Styles is that they let you gussy up your drawings with one or two clicks. The downside is that you run the risk of producing a drawing that looks exactly like a million other drawings on a million other PowerPoint slides. (It's a modest risk because most folks use drawings infrequently and because you'll deliver such a compelling presentation that your audience won't notice.) To format your drawings by applying a prebuilt Shape Style, first select the line or shape to which you'll apply your Shape Style. Go to Drawing Tools Format
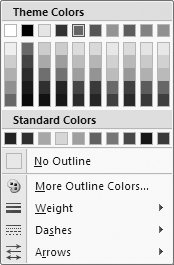
9.2.3. Modifying Lines, Connectors, and Shape OutlinesYou can change the lines and connectors you add to your slide by modifying their color , their weight (thick to thin), their type (dashes, dots, or solid), or by adding arrows to one or both ends. And because the outline of every shape you create in PowerPoint is a line, you can change those the same way. Select the line, connector, or shape that has an outline you want to modify. Then click Drawing Tools Format From the Shape Outline menu, choose one or more of the following:
Tip: To shorten or lengthen a straight line, mouse over one of the line's end points (your cursor turns into a double-headed arrow when you're in the right spot). Then drag to shorten or lengthen your line. (This trick also works for rotating lines, as described in Section 9.2.6.) 9.2.4. Modifying the Inside of a ShapeEvery shape you add to your slides consists of an outline (a line ), and an inside (a fill ). You can fill in a shape by changing its color, or by adding a picture (including built-in repeating pictures called textures ) or a gradient. Select the shape you want to modify. Then go to Drawing Tools Format
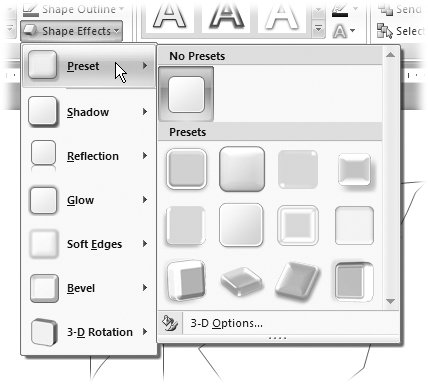
9.2.5. Applying Special EffectsNew in PowerPoint 2007 is the ability to add special effects like glows, reflections, shadows, and beveling to your shapes and lines with just a couple of mouse clicks.
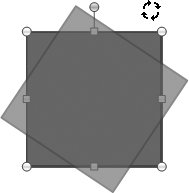
Technically, you can apply any special effect you like to lines as well as to shapes. But because lines tend to be skinny, they usually don't benefit much from 3-D effects. Select the shape or line you want to apply a special effect to. Then, click Drawing Tools Format 9.2.6. Rotating DrawingsYou rotate lines and shapes the way you rotate and reposition every other type of object on your slides: by selecting them and then dragging the rotation handle. 9.2.6.1. Rotating linesIf you add a line to your slide and then decide you want to slant it a bit, no problem. PowerPoint gives you two different ways to rotate lines: dragging the end points, and using the Size and Position dialog box.
On your slide, click to select the line you want to rotate. PowerPoint displays circular endpoints, one at each end of the line. Click one of the endpoints and drag to rotate the line. When you let go of your mouse, PowerPoint displays the rotated line (see Figure 9-10).
9.2.6.2. Rotating shapesIf you've got a steady hand, the quickest way to rotate a shape is to click the shape's rotation handle and drag. When you want to tell PowerPoint exactly how many degrees to rotate your shape, use the Size and Position dialog box shown in Figure 9-11 instead.
Tip: PowerPoint gives you a quick way to rotate a shape 90 degrees, as well as to flip shapes (rotate them vertically or horizontally). On the Drawing Tools Format tab, click Arrange  Rotate and then choose one of Rotate Right 90, Rotate Left 90, Flip Vertical, or Flip Horizontal. Rotate and then choose one of Rotate Right 90, Rotate Left 90, Flip Vertical, or Flip Horizontal. | |||||||||||||||||||||
|


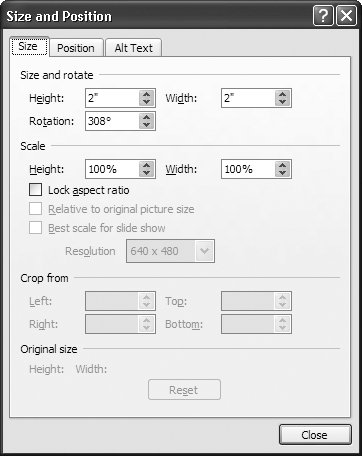
Tip: To display the Size and Position dialog box shown in Figure 9-11, right-click any shape and choose Size and Position.
9.2.7. Repositioning Lines and Shapes
Similar to the way you rotate lines and shapes, you reposition them on your slide in one of two ways: by dragging them, or by using the Size and Position dialog box shown in Figure 9-11.
To reposition a line or shape by dragging, first select the line or shape you want to reposition. PowerPoint displays endpoints (line) or a selection box (shape). Move your mouse over the highlighted line or selection box. When your mouse is in the right place, your cursor turns into a four-headed arrow, and you can drag to reposition the selection.
9.2.8. Resizing Drawings
You automatically choose a size for your shapes and lines as you draw them, by dragging. But if you change your mind, you can easily resize them. To do so:
-
On your slide, select the line or shape you want to resize .
PowerPoint displays endpoints (for the lines) and a selection box, complete with round and square resize handles (for the shapes).
-
Click an endpoint or a resize handle and drag .
Your cursor changes from an arrow to a + symbol. As you drag, PowerPoint displays a semitransparent ( ghosted ) version of your line or shape (see Figure 9-13).
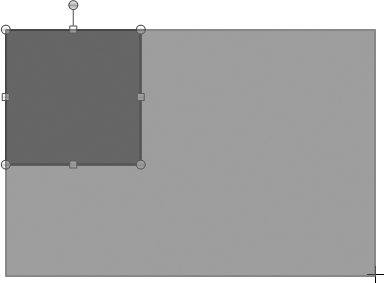
Figure 9-13. Dragging a square resize handle lets you distort your shape by stretching or shrinking just one aspect of the shape. Dragging a circular resize handle lets you enlarge or shrink your shape. (To enlarge or shrink the shape while keeping it in perfect proportion, press Shift while you drag.)
-
When the ghosted line or shape is the size you want it, let go of the mouse button .
PowerPoint redraws your selection.
Note: Another way to resize your drawings is with the Shape Height and Shape Width options on the Drawing Tools Format tab. See Figure 9-14 for details.
|

9.2.9. Changing the Type of a Shape or Connector
Suppose you add a plain rectangle to your slide, add some text, and then you decide a fancier callout would look better. You're in luck: PowerPoint lets you experiment by changing any type of shape to another type of shape, and any type of connector to another type of connectorwithout losing formatting you've already applied.
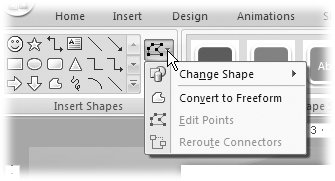
To change a shape to a different type of shape, select it and then click Drawing Tools Format Insert Shapes Edit Shape (Figure 9-15). On the menu that appears, mouse over the Change Shape menu option, and the Shape gallery appears. Click the shape you want to change your existing shape to.
|
Changing a connector's type works a little differently: On your slide, right-click the connector you want to change. From the context menu that appears, choose Connector Types and then one of the following (unchecked) options: Straight Connector, Elbow Connector, or Curved Connector.
9.2.10. Adding Text to Shapes
A rectangle or star isn't particularly compelling all by itself. But adding some text can send a powerful message. For example, say you've got a slide that shows a sales chart. On the chart you've drawn an arrow shape to point out a spike in company earnings. Adding a quickie text explanation to the arrow ( One-time State Contract ) provides your audience with instant clarity.
PowerPoint's shapes come with text boxes built in, so all you have to do to add text is select the shape and start typing. If you've just added the shape to your slide, chances are it's already selected. Just click in the text box and type away (Figure 9-16).
|
You can format the text you just added by heading to the WordArt Quick Styles section of the Drawing Tools Format tab and selecting one or more of the Text Fill, Text Outline, or Text Effects options. Chapter 3 walks you through the process of formatting text.
9.2.11. Reshaping and Distorting Shapes
PowerPoint displays little yellow diamond-shaped distortion points on some shapes (but not all). By clicking one or more distortion points and dragging, you can push, pull, and otherwise distort the basic shape into custom shapes (see Figure 9-17). Customizing a basic shape this way is usually easier than drawing your own custom shape.
|

For some shapes, PowerPoint strictly controls how much distortion you can apply. You can make the happy face into a frowny face, for example, but nothing in between.
9.2.12. Aligning Shapes and Lines
To help you lay out the different shapes and lines you add to your slides, PowerPoint lets you display helpful rulers and gridlines. It also lets you align multiple objects quickly. For example, you can line up a bunch of shapes on the left or right side of your slide simply by clicking a button.
To help you get the alignment right, you can have PowerPoint display rulers or gridlines (Figure 9-18). Choose View Show/Hide Ruler or View Show/Hide Gridlines. Another way to show these helpful tools: right-click a blank spot on a slide and choose Ruler or "Grids and Guides from the shortcut menu.
|

Note: You can create additional guides by turning guides on (Section 4.2), and then Ctrl-clicking a guide and dragging to create a new guide.
First select the lines or shapes you want to align. Then go to Home Drawing Arrange Align to display the alignment menu shown in Figure 9-19.
Choose one or more of the following:
-
Align Left, Center, Right, Top, Middle, or Bottom . Tells PowerPoint to line up your selected objects with respect to the slide (see Align to Slide below), or with respect the selected objects themselves (see Align to Selected Objects below). For example, choosing Align Left repositions your objects so that they're lined up on the left side of the slide ( assuming you've also selected Align to Slide; see next).
-
Distribute Horizontally, Vertically . Tells PowerPoint to spread out multiple objects so that they're equally distant from the sides and top-and-bottom of a slide, respectively.
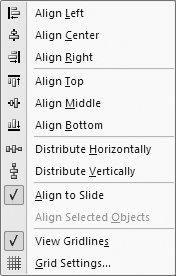
Figure 9-19. The number of options that PowerPoint activates (as opposed to grays out) depends on how many objects you've selected.
-
Align to Slide . Tells PowerPoint to align left, center, right, top, middle, or bottom (see above) with respect to the edges of the slide.
-
Align Selected Objects . Tells PowerPoint to align left, center, right, top, middle, or bottom (see above) with respect to the other objects you've selected.
-
Show Gridlines . Tells PowerPoint to show gridlines.
-
Grid Settings . Displays the Grid and Guides dialog box (Figure 9-20), which lets you customize the gridlines that appear (if you've told PowerPoint to show them as described above). The Grid and Guides dialog box also lets you tell PowerPoint to help you position objects so that they touch ( snap to ) gridlines or other objects on your slide.
Note: You can display the Grid and Guides dialog box shown in Figure 9-20 by right-clicking a slide and choosing Grid and Guides.
EAN: 2147483647
Pages: 96