8.1. Printing Slides (One Slide per Page) The most straightforward to way to print your presentation is to print each individual slide on a separate piece of paper. You can keep paper printouts in a file, bring them with you to the presentation as a failsafe, or use them to practice your spiel or proof your slides (some errors are easier to spot in plain black and white). When you commit your slides to paper, you have a few extra decisions to make. For example, onscreen slides don't usually have a footer with a page number and date, but that kind of information is mighty handy on a hard copy. You can also choose exactly which slides to print, whether to print in black and white or color , and more. The following tutorial walks you through all your options.
Tip: A super-fast way to print one slide per page is to select Office button  Print Quick Print. But because choosing this option tells PowerPoint to begin printing immediatelywithout giving you a chance to inspect or change your print settingsyou probably dont want to use it unless you've printed your presentation at least once following the steps in this section. Print Quick Print. But because choosing this option tells PowerPoint to begin printing immediatelywithout giving you a chance to inspect or change your print settingsyou probably dont want to use it unless you've printed your presentation at least once following the steps in this section.
To print your slides: -
Choose Office button Print Print Preview . The Print Preview tab (Figure 8-1) appears, along with a preview of your first slide. As you mouse over the preview, your cursor turns into a magnifying glass bearing either a plus sign (+), which tells PowerPoint to zoom in when you click, or a minus sign (-), which tells PowerPoint to zoom out when you click. 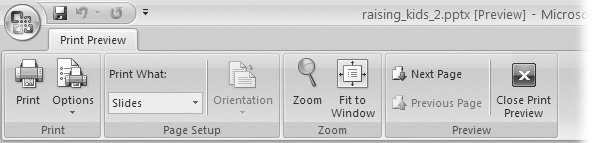 | Figure 8-1. Out of the box, PowerPoint assumes you want to print your presentation one slide per page, so that's what you get if you click the printer icon. But because printing a presentation is a time-consuming proposition, you'll want to set a few options before you actually tell PowerPoint to start printing. | | -
Make sure the word Slides appears in the Print What box . If it doesn't, click the drop-down arrow next to Print What and, from the list of options that appears, choose Slides. -
Click Options Header and Footer . The Header and Footer dialog box (Figure 8-2) appears. 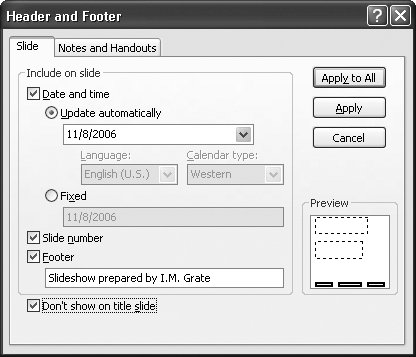 | Figure 8-2. As you turn on the checkboxes next to Date and Time, Slide Number, or Footer, Power-Point adjusts the thumbnail in the Preview section to let you know where it intends to put each footer element: left, center, or right. Here, the checkboxes next to all three elements are turned on, so all three footer elements in the Preview area appear black. Turning off an element grays out its position in the Preview. | | -
Check to make sure the Slide tab is selected; if it isn't, click to select it . This tab lets you set a host of printing options: -
If you want to add a date, timestamp, or both to your footer, then turn on the checkbox next to Date and Time. Then choose either Update automatically (to tell PowerPoint to adjust the date or time so that it always matches today's, in which case you need to choose a date-and-time format from the drop-down list shown in Figure 8-2) or Fixed (in which case you need to type the fixed text you want PowerPoint to add to your footer). -
If you want to add a consecutively numbered page number (beginning with 1) to the footer that appears on each page of your printout, then turn on the checkbox next to Slide number.
Tip: If you want to number your slides starting not from 1 but from, say, 21 (perhaps you're responsible for the second half of a 40-page presentation), click Close Print Preview to return to your presentation, and then choose Design Page Setup Page Setup. When the Page Setup dialog box opens, enter 21 in the "Number slides from" box.
-
If you want to add text to your footer, turn on the Footer checkbox and then, in the text box, type in the text you want to appear at the bottom of each page of your printout. -
If you don't want your footer to appear on the first page of your presentation (most folks don't, because the first page usually contains the title of their presentation and nothing more), then turn on the checkbox next to "Don't show on title slide." After you've chosen your settings, click Apply to All to tell PowerPoint to add your footer to each page of your document.
Tip: You can reformat your header and footer text by changing the font of the page number, say, or the color of the date. To do so, you need to edit your presentation's Slide master , which you learn all about in Chapter 5.
-
To choose whether to print in color, grayscale (like the illustrations in this book), or plain black and white, click Options Color/Grayscale . From the list that appears, choose one of the following: Color, Grayscale, or Pure Black and White. As you click, you can see each option in the Preview pane. Choose Color when you need color printouts to show in public (this option uses a lot of ink). Choose Grayscale if you don't have a color printer, but want your printed slides to look as much as possible like they do in PowerPoint. Choose Pure Black and White only if your presentation doesn't contain a lot of graphics and you want to print it out as quickly as possible. (See box in Section 8.1 for more on the differences between Grayscale and Pure Black and White.) -
Choose one or more of the following options, which determine how the slide appears on the page : -
Options Scale to Fit Paper . Tells PowerPoint to stretch the content of your slide, leaving the tiniest of margins on all sides. -
Options Frame Slides . Tells PowerPoint to draw a thin black line around the content of each slide. -
Options Print Hidden Slides . Tells PowerPoint to print any slides youve previously earmarked as hidden (Section 7.1.2). PowerPoint doesn't activate this option if your slideshow doesn't contain any hidden slides. -
Click Next Page and Previous Page to scroll through the preview of your presentation and make sure everything looks good . Alternatively, you can use the scroll bars that appear in the Preview area to scroll through each slide. You want to make sure your slideshow looks goodright down to the headers, footers, and margins before you've spent half an hour (and half an ink cartridge) printing it. -
If you spot a problem, then click Close Print Preview . The Print Preview tab disappears, and you return to the main ribbon. Make any changes you want, and then choose Office button Print Print Preview. Repeat steps 2 through 8 until youre satisfied with how your presentation looks in preview mode. -
When you're ready to print, click the Print icon . The Print dialog box you see in Figure 8-3 appears. -
Tell PowerPoint which pages you want to print by choosing one of the following options : -
All . Prints every page of your presentation. PowerPoint assumes you want this option, unless you tell it differently. -
Current slide . Prints only the currently selected slide. 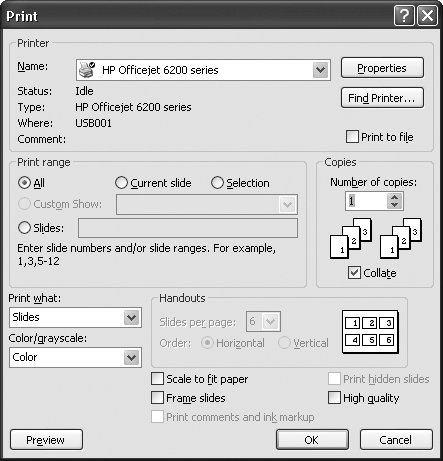 | Figure 8-3. Most of the options you see here are options you've already set in the Print Preview ribbon. (When you set them in the Print Preview ribbon, PowerPoint carries them over to this dialog box.) Two options that you do want to set (or double-check ) here: which pages you want to print, and how many copies you want to print. | |
-
Selection . Prints a range of selected slides. PowerPoint doesn't activate this option until you select multiple slides in the Slides pane (see Section 5.1). -
Custom show . Prints a named subset of your slideshow called a custom show. To see how to create a custom show, flip back to Section 7.2.1. -
Slides . Lets you specify a print range, which may be contiguous (112) or non-contiguous (1, 2, 5, 6). -
Tell PowerPoint how many copies of your presentation you want to print in the "Number of copies" box . If you want just one copy, then you can skip this step: PowerPoint assumes you want to print one copy unless you tell it differently. UP TO SPEED
When to Go Gray | | PowerPoint gives you three choices when it comes to printing your presentation: color, grayscale, and in pure black and white. Here's when (and why) you would choose each: -
Color . If you have a color printer and you don't expect to make black-and-white copies of your printoutyou're printing overhead transparencies , for exampleyou'll want to print in color. This option is the only one that prints slide backgrounds. -
Grayscale . If you don't have a color printer, or just want to print some inexpensive black-and-white handouts, then choose Grayscale. In this mode, PowerPoint prints graphic portions of your slides that it won't print in pure black and white. The quality of the images is like the black-and-white photographs in a newspaper. -
Pure black and white . If you don't have a color printer, your presentation doesn't contain a lot of graphics (fills, patterns, shadows, backgrounds, and so on), and you want to speed up the printing process, pure black and white is the way to go. When you print using this option, graphic fills and patterns won't appear in your printouts, and any shadow effects you've applied to non-text objects appear pitch black. Keep in mind that unless you print in color, your slide backgrounds, background images, and text shadow effects won't appear in your printouts. And finally, if you're still trying to decide between the grayscale and black-and-white, head back to your presentation proper and experiment with the many subtle shading variations PowerPoint offers, and then print your slides. Go to View Color/Grayscale and choose either Grayscale or Pure Black and White. Doing so pops up either the Grayscale or Black and White tab, where you can select (and preview) several shading options. | -
|
