Working with Basic Disks
| Unless you convert it after the initial installation of Windows Server 2003, the physical disk that the operating system is installed on will be configured as a basic disk with a single partition. If you choose to leave this disk configured as a basic disk, you need to understand how to work with basic disks. This section discusses how to perform the following tasks:
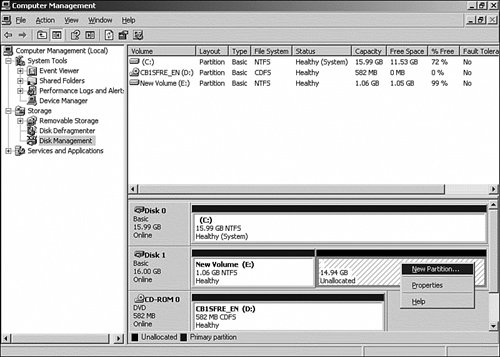
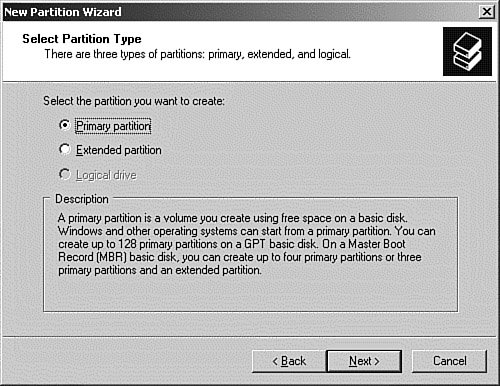
Creating a Primary Partition on a Basic DiskAs discussed earlier in this chapter, when Windows Server 2003 is initially installed on a new machine, it is installed on a basic disk in a primary partition. Usually, after the initial installation of the operating system, unallocated free space is still available on the disk. This space can be used to create additional drives. On a basic disk, you can have either four primary partitions or three primary partitions and an extended partition. Step by Step 12.4 walks you through creating a primary partition on a basic disk.
Creating an Extended Partition on a Basic DiskIf you need to create more than four partitions on a basic disk, you must create an extended partition so that you can create logical drives inside it. Step by Step 12.5 walks you through creating an extended partition on a basic disk.
Creating a Logical Drive on a Basic DiskBy itself, an extended partition isn't worth much. However, within an extended partition, you can create a theoretically unlimited number of logical drives. Step by Step 12.6 outlines how to create a logical drive.
Deleting a PartitionDeleting a partition or logical drive is far easier than creating one. However, it is important to remember that when a partition or logical drive is deleted, the data that was on that drive or partition is gone. It cannot be recovered by any utility that is included with Windows Server 2003. Before deleting a partition or logical drive, always make sure you have a current backup! Note: Delete In the Proper Order You cannot delete an extended partition until all the logical drives inside it have been deleted. Step by Step 12.7 show you how to delete a partition or logical drive.
Windows Server 2003 is self-preserving in that it does not allow you to delete the system or boot partitions from within the Disk Management GUI. File Systems and Formatting a PartitionBefore you can store data on a drive, it has to be formatted with a file system. Two main file systems are recognized by Windows Server 2003: File Allocation Table (FAT16 and FAT32) and the NT File System (NTFS). Although other file systems are in use in Windows Server 2003, such as the Universal Disk Format (UDF) and the CD-ROM File System (CDFS), they are read-only file systems and do not truly support detailed access controls. For this reason, this sectionand the Microsoft examfocuses on the capabilities and features of the FAT and NT file systems. The File Allocation Table (FAT) File SystemThe FAT file system is recognized by Windows Server 2003 to provide legacy support for earlier Windows operating systems. Because FAT was originally designed to support disks that were much smaller than the devices in use today, it is not very efficient at handling large disks or files. Windows Server 2003 is able to read partitions formatted in two versions of FATthe 16-bit version (FAT16) supported by early versions of MS-DOS and the 32-bit version (FAT32) first introduced with Windows 95 OEM Service Release 2 (OSR2). The first version of the FAT file system, FAT12, used in the earliest versions of MS-DOS, is not supported in Windows Server 2003. Because FAT predates Windows NT and Windows 2000/2003/XP, it does not include support for extensive security or enhanced partition features such as compression. From a practical perspective, the biggest difference between FAT16 and FAT32 is the maximum supported partition size. This is achieved by doubling the size of the File Allocation Table from 16 bits to 32 bits. For FAT16 partitions, the maximum size is 4GB, even though most operating systems limit FAT16 to 2GB partitions. In theory, FAT32 partitions support a maximum size of 2,047GB. However, there is a 32GB limitation on creating FAT32 partitions in Windows 2003. The NT File System (NTFS)Introduced with the first versions of Windows NT, the NT File System (NTFS) is designed to provide a high-performance, secure file system for Windows NT Servers. Windows Server 2003 includes the same version of NTFS included with Windows 2000. Here are some of the benefits of NTFS over FAT:
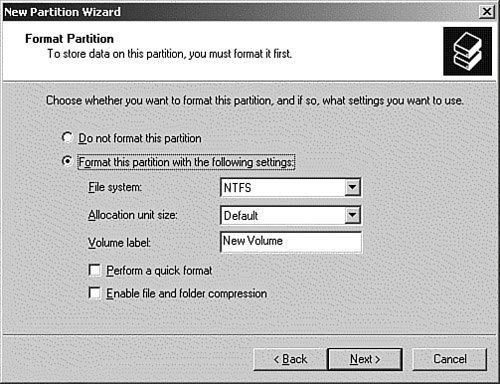
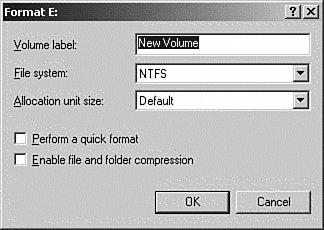
The selectivity of the NTFS compression settings allows administrators the ability to pick and choose whether specific file system objects are compressed. Although data compression reduces the drive space required on the volume, it puts a greater burden on the system's resources. A small amount of processing overhead is involved in compressing and uncompressing files during system operation. Providing the option to selectively compress entire volumes, folders, or individual files ensures that the drive space is used as efficiently as possible, while still maintaining timely file services. In an effort to provide the fastest file services available, NTFS uses smaller clusters and has been designed to require fewer disk reads to find a file on the volume. NTFS also supports significantly larger volumes than FATup to 16TB (terabytes) on a single volume. Perhaps more importantly, individual files, folders, and volumes can be secured at the user and group level. This is significantly more secure than FAT, which is limited to three very basic permission settings (and then only when the volume is accessed via shared folders): Read, Change, and Full Control. Securing folders and, when possible, files is discussed in greater detail in Chapter 4. Because NTFS offers such improvements over FAT, Microsoft (and just about anyone else you talk to) recommends that all Windows Server 2003 volumes be formatted with NTFS. However, there are some situations where this is not possible. For example, most multiple-boot configurations require a FAT file system on the boot partition. If you need to maintain a FAT volume on the server, it is important that you understand the security implications of the configuration. Exam Alert: Mutually Exclusive Remember that EFS and compression are mutually exclusive. Both EFS and compression are covered in Chapter 13. Formatting the Partition or Logical DriveAfter you decide which file system to use, you have to format your drives. During the initial installation of Windows Server 2003, the installation procedure formatted the installation drive for you. In addition, when manually creating a partition or logical drive, the wizard prompts you for the file type and then formats the drive for you. If you need to manually format a partition or logical drive, follow the procedure provided in Step by Step 12.8.
Remember, Windows Server 2003 is self-preserving in that it does not allow you to format the system or boot partitions from within the Disk Management GUI. Changing the Drive Letter of a PartitionIn Windows Server 2003, only the system and boot partitions are required to maintain specific drive letters. Any other drives can be assigned the letters CZ. Drive letters A and B are reserved for floppy drives; however, you can assign B to a network drive if you want. The only caveat is that if you have installed a program on a drive or if a program is looking for its data in a specific location, you might not be able to access it after you change the drive letter. This happens because many programs store their location in the Registry. When you change a drive letter, the program entries in the Registry aren't updated with the changes. If you want to rearrange drive letters, it should be done immediately after the initial installation of Windows Server 2003 and before you install any programs. Use the procedure outlined in Step by Step 12.9 to change drive letter assignments.
Using Mounted DrivesA feature of NTFS is the capability of mounting a partition or volume as a folder on an existing drive. This is especially useful on data drives. For example, suppose that your user data drive is rapidly running out of free space. You could always go out and buy a larger drive and then move all the files over to the new drive. However, by using a mounted drive, you can mount the new drive as a folder on the existing drive, thereby adding additional space to the existing drive. This saves you from having to move the user files. The end users won't see any difference because they still access everything via the same drive letter or share. Additionally, you can create a volume from free space on an existing drive and then mount that volume as a folder. Note: Mount Points In some of the Windows Server 2003 documentation, you might see Mounted Drives referred to as Mount Points. This was the terminology used in previous versions of Windows. Same technology, just a different name. An additional advantage of mounted drives is that they don't use a drive letter. As we mentioned earlier, there are only 24 letters available. You also are not limited to mounting other NTFS volumes. Other file systems can be mounted, such as a CD or DVD, or a FAT volume. You can mount multiple drives to a volume and move them to different folders, if needed. For example, when a mounted volume is moved, deleted, or dismounted, the files and folders on the volume are not deleted. This allows you to move the drive to a different folder or to another computer. Use the procedure outlined in Step by Step 12.10 to create a mounted drive.
Exam Alert: Mounted Drives A mounted drive can only be mounted to an empty folder. You will need to know this for the exam. Marking a Partition As ActiveWhen an Intel-based computer starts, it looks for the active partition to start the system. This can be either a primary partition on a basic disk or a simple volume on a dynamic disk. However, the simple volume must have previously been created and marked as the active partition before the disk was converted from basic to dynamic. Although the active partition can be changed on a basic disk, it cannot be changed on a dynamic disk. Follow the procedure outlined in Step by Step 12.11 to mark a primary partition as Active.
|
EAN: 2147483647
Pages: 219