Recovering from Disk Failures
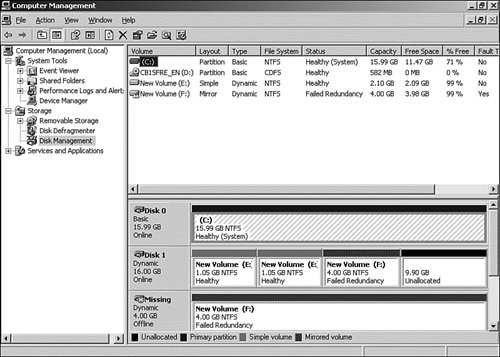
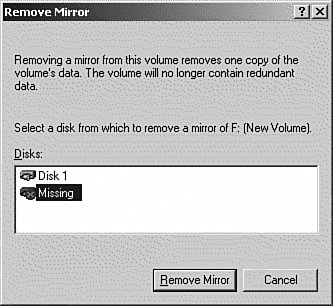
| Unfortunately, hard disks can and do fail. This alone is a very solid reason for ensuring that you have a well thought out and practiced disaster-recovery plan in place (see Chapter 17 for more information on using the Windows Backup utility). If your data was on a basic storage disk or a simple, spanned, or striped dynamic volume, you have no choice but to replace the disk and restore the data from the last backup. If you experience failure of a disk in a mirrored volume or a RAID-5 array, fault tolerance is in place and you can recover your data. Recovering a Failed Mirrored DriveIf one of the drives in a mirrored set happens to fail, you will be provided with a graphical indication in Disk Management. Fortunately, because mirrored volumes are fault tolerant, your server continues to operate normally, albeit with slower read performance. You can schedule your repairs at a convenient time. The process to repair the mirror depends on whether the disk that failed was part of a mirrored set that contained the system or boot partition. Note: Simulating an Error The error condition in this Step by Step can be simulated by unplugging one of your physical drives if you're using dedicated hardware. If you're using a virtual product such as VMWare or Virtual PC, you can delete or disable one of your virtual drives. If the failed disk did not contain the system or boot partition (only data), you can restore the mirror by following the procedure outlined in Step by Step 12.20.
If the mirrored volume that contains the boot or system partition fails and it's the primary drive that has failed, you most likely will not be able to boot your server. This is because the BOOT.INI file is still configured to look for that drive. This will not affect the operation of your server because the server is able to access the files it needs to continue running from the other half of the mirror. However, unless you have hot-swap drives and can replace the failed disk without shutting down the server, eventually you will need to power down, replace the failed disk, and then restart the server. The easiest way to reboot and repair the server is to create a Windows Server 2003 boot floppy that contains the system files and a copy of the BOOT.INI file that points to the secondary disk in the mirrored set. Technically speaking, the floppy you are creating is not really a boot floppy because it doesn't contain the operating system. Earlier in the chapter we discussed the Windows Server 2003 boot process. When the server is started, it looks for the files in the Windows Server 2003 system partition. We will re-create the system partition on a floppy disk and edit the BOOT.INI file to point to the operating system files that are on the surviving secondary mirrored volume. If the failed disk contained the system or boot partition, you can restore the mirror by following the procedure outlined in Step by Step 12.21.
Recovering a Failed RAID-5 DriveRecovering from a disk failure in a RAID-5 array is a fairly simple process thanks to the fault tolerance provided by the array. Remember that RAID-5 arrays can provide fault tolerance for only one failed disk, so be sure to replace the failed disk as soon as possible. While the disk is failed and not replaced, you can still use the RAID-5 array; however, I/O performance will be severely degraded because the missing data must be re-created from the parity information. Again, you should replace a failed disk in a RAID-5 array as soon as you can by performing the procedure outlined in Step by Step 12.22.
Importing Foreign DisksDynamic disks can be moved from any Windows 2000 computer or later to Windows Server 2003. When a dynamic disk is moved from one computer to another, it is marked as a Foreign Disk. This is because it's not a member of the disk group on the receiving computer. Before the disk can be used, it must join the disk group on the new computer by importing it. After the disk is imported, you can access any volumes that are on it. Importing a foreign disk can be accomplished by using the diskpart utility or via the Disk Manager MMC. When moving a single disk, or the entire disk group to another computer, the process is fairly straightforward. Just right-click the entry for the foreign disk in the Disk Manager MMC and click Import. Note: Rescan Disks It is imperative that you rescan disks after you move hard disks between computers. When Disk Management rescans disk properties, it scans all attached disks for changes to the disk configuration. It also updates information about removable media, CD-ROM drives, basic volumes, file systems, and drive letters. Without a rescan, your new disks probably won't be recognized. However, the situation becomes more complicated when fault tolerant or nonredundant volumes that span multiple disks are moved. For example, if you move one volume of a mirror, and then move the other volume at a later date, they will both appear to be in synch, but in reality they could possibly have different contents. A second example is if you move one of the volumes of a RAID-0 array. This volume will appear as disabled, even after you attempt to import it. It can be brought back online after you move the remaining volumes over, or you can just delete it and reuse it. |
EAN: 2147483647
Pages: 219
- Chapter V Consumer Complaint Behavior in the Online Environment
- Chapter IX Extrinsic Plus Intrinsic Human Factors Influencing the Web Usage
- Chapter XII Web Design and E-Commerce
- Chapter XIII Shopping Agent Web Sites: A Comparative Shopping Environment
- Chapter XVI Turning Web Surfers into Loyal Customers: Cognitive Lock-In Through Interface Design and Web Site Usability