Lesson 1: Preparation of Exchange Server Environments
The actual upgrade from Exchange Server 5.5 is relatively easy compared to the various prerequisites that must be met. Directory synchronization between Active Directory and the Exchange directory is important for several reasons. For instance, you need to extend Active Directory with Exchange-specific items and build a common global address list across all platforms.
This lesson focuses on the task of preparing an Exchange Server organization for an upgrade, including installation of Windows 2000 Server and configuration of Active Directory. You will use the Active Directory Connector (ADC) to populate and synchronize user accounts with mailbox information.
At the end of this lesson, you will be able to:
- Identify important aspects of upgrading a primary domain controller (PDC) running Exchange Server 5.5 to Windows 2000 Server and Active Directory.
- Install the ADC and configure user connection agreements for two-way directory synchronization.
Estimated time to complete this lesson: 3 hours
Preparing the Windows Environment
Exchange Server 5.5 is typically used in a Windows NT 4.0 domain environment—Exchange 2000 Server is strictly a Windows 2000 platform. Hence, your preparation requires an upgrade to Windows 2000 Server and Active Directory first. You must deploy Active Directory in your environment if you are planning to install Exchange 2000 Server.
Upgrading the Primary Domain Controller
To avoid the installation of separate Windows 2000 domains, consider upgrading the PDC(s) in your domain environment directly. This is probably the easiest upgrade method because it preserves all account information, including the original security identifiers (SIDs). A SID is a value that uniquely identifies a user account and is used by Windows 2000 to determine access permissions. However, upgrading the PDC involves an additional configuration step if your PDC also runs Exchange Server (see Exercise 1).
Site Services Account Upgrade
Exchange 2000 Server is unable to work with Windows NT 4.0-based security information. This includes the Site Services account used to communicate with previous Exchange Server versions. Because Exchange 2000 Server needs to use the Site Services account, you must first upgrade the PDC of the domain in which this special account exists. During this upgrade, the Site Services account is converted into a Windows 2000 security principal. You can read more about Site Services account dependencies later in this chapter.
NOTE
You don't need to upgrade your entire Windows NT 4.0 environment to Windows 2000 to upgrade to Exchange 2000 Server. However, it is a good idea to upgrade at least the PDCs of all your user domains.
Active Directory Migration Tool
Apart from upgrading existing domains to Windows 2000 Server, you have the option of installing Windows 2000 in separate domains and using the Active Directory Migration Tool to clone the existing security information. Cloned accounts are specific Windows 2000 accounts for which properties and group memberships have been copied from corresponding Windows NT 4.0 source accounts. Although the account objects have a different primary SID than their source accounts, each source account's SID is copied to the SIDHistory attribute of the corresponding clone. Through the old SID preserved in the SIDHistory attribute, the Windows 2000 user can access all network resources available to the source account—provided that trusts exist between the Windows NT domains and the clone's Active Directory domain.
The Active Directory Migration Tool is appropriate for complex Windows NT environments consisting of multiple Windows NT 4.0 domains because it allows consolidation of the domain environment. You can read more about this tool in Planning Migration from Microsoft Windows NT to Microsoft Windows 2000, which is available in the online documentation for Windows 2000 Server.
Avoiding LDAP Port Conflicts
When upgrading PDCs or backup domain controllers (BDCs) running Exchange Server 5.5, you need to change the Lightweight Directory Access Protocol (LDAP) port number for the Exchange directory service. The legacy Exchange directory supports LDAP and so does Active Directory. Hence, both expect incoming LDAP connections on TCP port 389, LDAP's well-known TCP port, by default. On an Active Directory domain controller, such as an upgraded PDC, Active Directory is started automatically and locks TCP port 389 for its own use. When Exchange Server starts, it cannot access the same port and cannot communicate via LDAP until you change the LDAP port for the Exchange directory to a port other than 389 (see Figure 6.1).
NOTE
Microsoft recommends changing the LDAP port for the Exchange directory service prior to upgrading to Windows 2000 and Active Directory.
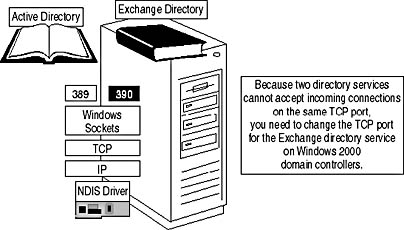
Figure 6.1 Active Directory and Exchange directory on a domain controller

Exercise 1: Changing the LDAP Port for Exchange Server
In this exercise you will change the LDAP port for the Exchange directory service using the Exchange Administrator program. This is a prerequisite for subsequent exercises in this chapter.

To view a multimedia demonstration that displays how to perform this procedure, run the EX1CH6.AVI files from the \Exercise_Information\Chapter6 folder on the Supplemental Course Materials CD.
Prerequisites
- BLUESKY-PDC is configured as the PDC and BLUESKY-BDC functions as a BDC in a single Windows NT 4.0 domain called BLUESKY-OLD-10. Both servers run Exchange Server 5.5 with Service Pack 3.
- Log on as Administrator to BLUESKY-PDC.
To change the LDAP port for Exchange Server
- Start Microsoft Exchange Administrator from the Microsoft Exchange program group.
- Connect to the server BLUESKY-PDC. If required, select Connect To Server from the File menu to display the Connect To Server dialog box, type BLUESKY-PDC, and click OK. The Connect To Server dialog box may also appear automatically when you start the Exchange Administrator program.
- Expand the site container (BLUESKY-OLD-10), then the Configuration container, and then select the Protocols container to display its contents in the right pane.
- Double-click the LDAP (Directory) Site Defaults object. In the General tab, change the port number to 390, and then click OK.
At this point, you have configured the Exchange directory service to use TCP port 390 (see Figure 6.2).
- Close Microsoft Exchange Administrator and reboot BLUESKY-PDC to activate the changes.
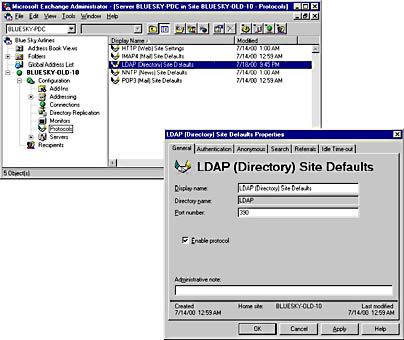
Figure 6.2 Changing the LDAP port number for the Exchange directory
Exercise Summary
To prevent port conflicts when running Exchange 2000 Server on a domain controller, change the TCP port number for the LDAP interface of the Exchange directory service. Be cautious, however, not to specify a TCP port in use by another service. A list of well-known ports can be found in the SERVICES file in the \Winnt\System32\Drivers\Etc directory.
Upgrading the Operating System
Exchange 2000 Server can only be installed on a computer running Windows 2000 Server, Windows Advanced Server, or Windows Datacenter Server updated with Windows 2000 Service Pack 1. Furthermore, the server must be a member of an Active Directory domain. If you are planning to directly upgrade an existing computer from Exchange Server 5.5, you need to upgrade its operating system first.
Mixed Domain Environments
Active Directory supports mixed networks containing computers running Windows NT Server 4.0 and Windows 2000 Server, so you don't need to upgrade all operating systems at once before installing Exchange 2000 Server. Upgrade the PDC first and then the computers running Exchange Server 5.5 one at a time. If the Exchange servers are operating as BDCs, change the LDAP port number for the Exchange directory as previously outlined prior to the upgrade. If your domain also contains member servers running Exchange Server 5.5, upgrade them after the BDCs have been upgraded.
Exercise 2: Upgrading to Windows 2000 Server
In this exercise you will upgrade the PDC of your test environment to Windows 2000 Server. This will preserve all existing accounts, including the Site Services account for Exchange Server.
To view a multimedia demonstration that displays how to perform this procedure, run the EX2CH6*.AVI files from the \Exercise_Information\Chapter6 folder on the Supplemental Course Materials CD.
Prerequisites
- Complete Exercise 1, earlier in this lesson.
- Log on as Administrator to BLUESKY-PDC.
- Insert the Windows 2000 Server or Advanced Server installation CD into the CD drive of BLUESKY-PDC. You will also need the Windows 2000 Service Pack CD to update the installation later on.
To upgrade to Windows 2000 Server
- Launch Setup from the installation CD and, in the Microsoft Windows 2000 Server CD dialog box asking you whether you want to upgrade to Windows 2000, click Yes.
- The Windows 2000 Setup Wizard will start, showing the Welcome screen. Make sure Upgrade To Windows 2000 (Recommended) is selected before you click Next.
- On the License Agreement wizard screen, select I Accept This Agreement, and then click Next.
- On the Your Product Key wizard screen, enter the product key of your Windows 2000 CD, and then click Next.
- On the Directory Of Applications For Windows 2000 wizard screen, click Next to continue without displaying further information.
At this point, Setup copies important files to the computer's hard disk and reboots the computer (see Figure 6.3).
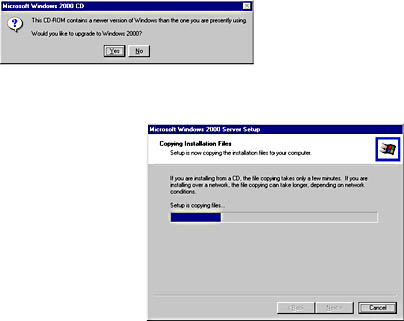
Figure 6.3 Starting the Windows upgrade process
- BLUESKY-PDC will be rebooted automatically. To continue the upgrade process, make sure Microsoft Windows 2000 Server Setup, on the Boot menu, is the active option.
- After copying files and saving the current configuration, Setup will reboot the server computer a second time to launch Windows 2000 in graphical mode.
- Setup now detects and installs devices on your computer; automatically installs network and other software, registers, and components; removes temporary files; and finalizes the upgrade before it reboots the server one more time.
- Setup will log on to Windows 2000 automatically to launch the Active Directory Installation Wizard. You must install Active Directory because you are upgrading the PDC.
- On the Welcome wizard screen, click Next.
- On the Create Tree Or Child Domain wizard screen, select Create A New Domain Tree, then click Next.
- In the Create Or Join Forest dialog box, make sure Create A New Forest Of Domain Trees is selected, and then click Next.
- On the New Domain Name wizard screen, type the domain name BlueSky-Old-10.com, and then click Next.
- On the Database And Log Locations wizard screen, accept the defaults, and click Next.
- On the Shared System Volume wizard screen, accept the defaults, and click Next.
- An Active Directory Installation Wizard dialog box will appear informing you that a DNS Server could not be contacted. Click OK, and then, on the Configure DNS wizard screen, accept the Yes, Install And Configure DNS On This Computer (Recommended) option by clicking on Next.
- On the Permissions wizard screen, make sure Permissions Compatible With Pre-Windows 2000 Servers is selected, and then click Next.
- On the Directory Services Restore Mode Administrator Password wizard screen, under Password and Confirm Password, type password, and then click Next.
- On the Summary wizard screen, verify that the settings are correct, and then click Next to begin the configuration of Active Directory.
At this point, you have successfully configured the Active Directory environment hosting an Exchange Server 5.5 organization (see Figure 6.4).
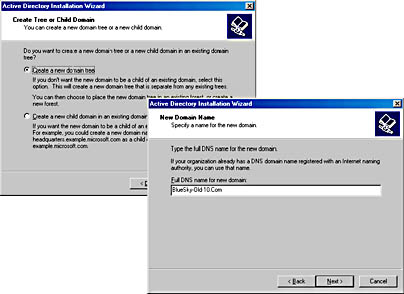
Figure 6.4 Running the Active Directory Installation Wizard
- On the Completing The Active Directory Installation Wizard screen, click Finish.
- In the Active Directory Installation Wizard dialog box, click Restart Now.
- Log on again to BLUESKY-PDC, now running Windows 2000 Server, as Administrator. In the Windows 2000 Configure Your Server window that appears automatically, deselect the Show This Screen At Startup, and then close the window.
- Insert the Windows 2000 Service Pack 1 CD in the CD-ROM drive, and then click the Start button, point to Run, type E:\i386\Update\UPDATE.EXE, and then click OK.
- In the Windows 2000 Service Pack Setup dialog box, select the Accept The License Agreement (Must Accept Before Installing The Service Pack) check box, and then click Install.
- In the final Windows 2000 Service Pack Setup dialog box, click Restart to reboot the system and complete the update.
Exercise Summary
As soon as the Active Directory environment is configured, both domain controllers BLUESKY-PDC and BLUESKY-BDC are listed in the domain controllers organizational unit (OU). Because the domain environment operates in mixed mode, BDCs (BLUESKY-BDC) can fully participate and the Exchange Server organization functions as normal. It is only during the upgrade, when Active Directory is not yet configured, that Exchange Server services are unable to start.
Configuring the Active Directory Connector
To ensure a common global address list for all users, whether they still reside on Exchange Server 5.5 or are migrated to Exchange 2000 Server, you need to synchronize the directories with each other. To enable directory synchronization, install the Active Directory Connector (ADC) and configure user connection agreements. Connection agreements can replicate recipient and public folder information between Exchange Server 5.5 and the Global Catalog.
NOTE
The Active Directory Connector of Exchange 2000 Server requires Exchange Server 5.5 Service Pack 3. Consequently, you need to update at least one server in each site to Exchange Server 5.5 SP3 to achieve complete system integration.
Windows 2000 Versus Exchange 2000 Server
To support Exchange Server 5.5, Windows 2000 provides a basic ADC version. The ADC of Exchange 2000 Server, alternatively, comes with enhanced functionality for replicating configuration and routing information. The Exchange 2000 version updates the Active Directory schema on its first installation. Because this schema extension is a prerequisite for upgrading to Exchange 2000 Server, you must install at least one instance of the Exchange 2000 ADC in your Active Directory forest as part of your upgrade preparation.
TIP
For best performance, upgrade all ADC installations to the version that comes with Exchange 2000 Server.
Synchronizing Directory Information
As soon as the Windows NT user accounts are migrated to Active Directory, you need to synchronize the accounts with their corresponding mailbox information using an ADC connection agreement. Directory synchronization is performed between the Global Catalog and the Exchange directory service (see Figure 6.5). Typically, the Global Catalog is the first server installed in the forest. It is a good idea to assign this role to one server in each Windows 2000 domain. Yet even if you do not plan to deploy ADC in all of your domains, you need to extend the domain where the schema master resides using the ADC Setup program with the /schemaonly switch. As mentioned earlier, the Active Directory schema must be extended to support additional Exchange 2000-related object classes and attributes. As soon as this is accomplished, you can deploy ADC in child domains.

Figure 6.5 Directory synchronization via ADC and a connection agreement
Automatic Account Creation
In Exchange Server 5.5 it is possible to specify one Windows NT account as the primary Windows account for multiple mailboxes. In Exchange 2000 Server, account and mailbox information are part of the same Active Directory object; hence, each Windows 2000 account can have only one mailbox directly associated with it. To synchronize the information from additional mailboxes with Active Directory, additional account objects must be created in Active Directory. The ADC is also able to create Windows accounts for mailbox objects where a corresponding Active Directory object could not be found.
You can control the automatic creation of Active Directory accounts via the Advanced tab of each connection agreement. By default, disabled Windows user accounts are created, but you may change this behavior to create enabled accounts or Windows contacts by selecting the appropriate option from the When Replicating A Mailbox Whose Primary Windows Account Does Not Exist In The Domain check box.
Exercise 3: Installing and Configuring the ADC
In this exercise you will synchronize Active Directory with the Exchange directory using the ADC and a connection agreement. To prepare for an upgrade to Exchange 2000 Server, install and configure the ADC, which can be found on the Exchange 2000 Server installation CD.
To view a multimedia demonstration that displays how to perform this procedure, run the EX3CH6*.AVI files from the \Exercise_Information\Chapter6 folder on the Supplemental Course Materials CD.
Prerequisites
- Complete Exercise 2, earlier in this lesson.
- Log on as Administrator to BLUESKY-PDC.
- Insert the Exchange 2000 Server installation CD into the CD drive of BLUESKY-PDC. You can use the Standard or Enterprise edition to perform the procedure.
To install and configure the ADC
- Click Start, select Run, and, in the Run dialog box, click Browse to display the Browse dialog box.
- From the Exchange 2000 Server CD, from the directory \ADC\i386, select the Setup executable file, and then click Open.
- In the Run dialog box, click OK to launch the Microsoft Active Directory Connector Setup Wizard. On the Welcome screen, click Next.
- On the Component Selection wizard screen, activate the Microsoft Active Directory Connector Service Component and Microsoft Active Directory Connector Management Components check boxes, and then click Next.
- On the Install Location wizard screen, accept the default folder, which is C:\Program Files\Msadc, and then click Next.
- On the Service Account wizard screen, specify the services account of your Exchange Server 5.5 services, which should be BLUESKY-OLD-10\Administrator. Enter the corresponding password under Account Password, and then click Next to start the installation process.
At this point, you have successfully installed the ADC on BLUESKY-PDC and updated the directory schema (see Figure 6.6).
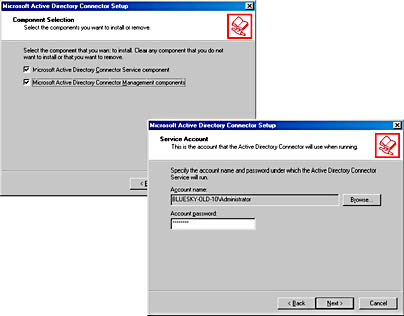
Figure 6.6 Installing the ADC
- On the Completing The Active Directory Connector Installation wizard screen, click Finish.
- From the Microsoft Exchange program group, start the Active Directory Connector tool.
- From the console tree, select Active Directory Connector (BLUESKY-PDC), then right-click on it. In the shortcut menu point to New, and then select Recipient Connection Agreement.
- In the General tab, under Name, type CA for Blue Sky Airlines.
- Under Replication Direction, select Two-way. In the Microsoft Active Directory Connector Management dialog box informing you that the certification authority (CA) must now write to the Exchange directory, which requires a service account with appropriate permissions, click OK.
- Switch to the Connections tab, verify that BLUESKY-PDC is listed under Windows Server Information and that the Authentication mechanism is Windows Challenge/Response.
- Under Connect As, click Modify. In the Connect As (Windows Server) dialog box, under Connect As, click Browse to select the BLUESKY-OLD-10\ Administrator account. Under Password, type password, and then click OK.
- Under Exchange Server Information, in the Server text box, type BLUESKY-PDC. Under Port, change the port number to 390, which is the LDAP port specified earlier for the Exchange directory.
- Under Connect As, click Modify. In the Connect As (Exchange Server) dialog box, under Connect As, click Browse to select the BLUESKY-OLD-10\ Administrator account. Under Password, type password. Verify that the property sheet is now configured as shown in Figure 6.7.
- Switch to the Schedule tab and select Always for the replication schedule. Select the Replicate The Entire Directory The Next Time The Agreement Is Run check box.
- Switch to the From Exchange tab, and click Add to choose a recipient container to take updates from.
- In the Choose A Container dialog box, expand BLUESKY-OLD-10, select Recipients, and then click OK.
- Under Default Destination, click Modify. In the Choose A Container dialog box, select Users, and then click OK.
- Switch to the From Windows tab, and click Add to specify an OU to take updates from.
- In the Choose A Container dialog box, select Users, and then click OK.
- Under Default Destination, click Modify. In the Choose A Container dialog box, select Recipients, and then click OK.
- Select the Replicate Secured Active Directory Objects To The Exchange Directory check box.
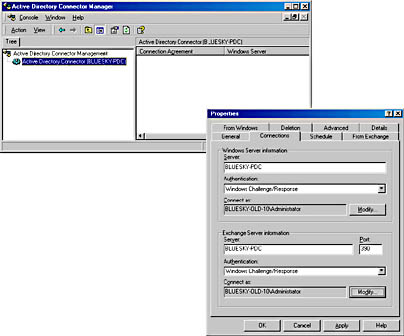
Figure 6.7 Configuring a connection agreement
- Leave all other settings at their defaults, and click OK.
- In the Microsoft Active Directory Connector Management dialog box that appears to inform you that this is the first intra-organizational Connection Agreement, click OK.
- In the Microsoft Active Directory Connector Management dialog box that appears to inform you that your Windows domain operates in mixed mode, click Yes.
- In the Microsoft Active Directory Connector Management dialog box that appears to inform you that security groups have been created for Exchange 2000 Server, click OK.
- Close the Active Directory Connector Management console.
Exercise Summary
After you have successfully configured the connection agreement, recipient information is replicated between Active Directory and the Exchange Server organization. According to the default configuration, the ADC creates disabled Windows 2000 accounts for all Exchange Server 5.5 mailboxes that do not have a matching Active Directory object. You can find these disabled accounts in the OU that you have specified in your connection agreement, such as the Users OU.
EAN: N/A
Pages: 186