Lesson 1: Exchange 2000 Server Security
No computer system is ever completely secure. However, a mail host connected to the Internet has to cope with different threats than a workstation isolated in a private network. Accordingly, you will have to identify a realistic level of security that provides the services your users require. Windows 2000 and Exchange 2000 Server cover the basic security needs and advanced requirements.
This lesson discusses how Exchange 2000 Server integrates with the security architecture of Windows 2000 Server. Fundamental security aspects are covered in the context of working with mailboxes and public folders using Messaging Application Programming Interface (MAPI)-based and Internet-based clients.
At the end of this lesson, you will be able to:
- Control access to resources.
- Separate your internal network from the Internet.
- Describe advanced technologies for signing and sealing of e-mail messages.
Estimated time to complete this lesson: 75 minutes
Controlling Access to Exchange 2000 Resources
All Active Directory objects support a standard set of access rights. Exchange 2000 Server extends Active Directory during the installation of the first server in the forest and implements additional permissions.
Access Control in Windows 2000
Each Active Directory object possesses its own security descriptor, which contains, among other things, information about the object's owner and a discretionary access control list (DACL). The DACL holds a list of access control entries (ACEs), which grant or deny a set of permissions to security principals, such as reading and writing object properties, or creating and deleting child objects. Security principals, in turn, are referenced by security identifiers (SIDs) and typically correspond to user accounts and security groups. Usually, you don't have to work with SIDs directly. If you are interested in a SID example, launch Registry Editor, and open the HKEY_USERS hive. Most likely, you will be able to find a SID that ends with 500, which refers to the built-in Administrator account (for example, S-1-5-21-606747145-152049171-1708537768-500).
When you successfully log on to Windows 2000 Server, the operating system authenticates your user account and password and creates an access token that contains your SID, the SIDs of any groups to which you belong, and information about your user rights (logon rights and other privileges). User rights pertain to the entire computer rather than a particular system object. Objects are protected through their security descriptors, so you can access an object only if its security descriptor grants the necessary access rights to one or a combination of multiple SIDs in your access token. For instance, if you are granted Read permissions for a particular Active Directory object and you are a member of a group, such as Enterprise Admins, that has the Full Control permission for this object, you are allowed Full Control permission. Because the access token is valid for the lifetime of your session, you only need to log on to your domain once to get seamless access to all resources. This also means you have to log off and on again for changes to group memberships for your account to take effect.
Extended Permissions for Exchange 2000 Server
Exchange 2000 configuration objects as well as Information Store service resources must be protected in a way not supported by standard access rights. To give an example, the Exchange-specific Modify Public Folder Replica List permission applies to information store objects and is only relevant in the context of public folder administration (see Chapter 18, "Public Folder Replication"). You can view and set both standard and extended permissions in the Security tab for most of the objects that are displayed in Exchange System Manager. If required, you may add the ShowSecurityPage value to the Registry to enable the Security tab for all objects, as demonstrated in Exercise 2 of Chapter 5, "Installing Microsoft Exchange 2000 Server."
Exchange 2000 Server adds a number of security objects, each representing an extended right, to the Extended Rights container of the Configuration naming context. These extended rights are replicated across the entire forest. Hence, Exchange 2000 Server is always able to perform required access checks. For example, you may grant another user account the mailbox right Full Mailbox Access to your mailbox-enabled user account (via the Exchange Advanced tab's Mailbox Rights button), and Exchange 2000 Server will determine that this user is allowed to work with your mailbox in Microsoft Outlook 2000.
NOTE
Independent of Windows 2000 auditing settings, the Information Store service will log a security event (Event ID 1016) in the application event log when a user using an account other than the primary account logs on to a mailbox.
Access to the Configuration
Enterprise Admins are automatically administrators for the entire Exchange 2000 organization. Full Control permissions are inherited from the top-level Configuration container to all child objects in the Active Directory Configuration naming context. The organization's configuration information is stored in this location. You can use ADSI Edit to view the entire contents of the Configuration naming context (see Figure 19.1). ADSI stands for Active Directory Services Interface.
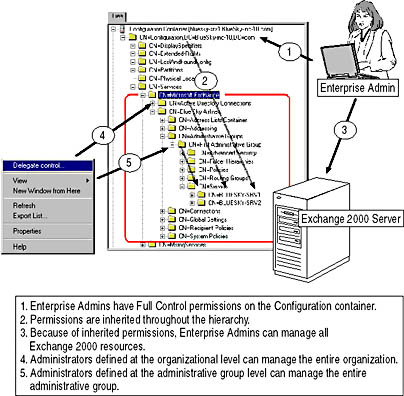
Figure 19.1 Exchange 2000 Server in the Configuration naming context
Windows 2000 Active Directory relies heavily on the concept of inheritance to simplify the task of permission management. Permissions defined for parent objects are applied consistently to all child objects. Without inheritance, you would have to apply permissions to all child objects manually, which could be a puzzling and error-prone undertaking. However, you have the option to block inheritance, if desired, in an object's Security tab, by deselecting the Allow Inheritable Permissions From Parent To Propagate To This Object check box.
Permissions are required at several different objects to gain the desired level of access. For example, administrators of administrative groups require the Read permission at the organization level as well; otherwise, they are unable to display the organization in Exchange System Manager. Therefore, to assign permissions to administrators at the organization or administrative group level properly, always use the Exchange Administration Delegation Wizard from within Exchange System Manager. Likewise, it is good practice to create security groups, delegate administrative permissions to these groups, and manage Exchange administrators through group memberships.
The following roles apply to organizational administrators at the administrative group level:
- Exchange View Only Administrator. Includes Exchange View Only Administrator permissions at the administrative group level.
- Exchange Administrator. Includes Exchange Administrator and Exchange View Only Administrator permissions at the administrative group level.
- Exchange Full Administrator. Includes Exchange Full Administrator permissions at the administrative group level.
NOTE
During the installation of Exchange 2000 Server, two groups called Exchange Domain Servers and Exchange Enterprise Servers will be created. All Exchange 2000 server accounts from your domain must be members of the Exchange Domain Servers group, which in turn is a member of Exchange Enterprise Servers. Members of these groups are allowed to perform advanced system tasks, such as mail transfer and directory synchronization.
Access to Mailbox Settings
Security settings for mailbox access are maintained through mailbox-enabled user accounts, which are managed in organizational units (OUs) in the Active Directory Domain naming context. The Information Store handles the corresponding mailbox resources and checks the security settings in Active Directory before allowing a particular user access to a mailbox. Hence, if you want to mailbox-enable user accounts, you need the appropriate permissions in both the OU, where the user accounts are located, and in the mailbox store, where you want to create the mailboxes. The management of mailbox-enabled user accounts was covered in Chapter 13, "Creating and Managing Recipients."
TIP
You should use the Delegation Of Control Wizard in Active Directory Users and Computers to assign administrative permissions to OUs. Use the Exchange Administration Delegation Wizard to grant mailbox administrators the required administrative permissions for organization or administrative groups. For mailbox management, the minimum rights of an Exchange View Only Administrator are required in the Administrative Group where the target Exchange 2000 servers exist.
Access Control Through NTFS Permissions
Access control to file objects on an NT file system (NTFS) partition relies on the same concepts as access control to Active Directory or information store objects. All Exchange 2000-related files should be placed on NTFS partitions, and NTFS permissions should be specified to make sure only authorized administrators and system accounts have access to sensitive data, such as databases and transaction log files. Although somewhat difficult, it is possible to read unencrypted messages within transaction logs of a mailbox store using Notepad. Fortunately, database files are not shared for general network access. You can read more about the maintenance of information store databases in Chapter 20, "Microsoft Exchange 2000 Server Maintenance and Troubleshooting."
TIP
To avoid performance losses, do not compress or encrypt the NTFS directories and database files of Exchange 2000 Server.
Access Control Through File Share Permissions
Only a few directories are shared for network access during the installation of Exchange 2000 Server, as outlined in Chapter 4, "Planning the Microsoft Exchange 2000 Server Installation." Carefully review the accounts with permissions and remove the Everyone group, if possible. Without granted permissions, users cannot access the resource. This is especially important if you have enabled message tracking (covered in detail in Chapter 20, "Microsoft Exchange 2000 Server Maintenance and Troubleshooting"). Message tracking logs are stored in the \Program Files\Exchsrvr\<servername>.log directory (that is, \ProgramFiles\ Exchsrvr\BLUESKY-SRV1.LOG), which is shared on all Exchange 2000 servers as <SERVERNAME>.LOG for everyone in the domain, by default. The logs contain information about message recipients, sizes, senders, delivery times, and possibly message subjects. You may manually restrict access to this share by removing the Everyone group and granting Exchange 2000 administrators explicit permissions. It is not advisable to modify or remove existing system entries.
Denying Permissions
You may want to explicitly deny accounts specific permissions, but you should be very careful, especially if you intend to deny access to special accounts such as the Everyone group. Denied permissions cannot be regranted, but if server services are denied access to their resources, Exchange 2000 Server cannot function properly. In fact, you may irreversibly damage your server installation.
Access to a resource is evaluated until the following occur:
- An ACE in the DACL denies the requested permissions. ACEs that deny permissions are listed first in the DACL and therefore override all other permissions.
- One or many ACEs together grant the requested permissions.
- The end of the DACL is reached with only a subset or no permissions granted.
Exchange Administration Delegation Wizard and Permission Denials
The Exchange Administration Delegation Wizard grants Read and View Information Store permissions to Exchange View-Only Administrators, but this wizard does not deny any rights. In other words, if you delegate View-Only permissions to a member of the Enterprise Admins group, all inherited permissions remain effective and the Enterprise Admin can continue to manage the entire organization without restrictions. To deny individual permissions, you need to use the Security tab provided with most configuration objects.
NOTE
You can enable the Security tab for all objects by adding a DWORD value called ShowSecurityPage to the following Registry location: HKEY_CURRENT_USER\ Software\Microsoft\ Exchange\ExAdmin. Set this value to 1, as demonstrated in Exercise 2 of Chapter 5, "Installing Microsoft Exchange 2000 Server."
Auditing and Protocol Logging
The Windows 2000 security architecture has two major purposes. It allows you to protect access to system resources, and it enables you to monitor this access. Auditing can be used to track user activities, such as logon attempts, system shutdowns or restarts, how individual users are working with mailboxes, and so on.
System Access Control List
Object security descriptors contain a DACL, and they may also hold a security access control list (SACL). Similar to the DACL, the SACL contains ACEs, which specify auditing directives, not user permissions. ACEs in SACLs reference SIDs and the type of access to be monitored. For example, you may specify that all access to the configuration of the Exchange 2000 organization should be audited for Enterprise Admins, whether or not the access was successful. In this case, when an Enterprise Admin views or changes the configuration, an event is written to the security event log on the server. You can examine events interactively using the Event Viewer that was introduced in Chapter 12, "Management Tools for Microsoft Exchange 2000 Server."
Enabling Security Auditing
Before any security-related events are written to the security event log, auditing must be turned on using Windows 2000 Security Tools, such as Group Policy or Domain Controller Security Policy. You will find various categories for which you can enable success and failure audits under /Computer Configuration/ Windows Settings/Local Policies/Auditing Policies (Group Policy) or Security Settings/Local Policies/Auditing Policies (Domain Controller Security Policy). Failure audits can help to reveal break-in attempts that rely on password-guessing methods (also known as brute-force attacks, in which all possible password combinations are tried until a password is discovered). You can find detailed information about Windows 2000 Security Tools in the Windows 2000 product documentation.
Auditing and System Performance
Auditing degrades the performance of your server. Depending on the number of users and other factors, system components, such as Active Directory and the Information Store service, may write a large number of events into the security event log. Activate security auditing carefully and only in situations when you suspect critical activities in your environment. Security logs are unsuitable for performance reports or statistics. For these purposes, use the Performance utility mentioned in Chapter 12, "Management Tools for Microsoft Exchange 2000 Server."
Internet Protocol Logging
Internet Information Services (IIS) support protocol logging. According to the specified logging level, you can track commands and responses as well as user data sent to or from a virtual server. For each conversation, you can examine the client's IP address, the client's domain name, the date and time, and the message content exchanged between the local and the remote system. This may allow you to detect whether outsiders are attacking your server (for example, denial-of-service attacks). Protocol logging is also an excellent troubleshooting utility.
For Simple Mail Transfer Protocol (SMTP) and Network News Transfer Protocol (NNTP) virtual servers, you can enable protocol logging in the virtual server's General tab in Exchange System Manager (see Chapter 11, "Internet-Based Clients"). For HTTP virtual servers, this is done using Internet Services Manager. However, IMAP4 and POP3 virtual servers do not provide this convenience. You need to use Registry Editor to set the required values under the following subkeys:
HKEY_LOCAL_MACHINE \System \CurrentControlSet \Services \POP3Svc or \IMAP4Svc \Parameters
The two important values for POP3 virtual servers are POP3 Protocol Log Path and POP3 Protocol Log Level. Values that refer to the IMAP4 protocol are called IMAP4 Protocol Log Path and IMAP4 Protocol Log Level. The first value points to the directory where the logging files will be created (file names have the format L0000001.LOG). The logging level, in turn, specifies the logged protocol details. Legal values are from 0 for no logging through 5 for most details. Be aware that whenever you modify these settings using the Microsoft Windows NT Registry Editor, you must restart the services for the new parameters to take effect.

Exercise 1: Enabling Security Auditing
In this exercise you will enable and test Windows 2000 security auditing using the Domain Controller Security Policy snap-in. BLUESKY-SRV1 and BLUESKY-SRV2 are configured as domain controllers.

To view a multimedia demonstration that displays how to perform this procedure, run the EX1CH19.AVI files from the \Exercise_Information\Chapter19 folder on the Supplemental Course Materials CD.
Prerequisites
- Restart BLUESKY-SRV1, and log on as Administrator.
To enable security auditing for unsuccessful attempts to access server resources
- Launch Domain Controller Security Policy from the Administrative Tools program group.
- In the Domain Controller Security Policy window, under Security Settings, expand Local Policies, and then select Audit Policy.
- In the details pane, double-click Audit Account Logon Events. In the Security Policy Setting dialog box, make sure the Define These Policy Settings check box is selected, select the Success and Failure check boxes, and then click OK. Repeat this step for all other audit categories (see Figure 19.2).
- Give the system a minute to propagate the changes, then launch Exchange System Manager, expand Administrative Groups and First Administrative Group, then Servers, right-click BLUESKY-SRV1, and select Properties.
- Click on the Security tab, click Advanced, click on the Auditing tab, select the entry for the Everyone group, and then click View/Edit.
- Notice that several settings have already been enabled because they are inherited from parent containers. Under Successful and Failed, select the Full Control check boxes. Notice that all other check boxes are automatically selected.
- Click OK three times to close all dialog boxes.
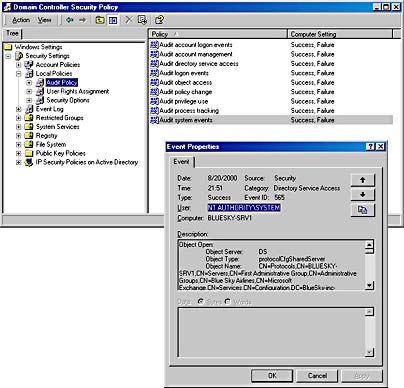
Figure 19.2 Enabling security auditing
- Right-click BLUESKY-SRV1 again, select Properties, click Details, and, under Administrative Note, type Security Auditing is fully enabled for domain controllers, and then click OK (to change the configuration and trigger a security event).
- From the Administrative Tools program group, start the Event Viewer.
- In the console tree, select Security Log, and verify that security events have been logged. Display the topmost event with a Category of Directory Service Access. If you do not see any Directory Service Access events, expand several containers within the Exchange System Manager, and then refresh the Event Viewer.
- Examine the event details, which specify that the Administrator has successfully accessed the configuration object of the server BLUESKY-SRV1.
- Switch back to the Domain Controller Security Policy, and deactivate all auditing categories again to avoid degrading system performance due to unnecessary event logging.
Exercise Summary
Before any events are logged, you must activate auditing in a group policy. After that, you can enable auditing for Exchange 2000 configuration objects, such as public folder trees, address lists, mailbox stores, and so on, in Exchange System Manager. All security-related events are written to the security event log, where you can view them using the Event Viewer.
Secured Internet Connections
If you are planning to connect your Exchange 2000 organization directly to the Internet, you will have to consider implementing hardware and software that protects your network and blocks unauthorized users while allowing authorized users access. In other words, you need to implement a firewall.
NOTE
Security breaches often exploit vulnerabilities exposed through software bugs. Microsoft continuously searches for security weaknesses and releases corresponding hot fixes that are incorporated into new Service Packs. You should generally install the newest Service Packs when they become available.
Firewalls, Connectors, and Encryption of Communication Channels
Figure 19.3 shows a minimal firewall architecture that you should consider if your Internet service provider does not provide any security for your network access point. The firewall server is equipped with three network cards, general IP forwarding is disabled, and network communication from either side of the firewall host is only allowed to systems in the demilitarized zone (DMZ), which is also called a perimeter network.
Typically, you do not maintain internal data, such as user mailboxes, on systems in the DMZ. Those servers need to be configured as front end servers relaying client access to back end systems where the actual user mailboxes reside. All incoming connections must pass through the first firewall, which only allows access to specific ports, such as TCP port 80 for HTTP or TCP port 110 for POP3. Any ports that are not required should be blocked. In addition, it is a good idea to enable Secure Sockets Layer (SSL)-based encryption for client connections. For instance, you should require SSL encryption for Outlook Web Access (OWA) to the front end server(s). Open TCP port 443 on the firewall and possibly block TCP port 80. You can read more about the configuration of authentication and SSL in Chapter 11, "Internet-Based Client Access."
Public SMTP connections cannot be encrypted because SMTP hosts of foreign domains will need to communicate with your SMTP relay host in the DMZ in clear text. On the other side, between the DMZ relay server and the servers in the internal network, you may configure an SMTP Connector and require authentication between the servers. This will make it very difficult for intruders to break through to internal servers. Another option is to use X.400 Connectors instead of SMTP Connectors. In this case, you have to open TCP port 102 to support X.400 over TCP on the second firewall.
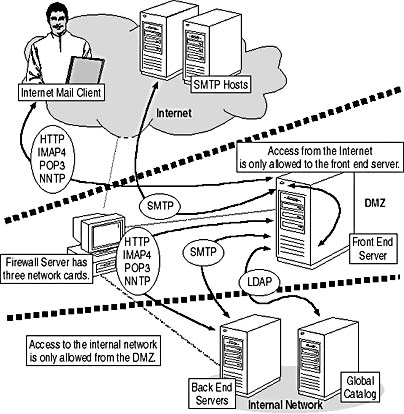
Figure 19.3 Firewall support for Exchange 2000 Server
Front End Versus Back End Communication
When a client connects to the front end server to access a mailbox server in the internal network, the front end server has to determine the corresponding back end mailbox server. For this purpose, communication with Active Directory is required. To allow access to the Global Catalog, you need to open TCP port 3268 on the second firewall. Be careful to only allow traffic originating from the front end server; packets from the public Internet with this TCP port number should not be allowed through. The front end server identifies the appropriate back end server through LDAP and accesses the mailbox on behalf of the user.
The protocol between the front end and back end systems corresponds to the protocol used on the connection between the client and the front end server. In other words, if you want to support OWA, you need to open TCP port 80 between the DMZ and the internal network. For IMAP4 communication, TCP port 143 must be opened, and so forth. You need not enable SSL encryption between the front end and back end systems to avoid the encryption overhead on the back end servers. You should only allow systems in the DMZ to communicate with internal systems over the second firewall.
NOTE
You may find it useful to configure multiple virtual protocol servers on computers in the DMZ. This allows you to optimize configuration settings in regards to public Internet and internal private connections.
MAPI-Based Clients Through Firewalls
You should carefully evaluate whether to allow MAPI-based clients, such as Outlook 2000, access to Exchange 2000 Server over the Internet. Explicit front end/back end configurations are not supported over MAPI. Hence, direct connectivity to the mailbox server and the Global Catalog is required, exposing a very sensitive data repository. To at least avoid opening access to yet another server, it may be a good idea to configure the Exchange 2000 server that is exposed to the Internet as a Global Catalog server. Furthermore, MAPI relies on remote procedure calls (RPCs) and dynamic TCP port assignments. Consequently, you will have to open TCP port 135 across your firewall system (for the RPC endpoint mapper) and configure static TCP ports for the Active Directory RPC interface and the Information Store service. These ports must be allowed through the firewall system, so you have to break a big hole in your firewall to support MAPI-based clients.
To configure static TCP ports for Information Store and Active Directory, use the Registry Editor to add a DWORD value called TCP/IP Port to the following locations and define desired port numbers in decimal format (for instance, 3501 and 3502):
HKEY_LOCAL_MACHINE \System \CurrentControlSet \Services \MSExchangeIS \ParametersSystem and \NTDS \Parameters
You do not need to reconfigure client computers because MAPI-based clients connect to the RPC endpoint mapper (TCP port 135) to query for the ports they should use. However, you must restart the server for the changes to take effect. You can read more about the communication of MAPI-based clients with Exchange 2000 Server in Chapter 3, "Microsoft Exchange 2000 Server Architecture."
NOTE
Enabling RPC-based communication through firewalls provides an additional avenue for denial-of-service attacks. If you need to support MAPI-based clients from remote locations over the Internet, consider the implementation of virtual private networks (VPNs), which can provide a sufficient level of security without TCP port restrictions.
Private/Public Key Security
Although you have the option to use SSL/Transport Layer Security (TLS), IP Security (IPSec), or VPNs to encrypt the communication between your systems, the messages are still kept in unencrypted form, which makes it possible to intercept them on an unprotected server, redirect them to an unauthorized recipient, or alter them. You need to consider extra encryption technologies if you plan to send sensitive data in e-mail messages over unsecured messaging hosts.
NOTE
Encrypting e-mail messages prevents virus scanners from checking attachments.
Message Signing and Sealing
Security features based on private/public key pairs give you the ability to sign messages digitally, which allows recipients to countercheck if an originator was truly the sender and that the message content has not been changed on its way into recipients' mailboxes. You also can encrypt the message content entirely, known as message sealing, in which case only the intended recipients will be able to decrypt and read the message. If an encrypted message was intercepted and redirected to an unauthorized person, the content is presented in unreadable form.
A sealed message does not necessarily carry a digital signature, and a signed message is not automatically sealed. However, Outlook 2000 encodes messages before signing them to make sure the message contents cannot be tampered with unnoticed. This is known as opaque signing. Clients that do not support Secure/Multipurpose Internet Mail Extensions (S/MIME) will display opaque signed messages with an empty body and an attachment named SMIME.P7M. In this case, you should send signed messages in clear text, which any Multipurpose Internet Mail Extensions (MIME) client can read. In Outlook 2000, open the Tools menu, select Options, click on the Security tab, and select the Send Clear Text Signed Message check box.
NOTE
E-mail systems may change the content of messages, for instance, when sending them through gateways across foreign systems. Correspondingly, the receiving e-mail client will indicate that a message was tampered with, although not maliciously altered.
Public Key Technology
The X.509 standard describes the handling of private/public key pairs within computer systems. Exchange 2000 Server's advanced security, as a dual key-pair system, relies on two public/private key pairs. Dual key-pair systems provide a higher level of security than single key-pair systems because each key pair has its dedicated purpose and keys are not interchangeable. One key pair is used for verifying and signing and the other for sealing and unsealing messages.
Private keys are available only to the users to whom they belong, and it is very important that these keys are not disclosed. They may be stored in protected format in the Registry database on your hard disk, in which case you can use the keys only with that specific computer (unless you configure server-based user profiles). Depending on the configuration of your computer, it may also be possible to have private keys on smart cards. Outlook 2000 uses a private signing key for signing messages; the private sealing key is used for unsealing (decrypting) encrypted messages you have received.
Because two different private keys exist, there must also be two corresponding public keys, which are available to the entire organization. Generally, all users except the actual key owner use them. A recipient can use the sender's public signing key to verify the digital signature of a received message. You will use the public sealing keys of all recipients during the process of message sending to seal (encrypt) a message for each of them (see Figure 19.4). The process of signing and sealing messages is described in detail later in this chapter.
A secret key, also known as a bulk encryption key, is a security string (password) that is used for both encryption and decryption of information. Outlook 2000, for instance, uses a secret key to encrypt and decrypt your private keys. The secret key cryptography algorithm is also used in conjunction with public sealing keys to encrypt messages. This provides several advantages, as outlined in Lesson 2.
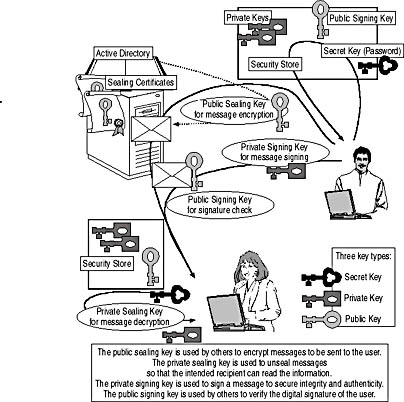
Figure 19.4 Different encryption key types
X.509 Certificate Services
Encryption keys are kept in X.509 certificates, which contain information about the supported encryption methods and ensure the legality of the keys. For instance, mailbox-enabled user accounts enrolled with advanced security hold an X.509 certificate that contains their public sealing key. Every user in the organization can retrieve these public keys from Active Directory. The X.509 certificates bind the public keys to their corresponding users and ensure that nobody has tampered with a sealing key.
To conform to X.509, advanced security certificates must contain the following:
- Unique serial number generated by the certification authority (CA) to identify each user's certificate
- Expiration date for the certificate
- CA's distinguished name
- CA's signature
- Public encryption keys
- User's distinguished name
- Version 3 Extensions, such as key identifiers, certificate policies, alternate names, and so on (only for X.509 version 3)
Certification Authorities
A certification authority (CA) issues certificates to users and computer systems. In Exchange 2000 Server environments, the CA is formed by Windows 2000 Server Certificate Services. Certificate Services deals with X.509 version 3 certificates and allows you to establish a sophisticated public-key infrastructure (PKI). In other words, Certificate Services can operate as a root CA or a subordinate of another CA. You have the option to deploy one or more Enterprise CAs for certificate issuance and revocation. Certificate Services is integrated with Active Directory. All servers running Certificate Services are trusted throughout the forest because they are referenced in a default certificate trust list (CTL) maintained in a group policy object. You can read more about Certificate Services in the Windows 2000 product documentation.
NOTE
To gain access to the features of X.509 version 3, the Key Management Service (KMS) of Exchange 2000 Server integrates with Certificate Services. Exchange 2000 Server can also issue X.509 version 1 certificates for backward compatibility with Microsoft Outlook 97 and earlier clients.
Exchange Certificate Templates
By default, Certificate Services can issue certificates for SSL-compatible client or server authentication, as well as S/MIME. The latter certificate is also known as a user certificate for secure e-mail communication. It is possible to use those S/MIME certificates with Outlook 2000 and Internet mail clients for message signing and sealing without the need for Key Management Services (KMS). However, these certificates are not integrated with Exchange 2000 Server, which forces each user to maintain certificates individually.
To establish an Exchange 2000 PKI based on the KMS, you need to configure Certificate Services as an Enterprise CA and install additional templates, such as Exchange User and Exchange Signature Only. Templates specify the format and content of certificates. As their names imply, Exchange Signature Only certificates will be issued for message signing, whereas Exchange User allows both message signing and sealing. As mentioned earlier, every Exchange 2000 user enabled with advanced security will work with two private/public key pairs. In addition, you need to install a third certificate template called Enrollment Agent (Computer), which enables KMS to request certificates on behalf of the users.
NOTE
Exchange certificates can be used in Outlook 2000 as well as in Internet mail clients, such as Outlook Express. You should not request additional S/MIME certificates, for instance through the Web interface of Certificate Services. If you are using different certificates and keys in different e-mail clients while working with the same mailbox, you may experience problems with mismatching security keys.
Exercise 2: Installing Windows 2000 Certificate Services
In this exercise you will install Windows 2000 Certificate Services. You will configure an Enterprise CA and add certificate templates required for Exchange 2000 Server's KMS.
To view a multimedia demonstration that displays how to perform this procedure, run the EX2CH19.AVI files from the \Exercise_Information\Chapter19 folder on the Supplemental Course Materials CD.
Prerequisites
- Restart BLUESKY-SRV1, and log on as Administrator.
- Insert the Windows 2000 Server installation CD into the CD-ROM drive.
- The Windows 2000 Service Pack 1 CD is likewise required.
To install Windows 2000 Certificate Services
- Click Start, point to Settings, and click Control Panel.
- In the Control Panel, launch Add/Remove Programs, and, in the Add/Remove Programs window, click Add/Remove Windows Components.
- On the Windows Components wizard screen, select the Certificate Services check box. In the dialog box that appears immediately, informing you that this computer cannot be removed from or join another domain when Certificate Services are installed, click Yes, and then click Next.
- On the Certification Authority Type wizard screen, make sure Enterprise Root CA is selected, and then click Next.
- On the CA Identifying Information wizard screen, enter the following settings (see Figure 19.5):
CA Name Blue Sky Airlines Root CA Organization Blue Sky Airlines Organizational Unit Information Technology City Seattle State Or Province WA Country/Region US E-Mail Administrator@BlueSky-inc-10.com CA Description The global CA for Blue Sky Airlines. Valid For 2 Years 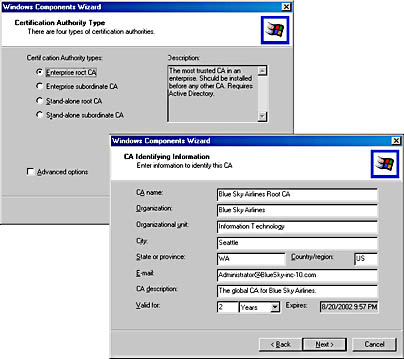
Figure 19.5 Installing an Enterprise root CA
- Click Next.
- On the Data Storage Location wizard screen, accept the suggested database and database log paths, and click Next.
- If a Microsoft Certificate Services dialog box appears informing you that you must stop the Internet Information Services, click OK to stop the services. After that, the Windows Components Wizard will begin the installation.
- An Insert Disk dialog box will appear prompting you to insert the Windows 2000 Service Pack 1 CD. Insert this CD into the CD-ROM drive, and then click OK. If a Files Needed dialog box appears, make sure the path information under Copy Files From is correct, and then click OK again.
- An Insert Disk dialog box will appear prompting you for the Windows 2000 Service CD. Insert this CD into the CD-ROM drive, and then click OK.
- On the final Windows Components Wizard screen, click Finish.
- In the Add/Remove Programs window, click Close, and then close the Control Panel as well.
- From the Administrative Tools program group, launch the Certification Authority snap-in, expand the Blue Sky Airlines Root CA container, right-click Policy Settings, point to New, and then select Certificate To Issue.
- In the Select Certificate Template dialog box, select Enrollment Agent (Computer), scroll down to the end of the list, hold down the Ctrl key, and select Exchange User and Exchange Signature Only in addition. Then click OK.
- In the Certification Authority window, select Policy Settings, and make sure the three templates have been added to the server (see Figure 19.6). Close the Certification Authority snap-in.
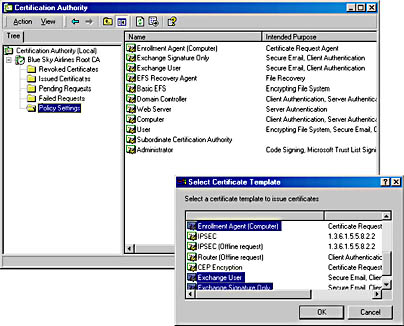
Figure 19.6 Adding Exchange-specific certificate templates
Exercise Summary
Certificate Services can be installed as part of the standard components that come with Windows 2000 Server. During the installation, you need to configure the CA type as well as identification information. A CA for Exchange 2000 Server must be integrated with Active Directory, so it should be an Enterprise Root CA or an Enterprise Subordinate CA, depending on your PKI. Once you have installed Certificate Services, you need to add three Exchange-specific certificate templates to the server to support KMS.
EAN: N/A
Pages: 186
- Article 215 Feeders
- Article 332 Mineral-Insulated, Metal-Sheathed Cable Type MI
- Article 353 High Density Polyethylene Conduit Type HDPE Conduit
- Annex C. Conduit and Tubing Fill Tables for Conductors and Fixture Wires of the Same Size
- Example No. D2(c) Optional Calculation for One-Family Dwelling with Heat Pump(Single-Phase, 240/120-Volt Service) (See 220.82)