| In previous versions of Flash, the only way to set columns of vertical characters was to create a text box that was one character wide. To make vertical text read across several columns, you needed a separate box for each column. Flash MX lets you change the direction in which text flows in static text boxes to create vertical text that flows automatical y from column to column. You determine whether the columns read left to right (as they do in English) or vice versa (as required for, say, Japanese text). You set the text-flow direction in the Property Inspector. To access the Property Inspector: To create vertical columns of text: -
With the text tool selected and the Property Inspector open, in the Property Inspector, click the Change Direction of Text button (Figure 2.58). Figure 2.58. When you have selected the text tool or a text box, the Property Inspector displays a text-direction button. Clicking it opens a menu of options for setting the direction in which your text flows. 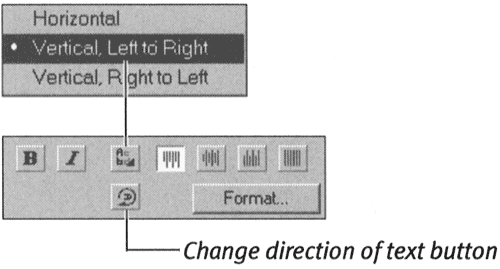 A pop-up menu of text directions appears. -
To create a vertical text box, do one of the following: -
To make text columns read from the left side of the box to the right, choose Vertical, Left to Right. -
To make text columns read from the right side of the box to the left, choose Vertical, Right to Left. -
Click the Stage at the spot where you want your text to start. Flash creates a vertical text box with a round resize handle. Notice that the blinking insertion pointer is lying on its side (Figure 2.59). Figure 2.59. With text direction set to vertical, clicking the Stage with the text tool gives you an insertion point lying on its side (top). As you type, you enter a column of single characters (middle). The text box grows in length to accommodate all the text you enter (bottom). 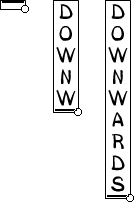 -
Click and drag the resize handle. -
When your text box is the desired height, release the mouse button. The resize handle changes to the square word-wrap handle. -
Enter your text. Flash places one character below another till the text reaches the bottom edge of the box. Then text jumps to the next column and continues flowing vertically (Figure 2.60). You can force text to flow to the next column by adding a paragraph return. Figure 2.60. When text direction is set to Vertical, Left to Right, a fixed-height text box creates columns of downward-reading characters that flow from column to column automatically. 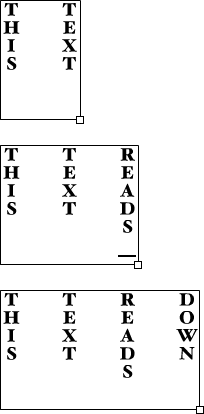 -
When you finish typing, click elsewhere on the Stage or change tools.  Tips Tips -
If you want to create a single column of vertical text, you can start typing as soon as you click the Stage to create the text box. As in the first task in the preceding exercise, the text box continues to grow in length as long as you type. -
In some Asian languages whose text is set in vertical columns, it is common to set words borrowed from foreign languages that are set in Latin characters so that they can be read as a unit instead of character by character. You can make any selected text characters read horizontally down as a unit by clicking the Rotation buttonin the Property Inspector (Figure 2.61). Figure 2.61. Select characters within a vertical text column (left); then click the Rotation button in the Property Inspector (middle) to rotate the characters and create a word that reads horizontally down (right). 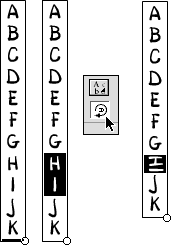 -
When the text tool is set to create vertical text, you'l see the horizontal I-beam cursor as soon as you click the Stage. But how can you tell which direction the text will flow without opening the text-direction menu in the Property Inspector? If the resize handle appears on the bottom-right corner, the columns flow left to right. If the resize handle is on the bottom-left corner, the columns flow right to left.
If most of your text work demands vertical text columns, you can make that setting your default. To make vertical text the default: -
From the Edit menu (Mac OS 9 and Windows) or from the Flash menu (Mac OS X), choose Preferences. The Preferences dialog box appears (Figure 2.62). Figure 2.62. The Editing tab of the Preferences dialog box contains options for making vertical text boxes the default style. 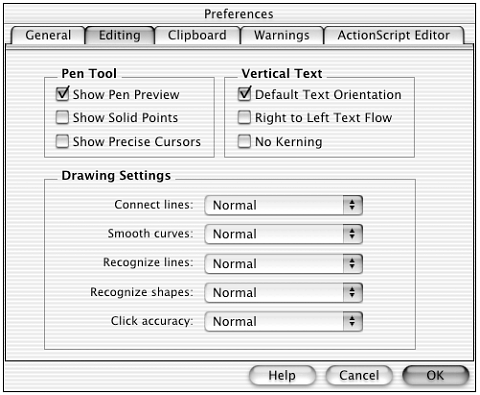 -
Click the Editing tab. -
In the Vertical Text section, select the Default Text Orientation checkbox. -
Click OK. The text tool is now set to create vertical text boxes and columns that flow left to right by default. You can always choose a new text flow and orientation from the Change Direction of Text pop-up menu in the Property Inspector.  Tip Tip
 |


