Adding Actions to Buttons All Flash buttons have certain actions built in. By default, when you move the mouse into the button area, Flash jumps to the Over frame; when you click the button, Flash takes you to the Down frame. To create more interactivity or to refine the way a button responds to a user 's mouse movements, you attach ActionScripts to an instance of a button. The process is similar to adding frame actions (see Chapter 12). Throughout the rest of this chapter, you'll be working with actions that make Flash move from frame to frame; therefore, it will be useful to create a multiframe document that has identifying text in each frame. To set up a document for testing actions: -
Open a new Flash document, and create two layers (Contents and Actions). -
In the Contents layer, create keyframes in frames 1 through 5. -
Add text that identifies each keyframe (Scene 1Frame 1, Scene 1Frame 2, and so on). -
In the Actions layer, add a stop action to Keyframe 1 so that the movie doesn't loop through the frames on playback. (For more-detailed instructions on adding actions to frames, see Chapter 12.) -
In the Timeline, select Keyframe 1 in the Contents layer. -
Create a button symbol, or copy one from an existing movie. -
Place an instance of the button symbol on the Stage. -
Save the document as a template for use throughout this chapter, and name it ObjectActions Template. The Mystery of ActionScript Terminology Entering the world of ActionScripting is like visiting a foreign country where you encounter a whole new language. You can't expect to gain native fluency immediately, but you can get around and have a good time if you learn a few key words and phrases Hello. Where is the train station? How much does this cost? Please. Thank you. Good bye. Teaching the full power and beauty of the ActionScript language is a task beyond the scope of this book. Still, the following definitions introduce some important ActionScript terms and concepts. Think of it as your travel-guide phrase-book. Look for other Terminology sidebars throughout the rest of the book for introductions to important ActionScript concepts. ActionScript is an object-oriented scripting language. The name of the object-oriented game is organization. You want to assemble and organize pieces of code for efficiency. When you write documents in a word processor, you use containers and tools to help make your writing fast and efficient. You can create files and folders, templates and boilerplate text, macros and mail merges, to name a few such tools. In writing scripts, you also use a variety of containers and tools for storing and reusing pieces of code. By nesting containers within containers and stringing them together, you wind up with a whole set of building blocks for creating interactivity in Flash movies. The largest ActionScript container is a class a group of items that are similar in some way. The items themselves are referred to as objects or instances of the class. Objects can be concrete graphical elements ( buttons and movie clips ) or abstract containers that merely hold data and never appear on the Stage ( variables ). Objects have two aspects: form and function. In scripting, the two aspects are called properties and methods . (You could also think of these two aspects as characteristics and behaviors .) Consider a concrete example. Imagine Ball, a class of items defined as spherical things. One particular object in this class is a movie clip called tennisBall. The properties of ten isBal (its form or characteristics) might be the color neon green, a rough surface, and a 3-inch diameter; its methods (functions or behaviors) might be bounce, roll, and spin. A second object in this class, softBall, might have such properties as the color white; a smooth surface; a 16-inch diameter; and such methods as fly, roll, and spin. Each property and method is defined by actions (also called statements by programmers). Actions are pieces of code that tell Flash how to manipulate a target object at any point in your movie. |  Tip Tip -
You may find it helpful to compare the script you just created with a script that you will create in the next section. To do so, save the changes you made to this file and then save a second copy of this file with a slightly different name. Name the files GoToButton and GoToButton Compare, for example.
To add an action to a button instance: -
Open a new copy of the ObjectActions Template that you created in the preceding exercise (choose File > New from Template). -
On the Stage, select the button. -
Access the Actions panel. The title bar indicates what type of object you have selected and, therefore, what type of object the script you are creating will attach to. This panel's title bar reads Actions-Button. -
From the Add menu, choose an action (Actions > Movie Control > goto , for example). When you have the Actions panel set to Normal mode, Flash adds an event handler (see the sidebar, "Terminology: Event Handler" on the next page) and appropriate statements for the action to the Script pane (Figure 13.18). Figure 13.18. In Normal mode, when you select an action for a button (top), Flash embeds that action in an event handler in the Script pane (bottom). The default handler for buttons makes your action take place when the user clicks and releases the mouse button within the active area of your button. 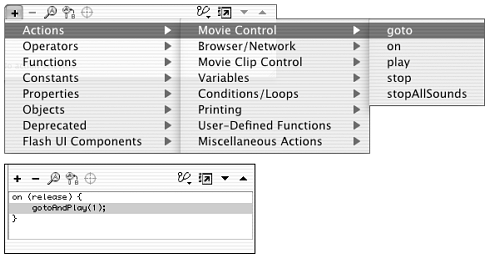 -
In the parameters area of the ActionsButton panel, define any parameters necessary for the action that you chose. For the goto action, for example, do the following: -
Select the radio button named Go to and Stop. -
In the Scene field, enter <current scene> , or choose it from the pop-up menu. -
From the Type pop-up menu, choose Frame Number. -
In the Frame field, enter 2 (Figure 13.19). Figure 13.19. In the parameters area of the ActionsButton panel, set any parameters required for your actions. For goto , for example, define the destination frame by entering your choices for the Scene, Type, and Frame parameters. To pause playback at your destination frame, choose Go to and Stop. 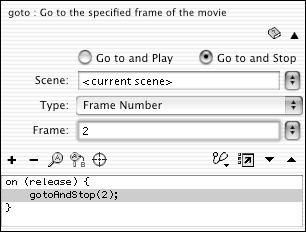 -
From the Control menu, choose Enable Simple Buttons, and test the action of your button. When you click the button, Flash moves the playhead to Frame 2 in the Timeline and stops playback of the movie. Terminology: Event Handler The Movie Control subset of the Actions category contains an action that is available only for buttons and movie clips, not frames. That action on is called an event handler because it responds to things that happen (events) and uses that incoming information to decide (handle) when and how to run a chunk of ActionScript. An event handler must be present at the beginning of all ActionScripts attached to buttons and movie clips. In Normal mode, whenever you choose an action from the Actions Toolbox, Flash checks to make sure that there is a handler in the Script pane. If there is no handler, Flash embeds your action in the default handler. The default handler for buttons differs slightly from the one for movie clips (Figure 13.20). Figure 13.20. The default event handler for buttons, on (release) , tells Flash to run the ActionScript after the user has clicked inside a button and released the mouse button. The rest of the ActionScriptthe part that tells the button what to dogoes between the opening and closing curly- brace symbols in the Script pane. The default event handler for movie clips, onClipEvent (load) , tells Flash to run the ActionScript after the movie clip has been created and appears in the Timeline. 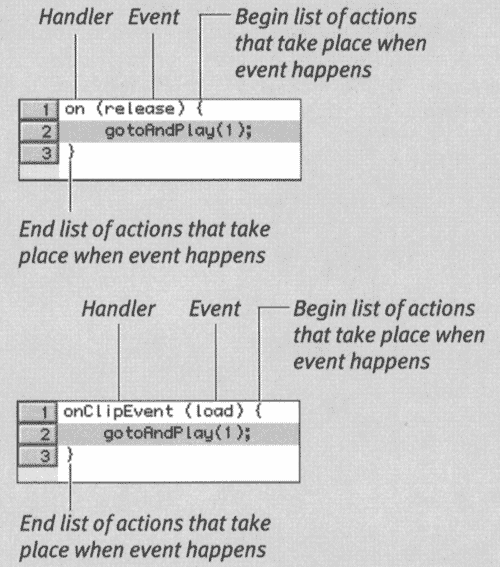 If you have a button selected on the Stage, and you choose an action from the Add menu, the default handler that Flash adds to the Script pane is on . If you have a movie clip selected on the Stage, the default handler is onClipEvent . on and onClipEvent indicate the start of the handler. You can also use the on handler with movie clips to make them act like buttons. What follows the handler in parentheses (release) or (load) , for exampleindicates the condition under which the handler tells the script to run (in these examples, when the mouse button is released or when the movie appears). The statement inside the parentheses is called an event . In Normal mode, you choose (from the parameters area of the Actions panel) new events for a handler that you've selected in the Script pane. The other items that get added to your script when you set up event handlers are curly braces. { indicates the beginning of the list of actions that are to be triggered by the specified event. } indicates the end of the list of the actions that are to be triggered by the specified event. All actions between the two braces take place when the triggering event occurs. | To add multiple actions to a button instance: -
Continuing with the file that you created in the preceding exercise, in Keyframe 1, select the button. -
Access the Actions-Button panel. The Script pane contains the event handler in Line 1 and the gotoAndStop (2) action. -
To add more actions to the script, do one of the following: -
To add an action before the gotoAndStop (2) action, select on (release) in Line 1 in the Script pane and then choose another action from the Add menu (or double-click an action in the Actions Toolbox). Flash adds the new action to the Script pane and displays the action's parameters. -
To add an action after the gotoAndStop (2) action, select gotoAndStop (2) in Line 2 in the Script pane and then choose another action from the Add menu (or double-click an action in the Actions Toolbox). Flash adds the new action to Line 3 in the Script pane (Figure 13.21) and displays the action's parameters. Figure 13.21. You can add multiple actions within one set of curly braces. Flash adds new actions directly below the selected line in the Script pane. In the bottom script, releasing the mouse button stops all sounds, sends the movie to Frame 2, and opens a new browser window. One mouse event triggers all the actions.  Tip
 |